How to Replace an Empty Ink Cartridge in the HP Deskjet 2655 All-in-One series Printer – an Illustrated Tutorial in 11 Steps

Make sure you purchase the right ink cartridges for your specific printer and printer region or have your old ones refilled. Cartridges are not compatible between different brands, and often not within the same brand. HP often designs its inkjet hardware to use country-specific consumables. When you unbox a new HP inkjet printer and set it up, you install a set of ink tanks that ship with the printer. As you turn on the device and get ready to use it, an initialization sequence localizes it to the country associated with the ink cartridges you installed. HP recommends that you use original HP ink cartridges.

XL (Extra Large) cartridges cost more but do provide better value in the long run. They will be able to print almost 3 times as many pages as a regular cartridge. Our advice is that if you print often, go with XL. However, ink can dry up. So if you are not a frequent printer, go with the regular cartridges.

Ink level warnings and indicators provide estimates for planning purposes only. When you receive a low-ink warning message, consider having a replacement cartridge available to avoid possible printing delays. You do not have to replace the cartridges until the print quality is unacceptable. Use the single-cartridge mode to operate the HP All-in-One with only one print cartridge. The single-cartridge mode is initiated when a print cartridge is removed from the print cartridge carriage.

Which ink cartridges do I need for my HP Deskjet 2655 All-in-One Printer?

For your US HP DeskJet 2655 All-in-One Printer you need HP 65 Black AND HP 65 Tri-color cartridges OR the XL versions: HP 65XL Black AND HP 65XL Tri-color cartridges.
There are also multipacks available like the HP 65 Black and Tri-color Original Ink Cartridges, 2 pack. Check the price of HP 65 cartridges at Amazon.com .

For your European or UK HP DeskJet 2655 All-in-One Printer you need HP 304 Black AND HP 304 Tri-color cartridges OR the XL versions: HP 304XL Black AND HP 304XL Tri-color cartridges.
There are also multipacks available like the HP 3JB05AE 304 Original Ink Cartridges, Black and Tri-Colour, Pack of 2.

Try Amazon's ink selector tool to find compatible ink cartridges for your printer.

Replace the ink cartridges

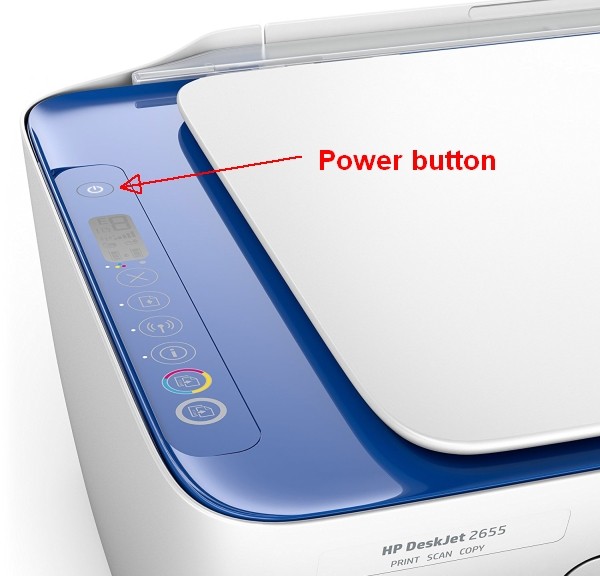
1. Press the Power button to turn on the printer, if it is not already turned on.
2. Load unused plain white Letter or A4-sized paper into the input tray.

Remove cartridge
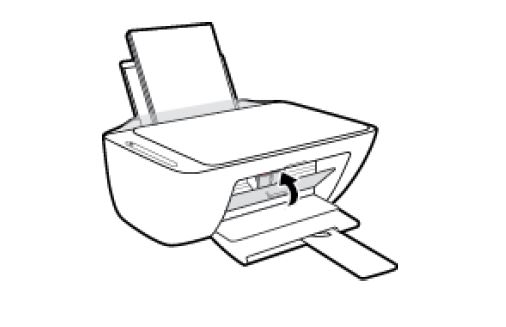
3. Lower the output tray, reach inside the printer, grasp the handle, and then lower the ink cartridge access door. The carriage moves to the center of the printer. Wait until the printer is idle and silent before continuing.
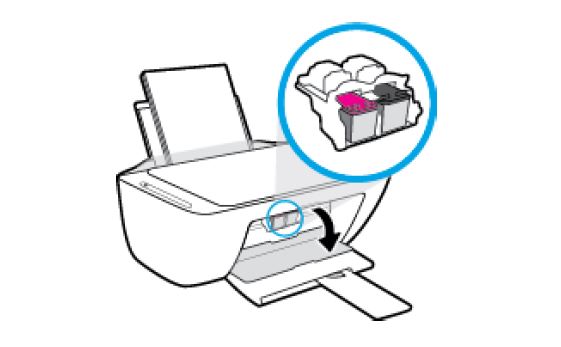
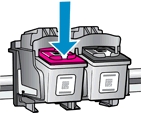
4. Lightly press down on the cartridge to release it, and then pull the cartridge out of its slot.
Insert the new cartridge
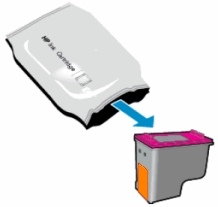
5. Remove the new cartridge from its packaging. Be careful to only touch the black plastic on the ink cartridge by holding the ink cartridge by its sides.

6. Pull the coloured tab to remove the plastic tape.


Do NOT:
– Remove the copper electrical strip.
– Touch the copper-colored contacts or the ink nozzles.
– Replace the protective tape on the contacts.

do not touch contacts

7. Hold the cartridge by its sides with the nozzles toward the printer, and then insert the cartridge into its slot at a slight upward angle. Make sure that the icon on the cartridge matches the icon on the slot. The tri-color cartridge goes in the slot on the left, and the black cartridge goes in the slot on the right.
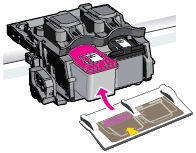
8. Push the cartridge forward until it snaps into place.
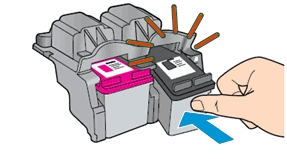
9. Repeat step 4 to 8 to replace the other cartridge, if necessary.
10. Close the cartridge access door.
Align the cartridges

11. To achieve the best print quality, it is necessary to align the ink cartridges. After installing new ink cartridges, the printer automatically prints an alignment page.

– Lift the scanner lid.
– Place the alignment page with the print side down on the scanner glass, and then position it according to the engraved guides around the glass.
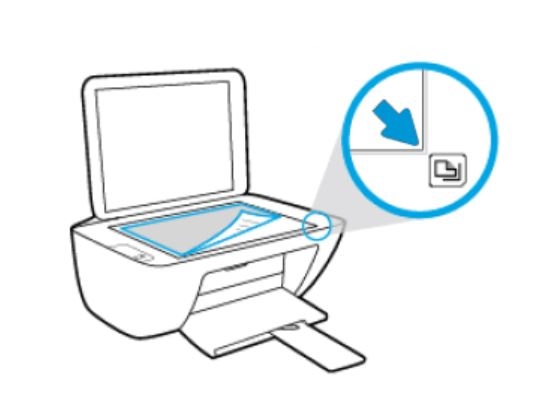
– Close the scanner lid.
– Press the Start Copy Black button or the Start Copy Color button on – the printer control panel. The printer aligns the ink cartridges.

The alignment page did not print?
If the alignment page did not print automatically, you can align the cartridges manually from the printer software.

– Open or search for the HP folder in your list of installed software programs, click the folder for your printer, and then click the name of your printer. HP Printer Assistant opens.
– Click Print & Scan, and then click Maintain Your Printer.
– Click the Device Services tab, and then click Align Ink Cartridges. The printer prints an alignment sheet.
– Now go back to step 11.
– Recycle or discard the cartridge alignment sheet.

How to Insert a SIM Card into an Alcatel OneTouch 10.16D Dual Sim Cell Phone – Tutorial

Which SIM Card do I need for my Alcatel OneTouch 10.16D Dual Cell Phone?

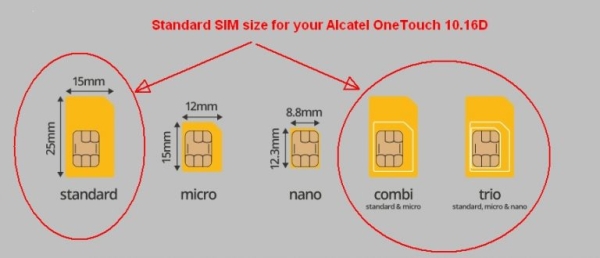
Make sure you use the correct size SIM card. Depending on the model of phone, there are three sizes of SIM card that can potentially be used in a phone: Standard SIM, Micro SIM and Nano SIM. The three SIM card types work in exactly the same way from a technical perspective. They just differ in the amount of plastic housing that surrounds the metallic chip. The Combi SIM is a Micro SIM card within a Standard SIM-sized unit, so if you need the smaller size of card you simply break the additional plastic away from around the Micro SIM card. This type of card allows networks to cater for more phone users with a single card. A Trio SIM is a Standard, a Micro and a Nano in one. Most of the pay-as-you-go SIM cards you buy from convenience stores operate under this format as they’re more useful to more users.

The Alcatel OneTouch 10.16D only accepts 2 big standard SIM size cards. You can also use a combi SIM or trio SIM and NOT break away the plastic from around the SIM card. Only remove the Standard SIM from the plastic card.

Sometimes getting a replacement SIM from your mobile network provider could be a hassle. If you already have a smaller SIM or if you find yourself switching phones around a lot, you may need to adapt — with a SIM adapter — any time you need to go bigger. They are used to transform your SIM card into a bigger size which is compatible with your phone. These adapters are quite cheap to purchase, however, getting a good quality adapter would mean that it would be able to let you fit your SIM tightly. Using one of those thin flimsy plastic SIM adapters (they usually have a hole in the back) or use one that uses tape to hold the SIM in is NOT recommended. Don’t place an empty SIM adapter in your phone, you must use it with the SIM card already inserted. An empty adapter might damage your phone!

Popular SIM card adapters cards include, but are not limited to:

  • Gold Samdi Brand Nano Sim Adapter and Micro Sim Adapter and Nano to Micro Adapter with a Sim Card Folder and a Needle
  • Sadapter Three Adapter Pack – Retail Packaging – Black
  • Noosy Sim Card Adapter Kits with Nano Sim Adapter and Micro Sim Adapter

Insert a SIM Card

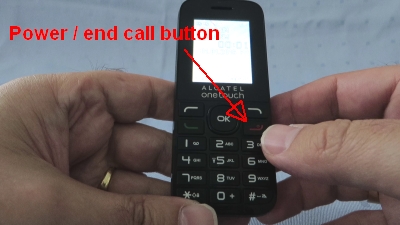
1. Turn off the power so that you won’t lose any stored information. If the device is on, press and hold the red power/end-call button for a couple of seconds, until the phone shuts down.

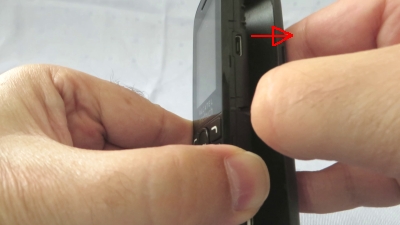
2. Remove the back cover. Hold the device in one hand and find the small notch that will help you to release the cover. It’s on the the bottom-right corner of the phone. Insert a fingernail into the notch. Lift upwards gently to pop the phone open. Working from the bottom-right corner upwards and then lifting the back cover seems to work well. Be careful not to damage your fingernails when you remove the back cover. Also, be certain not to bend or twist the back cover excessively. Doing so may damage the cover.

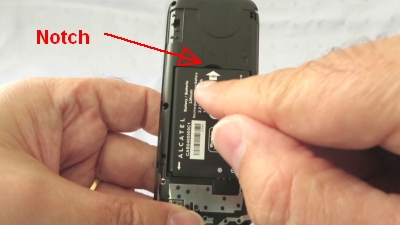
3. Remove the battery. Using your nail or finger, lift up the battery via the small notch at the top of the battery compartment and lift the battery out of the phone.

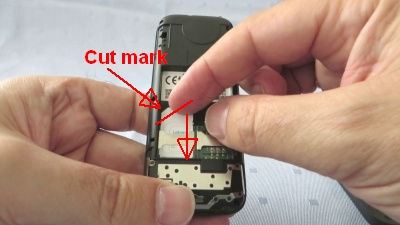
4. Place the first SIM 1 card with the gold contacts facing downwards and slide it into the left housing, marked with SIM 1 with the SIM card’s missing corner on the upper-left.
5. Place and optional second SIM 2 card with the gold contacts facing downwards and slight it into the right housing, marked with SIM 2, with the SIM card’s missing corner on the upper-left.

To remove a SIM card, press it downward a little and slight it out in an upward direction.

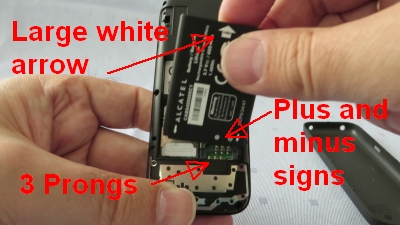
6. Reinstall the battery. Turn the battery if necessary. The Alcatel logo and the white arrows should be on top. Align the the plus and minus signs and three contacts with the three prongs on the bottom-right side of the battery slot. The large white arrow should be on top, as shown in the picture below. Slide the battery into the battery housing cavity and press down gently to secure it in place. It should fit easily and exactly.

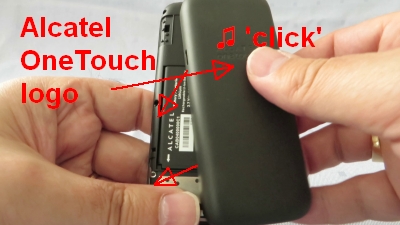
7. Replace the back cover. The Alcatel OneTouch logo on the back should be on top. Gently press the cover down and around the sides of the phone until it clicks into place.

8. Press and hold the Power button. Doing so will turn your phone back on and the device will automatically search for a network.

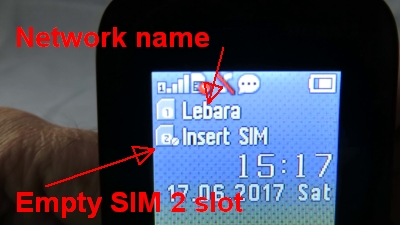
9. Check if your SIM card is recognized by the device. After ‘Searching netw…’, the name(s) of your network provider(s) should be visible at the top of the display.

How to Replace an Empty Ink Cartridge in the HP Photosmart 7150 series Printer – an Illustrated Tutorial in 11 Steps

Make sure you purchase the right ink cartridges for your specific printer and printer region or have your old ones refilled. Cartridges are not compatible between different brands, and often not within the same brand. HP often designs its inkjet hardware to use country-specific consumables. When you unbox a new HP inkjet printer and set it up, you install a set of ink tanks that ship with the printer. As you turn on the device and get ready to use it, an initialization sequence localizes it to the country associated with the ink cartridges you installed. HP recommends that you use original HP ink cartridges.

Ink level warnings and indicators provide estimates for planning purposes only. When you receive a low-ink warning message, consider having a replacement ink cartridge available to avoid possible printing delays. You do not have to replace the ink cartridges until the print quality is unacceptable.

Use the Reserve Mode (ink-backup mode) to operate the HP Photosmart 7150 Printer with only one ink cartridge. The ink-backup mode is initiated when an ink cartridge is removed from the print cartridge cradle. Printing in ink-backup mode slows the printer and affects the quality of printouts. We do not recommend using a photo print cartridge for ink-backup mode.

Which ink cartridges do I need for my HP Photosmart 7150 Printer?

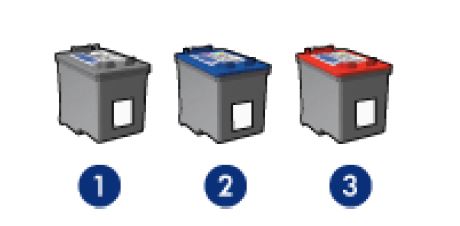
These print cartridges can be used with the printer:
l. black print cartridge
2. tri-color print cartridge
3. photo print cartridge

For your US, European and UK HP Photosmart 7150 Printer you need HP 56 Black OR HP 15 Black AND HP 57 Tri-color cartridges. There are also 2-Packs available, like the HP 56 / 57 Black and Tri-Color Original Value Pack Combo . You might also find Economy (Small) versions of the HP 56 and 57 cartridges. Check the price of HP 56 and HP 57 cartridges at Amazon.com .

Quality color photos: For more vibrant colors when printing color photographs or other special documents, remove the black print cartridge and install an HP 58 Photo Ink Cartridge.

Try Amazon's ink selector tool to find compatible ink cartridges for your printer.

Replace the ink cartridges

1. Press the power button to turn on the printer, if it is not already on.

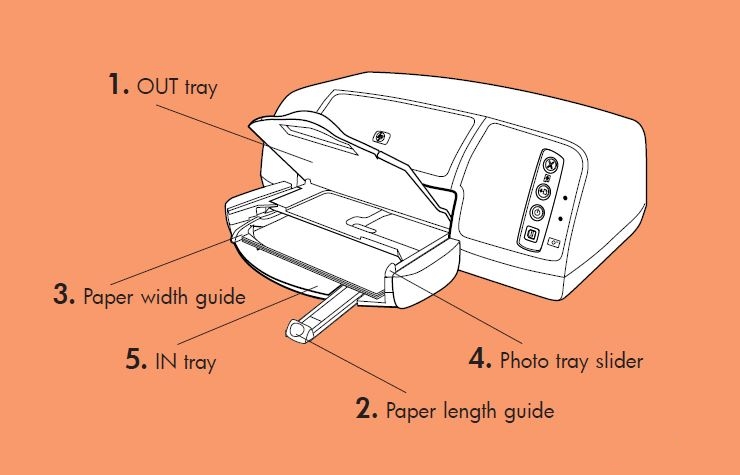
2. Load plain unused Letter or A4 white paper in the in the IN tray. To do this, you have to lift the OUT tray first.

Remove the old cartridge
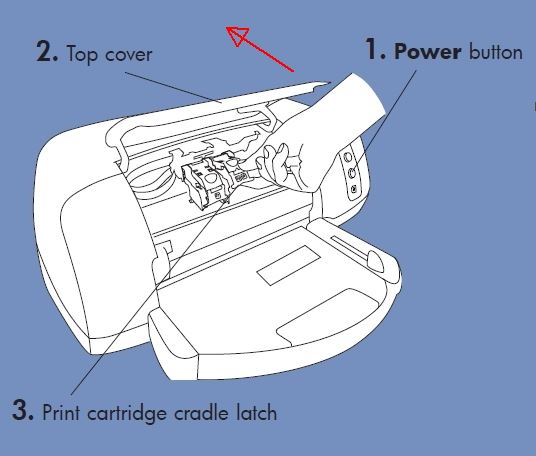
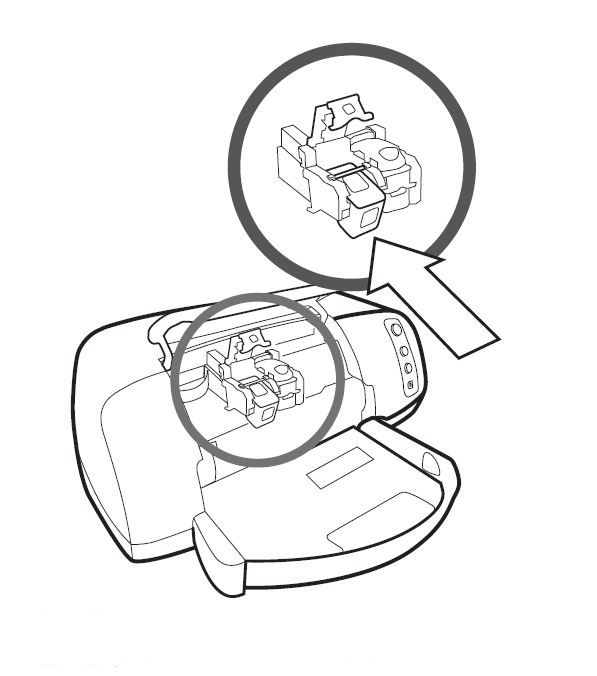
3. Open the printer top cover. The print cartridge cradle moves to the center of the printer. Wait until the print cartridge is idle and silent before you continue.

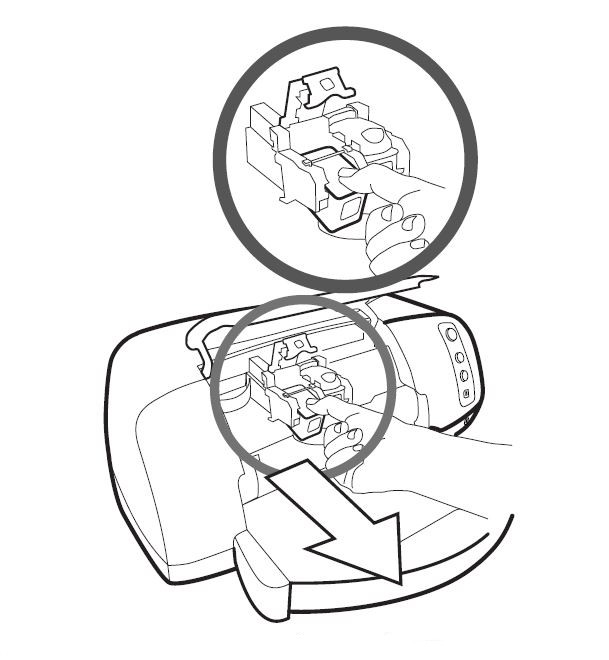
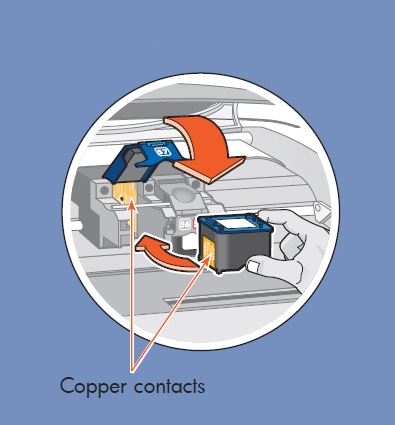
4. Lift the cradle latch of the print cartridge you want to install or replace by placing your finger under the number on the latch and pulling out. The print cartridge latch will pop open.

5. Slide out the old print cartridge and recycle or discard it. Remove the cartridge from the slot on the left to replace the tri-color cartridge. Remove the cartridge from the slot on the right to replace the black OR photo cartridge.

Insert the new cartridge
6. Remove the new cartridge from its package. Be careful to touch only the black plastic on the cartridge.

7. Carefully remove the plastic tape using the pink pull tab.


Do NOT:
– Remove the copper electrical strip.
– Touch the copper-colored contacts or the ink nozzles.
– Replace the protective tape on the contacts.
do not touch contacts

8. Hold the print cartridge so that the copper contacts will go into the printer first. Line up the ridges on the left and right sides of the top of the print cartridge with the grooves on the inside of the print cartridge cradle. Carefully slide the print cartridge into the cradle, then firmly push the cartridge in until it stops.

8. Lower the cradle latch. Place your finger on the top of the latch. Place your thumb under the number on the latch and hold it forward while pushing the latch down. Release the latch to lock the print cartridge into place.

9. Repeat step 4 to 7 to replace the other cartridge, if necessary.

10. Close the top cover.

Calibrate cartridges
11. Wait while the printer performs internal diagnostics. After two minutes, a calibration page prints automatically. This verifies that the print cartridges are installed correctly.

If colors are misaligned, or if the alignment page does not print correctly when you install a new print cartridge, use the following procedure to calibrate the printer manually.
– Go to the Device Services tab of the HP PhotoSmart Toolbox
– Click Calibrate the Printer.

How to Insert a SIM Card and Memory Card into a Motorola Moto G5 Plus Smartphone – Tutorial

Which Memory Card do I need for my Motorola Moto G5 Plus Smartphone?
Make sure you purchase the right Memory Card for your Smartphone. Your Motorola Moto G5 Plus built-in memory is usually 32 GB or 64GB, depending on the model. Users who demand more memory from their Phone can install an external microSDHC (High-Capacity) or microSDXC (eXtended-Capacity) memory card with a maximum capacity of 128 GB.

When you insert an SD card for the first time, you can choose to either use the card as Portable Storage or Internal Storage.

A. Portable Storage
Select this mode if you frequently swap your SD card between devices, use your SD card for media storage (such as pictures, movies, music) only. Only pictures and media can be stored on the card. Downloaded applications, their data, is always internal. They CAN NOT be moved to the card. The card is readable by other devices. Content on the card is not encrypted by default.

For the Portable Storage mode, you need at least a Class 2, 4, 6 or 10 card. A popular memory card for this mode is for example: Samsung EVO 32GB Class 10 Micro SDHC Card with Adapter (MB-MP32DA/AM) and SanDisk Ultra 16GB Ultra Micro SDHC UHS-I/Class 10 Card with Adapter .

B. Internal Storage
Select this mode if you want to completely extend your device storage with the card, and need the card to store large applications, games, and their data. The SD card can become your device primary storage. Downloaded applications, their data and media CAN be moved to the card. The card is not readable by other devices. The card is always encrypted, and can not be decrypted on any other device.

For the Internal Storage mode a high-speed card (UHS-1) is strongly recommended. Class 4 and Class 2 micro SD cards are NOT recommended for adopted internal storage usage. The performance of these cards is typically 10x slower than internal storage performance. High speed card are identified by these logos:


(#ad or paid links)

A popular memory card for this model is for example: SanDisk 64GB Ultra MicroSDHC UHS-I Memory Card with Adapter.

Many microSD Cards come with an SD Card adapter for compatibility with SD-enabled devices, such as cameras, camcorders and (notebook) computers. Memory cards usually come pre-formatted and do not need to be formatted out of the box. MicroSDHC/MicroSDXC host devices are required to accept older MicroSD cards.

If you insert a card formatted with an unsupported file structure, your Motorola Moto G5 Plus will ask you to reformat the memory card. Formatting your memory card on a PC may cause incompatibilities with your device. It’s recommended to format the memory card only on the device.

We recommend storing multimedia files (such as music, videos and pictures) on an external memory card in your device to free up your device’s internal memory for applications. Plus, if you buy a new Smartphone, you can simply swap your memory card between your old phone and your new device and all your data is back immediately.

Which SIM Card do I need for my Motorola Moto G5 Plus Smartphone?
Make sure you use the correct size SIM card. Depending on the model of smartphone, there are three sizes of SIM card that can potentially be used in a phone: Standard SIM, Micro SIM and Nano SIM. The three SIM card types work in exactly the same way from a technical perspective. They just differ in the amount of plastic housing that surrounds the metallic chip. The Combi SIM is a Micro SIM card within a Standard SIM-sized unit, so if you need the smaller size of card you simply break the additional plastic away from around the Micro SIM card. This type of card allows networks to cater for more phone users with a single card. A Trio SIM is a Standard, a Micro and a Nano in one. Most of the pay-as-you-go SIM cards you buy from convenience stores operate under this format as they’re more useful to more users.

If your SIM card is too big for your phone’s SIM card slot, a bit of DIY can come to the rescue. While you need to be very careful, you can turn a Standard SIM into a Micro or Nano SIM simply by trimming it. This can save you getting a new SIM when you upgrade phones to a model which uses a different card standard. There are a host of tutorials you can follow online and on YouTube, but do so at your own risk – if you damage the chip, the SIM won’t work at all. Motorola does NOT recommend cutting the card.

The Motorola Moto G5 Plus only accepts Nano-SIM Cards!

There is a single-SIM and dual-SIM version of the Motorola Moto G5 Plus. The US version of the Moto G5 Plus is Single-SIM only and does NOT support Dual-SIM.

Insert a SIM Card and memory card
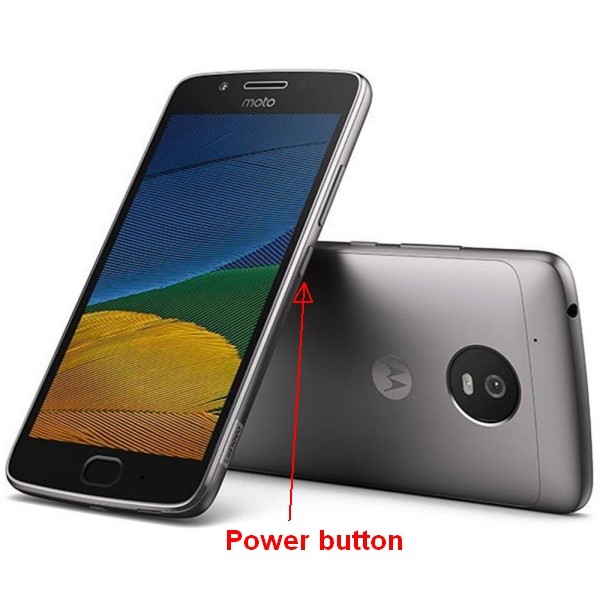
1. Turn off the power so that you won’t lose any stored information. If the device is on, press and hold the Power button. Tap Power off to turn off the phone.

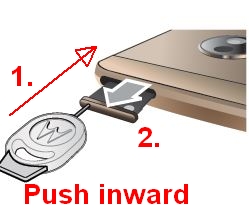
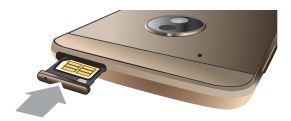
2. With the phone facing down, insert the SIM tool into the tray hole to pop out the tray. Some force may be needed. Just push the tool inward. By pushing the SIM tool inward the tray is unlocked and pops out.

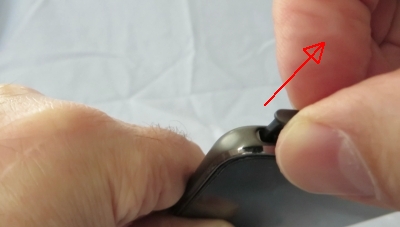
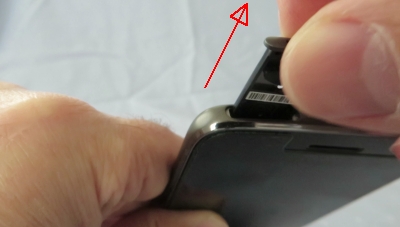
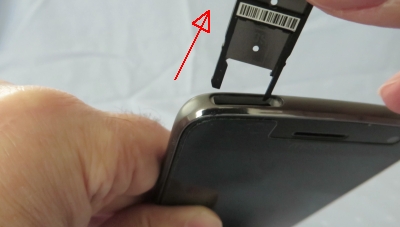
3. Pull the tray out and away from the device. Do so gently, since both the SIM card and its tray are fragile.

A. Singe-SIM (US) Version
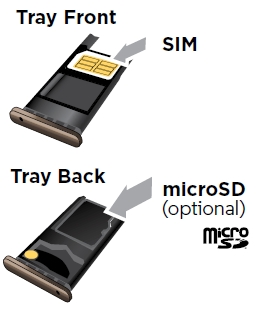
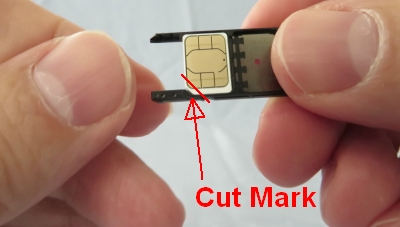
4. Put in the SIM card with the gold contacts facing UP. Because of the indentation on the card, you should only be able to place the card in the tray in one way. Push down on the card down until it’s fixed in the plastic of the tray.
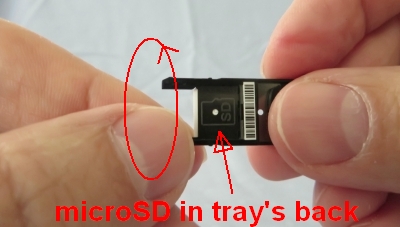
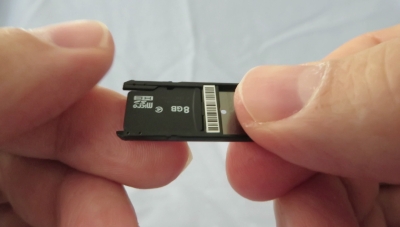
5. Turn the tray and put in an optional microSD card in the tray’s back (marked with SD) with the contacts facing DOWN. Push down on the card it’s fixed in the plastic of the tray.

B. Dual-SIM Version
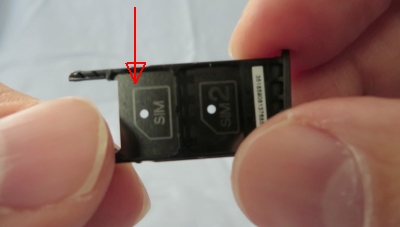
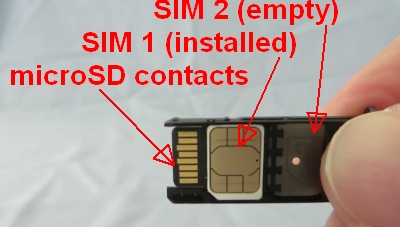
4. Put in the SIM card with the gold contacts facing UP in the LEFT side of the tray marked with SIM. Because of the indentation on the cards, you should only be able to place the cards in the tray in one way. Push down on the card until it’s fixed in the plastic of the tray.

4b. Put in an optional second SIM card with the gold contacts facing UP in the RIGHT side of the tray marked with SIM2. Because of the indentation on the cards, you should only be able to place the cards in the tray in one way. Push down on the card with with your thumb until it’s fixed in the plastic of the tray.
5. Turn the tray around and put in an optional microSD card in the tray’s back (marked with SD) with the contacts facing DOWN. Push down on the card until it’s fixed in the plastic of the tray.

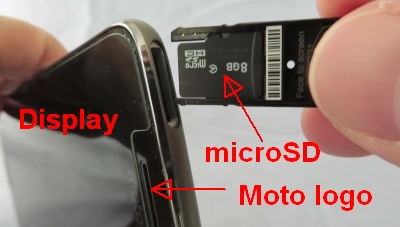
6. Push the tray back into your phone. The SIM card is at the back, the microSD card is on top.

7. Press and hold the Power button. Doing so will turn your Moto back on.
8. Check if your microSD card is recognized by the device. The name of your card should be visible in the Storage section of the Options menu. It’s displayed at the bottom under Portable storage.

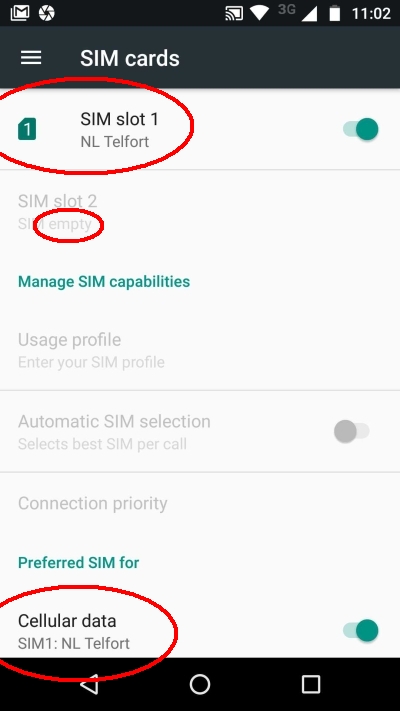
9. Check if your SIM card is recognized by the device. The name of your carrier should be visible in the SIM cards section of the Options menu.

Remove a SIM Card or Memory Card from your Motorola Moto G5 Plus
1. Before removing the microSD card, first unmount (eject) it for safe removal. This will tell the phone to stop communicating or transferring information from the memory card to the device, or vise versa from the phone to the memory card, and allow you to remove your memory card safely. Go to Settings > tap Storage. Scroll down to Portable storage and tap the Eject button. The eject button is the little triangle at the right of the name of your microSD card.

2. Turn off the power so that you won’t lose any stored information. If the device is on, press and hold the Power button. Tap Power off to turn off the phone.

If you do not unmount your SD card or power off the phone before removing your memory card then you can corrupt any files that might have been transferring when you removed the card and run the risk of damaging the memory card.

3. With the phone facing down, insert the SIM tool into the tray hole to pop out the tray. Some force may be needed. Just push the tool inward. By pushing the SIM tool inward the tray is unlocked and pops out.

4. Pull the tray out and away from the device. Do so gently, since both the SIM card and its tray are fragile.

5. Remove the SIM card or memory card from the tray. Make sure to store it safely as it’s small and easy to lose.