How to Insert or Remove a SIM Card and Memory Card into a Motorola Moto G9 Play Smartphone – Tutorial

Which SIM Card do I need for my Motorola Moto G9 Play Smartphone?

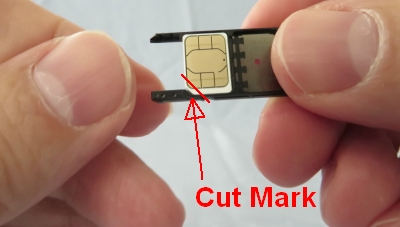
Make sure you use the correct size SIM card. Depending on the model of smartphone, there are three sizes of SIM card that can potentially be used in a phone: Standard SIM, Micro SIM and Nano SIM. The three SIM card types work in exactly the same way from a technical perspective. They just differ in the amount of plastic housing that surrounds the metallic chip. If your SIM card is too big for your phone’s SIM card slot, you can cut it with a SIM card cutter.

The Combi SIM is a Micro SIM card within a Standard SIM-sized unit, so if you need the smaller size of card you simply break the additional plastic away from around the Micro SIM card. This type of card allows networks to cater for more phone users with a single card. A Trio SIM is a Standard, a Micro and a Nano in one. Most of the pay-as-you-go SIM cards you buy from convenience stores operate under this format as they’re more useful to more users.

The Motorola Moto G9 Play only accepts Nano-SIM Cards.
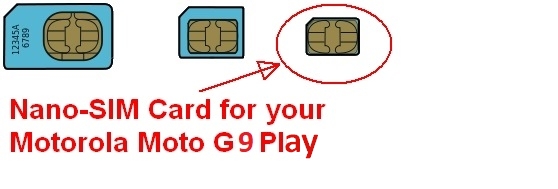
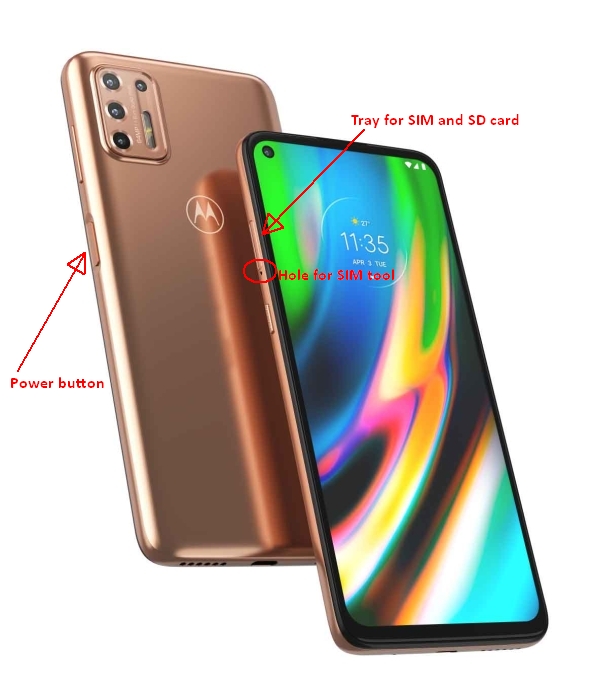
motorola moto g9 play how to insert or remove sim cards and sd memory card 01

You can use two SIM cards with different phone numbers in a Motorola Moto G9 Play. However it’s a hybrid slot, that means the second SIM card slot is also where you place your microSD card. You cannot insert two SIM cards and one microSD card at the same time. You must choose between one SIM card and a microSD card, or two SIM cards. The Motorola Moto G9 Play support DSDS (Dual SIM Dual Standby), which doesn’t allow two calls on two different SIM cards, but allows you to forward calls that come in on SIM card 1 to SIM card 2 when SIM card 1 is occupied and vice versa. This function is called Dual SIM reachability.

Which Memory Card do I need for my Motorola Moto G9 Play Smartphone?

Make sure you purchase the right Memory Card for your Smartphone. Your Motorola Moto G9 Play built-in memory is usually 64 GB. Users who demand more memory from their Phone can install an external microSD (sometimes named microSDHC (High-Capacity) or microSDXC (eXtended-Capacity) memory card with a maximum capacity of 512 GB. Class 2, 4, 6 or 10 cards will all work.
motorola moto g9 play how to insert or remove sim cards and sd memory card 02

[wbcr_html_snippet]: PHP snippets error (not passed the snippet ID)

Portable storage
When you insert an SD card in a smartphone for the first time, you can sometimes choose to either use the card as Portable Storage or Internal Storage. Your Motorola Moto G9 Play uses the card as portable storage for media files like photos, videos, and music. Because it’s portable, you can easily swap the card and its content between devices. After you insert the card, you might want to update settings within media apps (like camera, music, and podcast apps), so they use the card to store content you create or download. You can’t store apps on the SD card because it is portable storage.

Many microSD Cards come with an SD Card adapter for compatibility with SD-enabled devices, such as cameras, camcorders and (notebook) computers. Memory cards usually come pre-formatted and do not need to be formatted out of the box. MicroSDHC/MicroSDXC host devices are required to accept older MicroSD cards. If you insert a card formatted with an unsupported file structure, your Motorola Moto G9 Play will ask you to reformat the memory card. Formatting your memory card on a PC may cause incompatibilities with your device. It’s recommended to format the memory card only on the device.

We recommend storing multimedia files (such as music, videos and pictures) on an external memory card in your device to free up your device’s internal memory for applications. Plus, when you purchase a new Smartphone, you can simply swap your memory card between your old phone and your new device and all your data is back immediately.

Insert a SIM Card and memory card
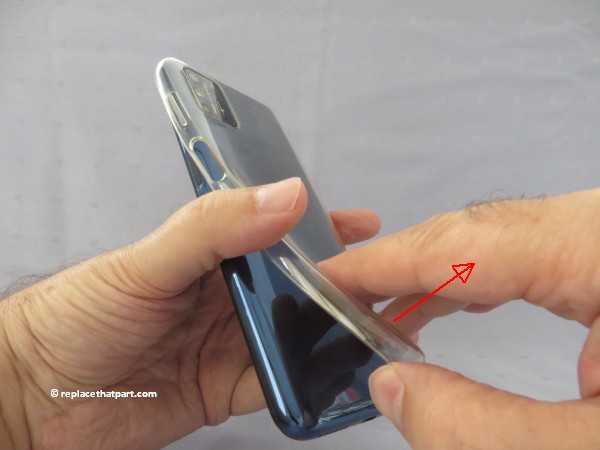
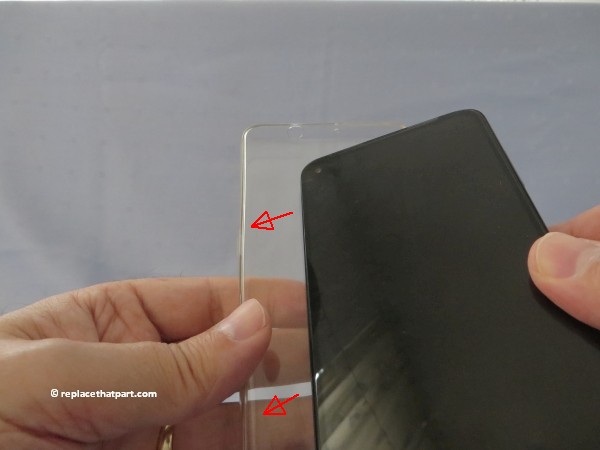
1. First, remove any protective case or cover, if you use any. Motorola includes a basic clear plastic one with the phone.
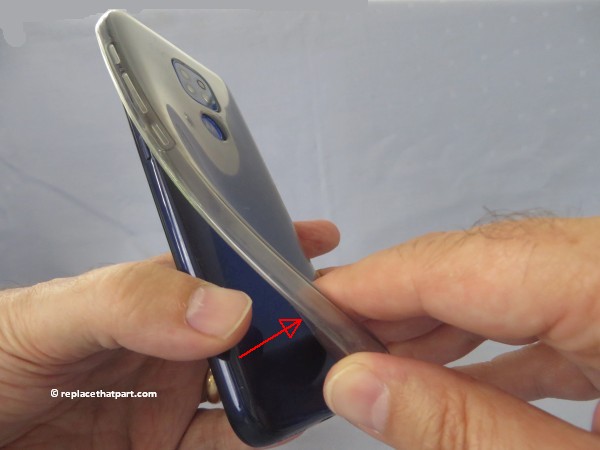
motorola moto g9 play how to insert or remove sim cards and sd memory card 03

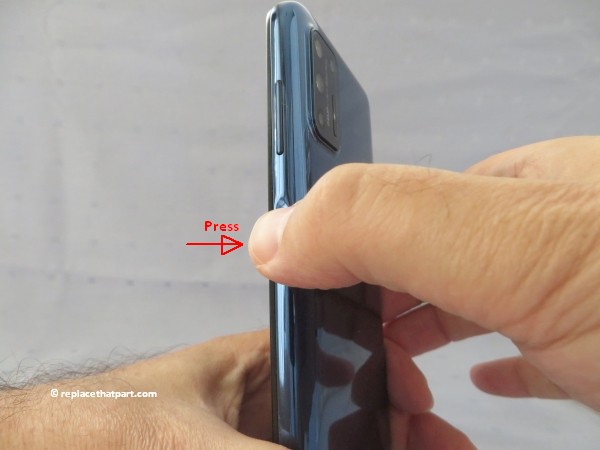
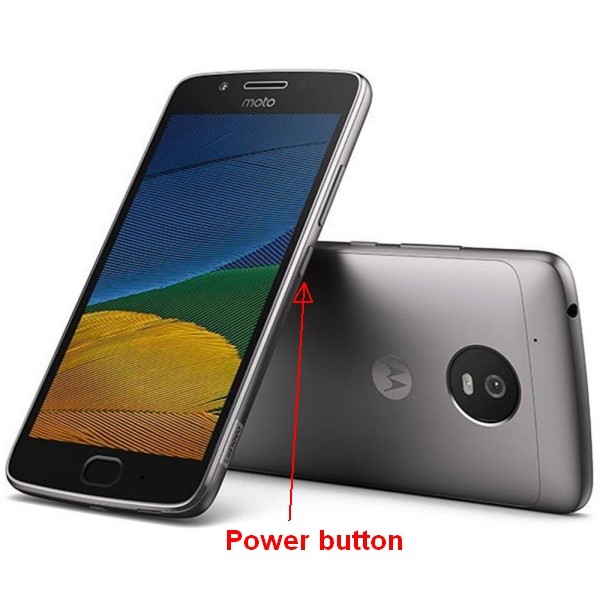
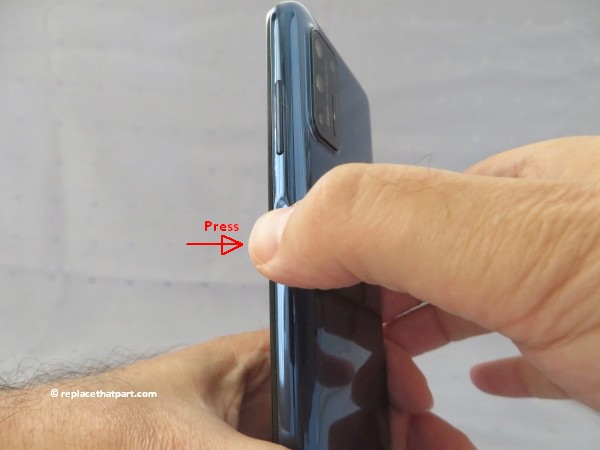
2. Turn off the power so that you won’t lose any stored information. If the device is on, press and hold the Power button for a couple of seconds. Tap Power off to turn off the phone.
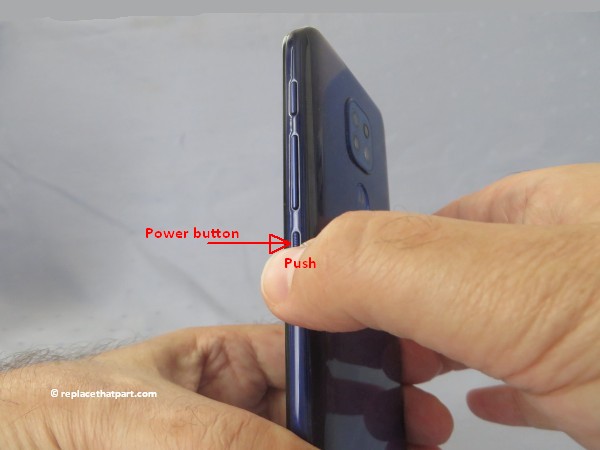
motorola moto g9 play how to insert or remove sim cards and sd memory card 04

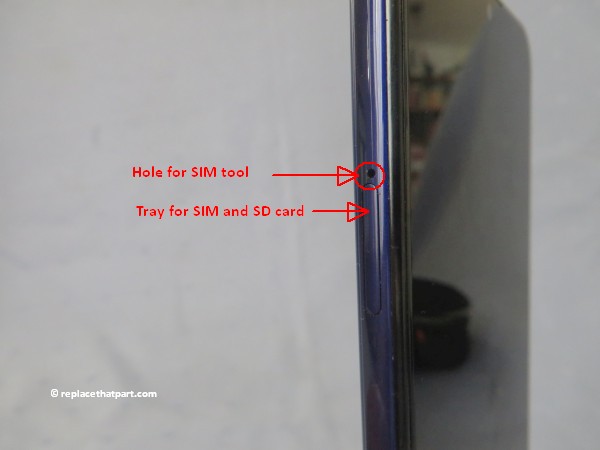
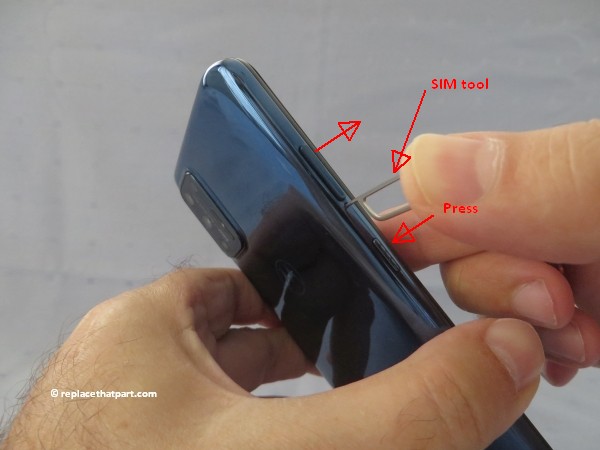
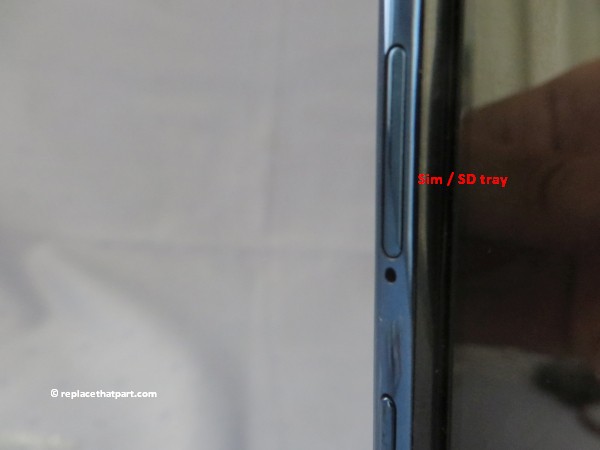
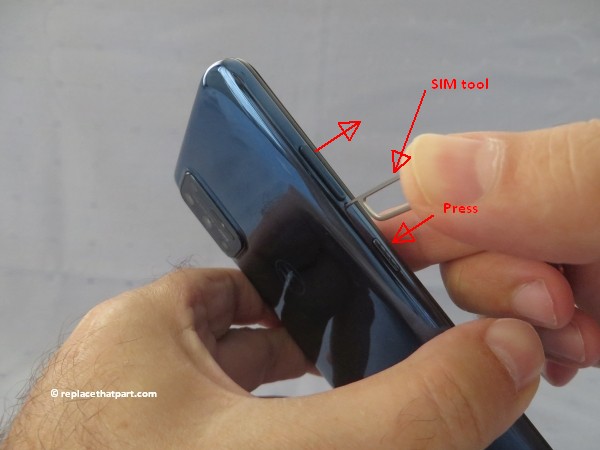
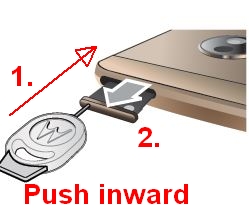
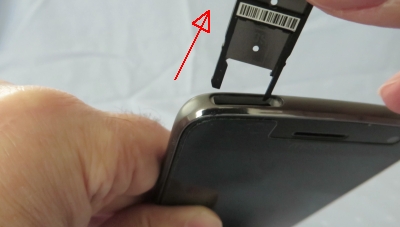
3. Insert the SIM tool into the tiny hole just above the tray to pop out the tray. Some force may be needed. Just push the tool inward. By pushing the SIM tool inward the tray is unlocked and pops out a little.
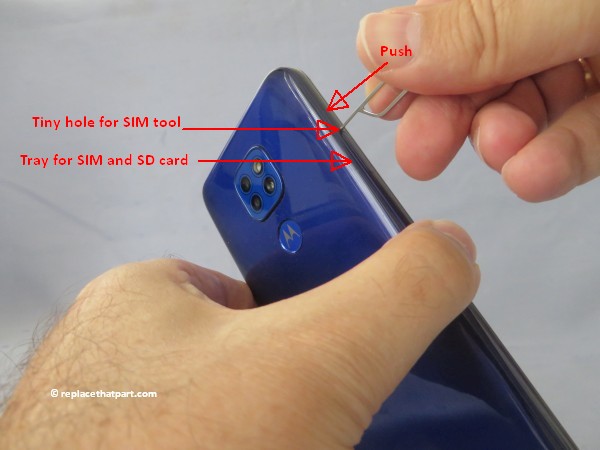
motorola moto g9 play how to insert or remove sim cards and sd memory card 05

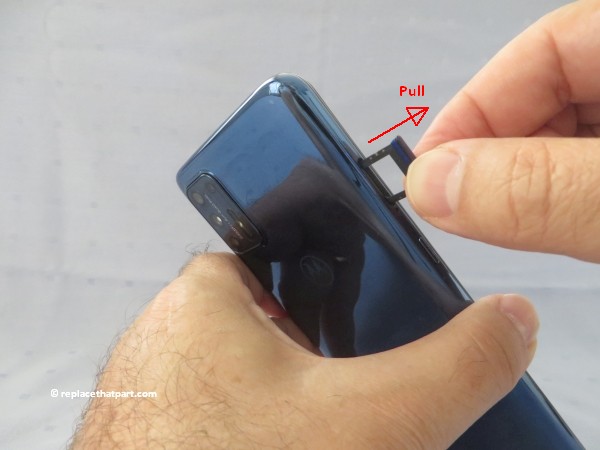
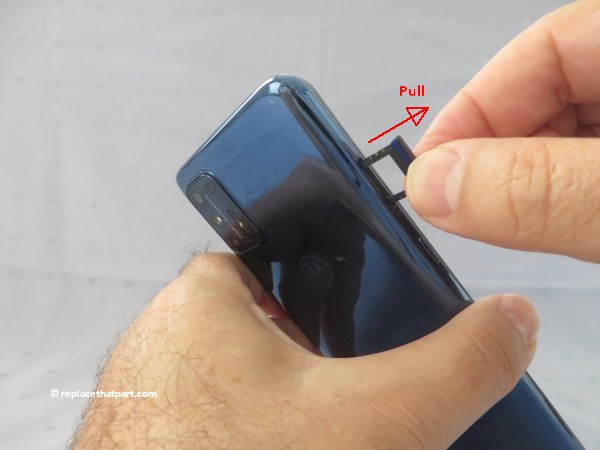
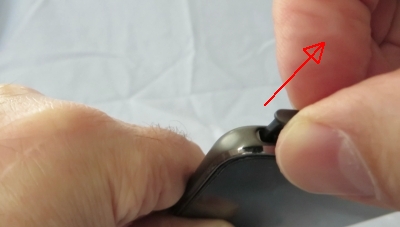
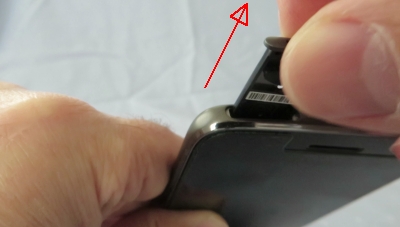
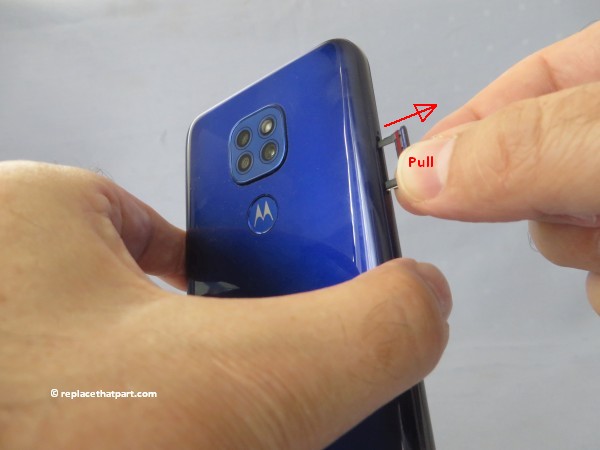
4. Pull the tray out and away from the device. Do so gently, since the tray is fragile.
motorola moto g9 play how to insert or remove sim cards and sd memory card 06

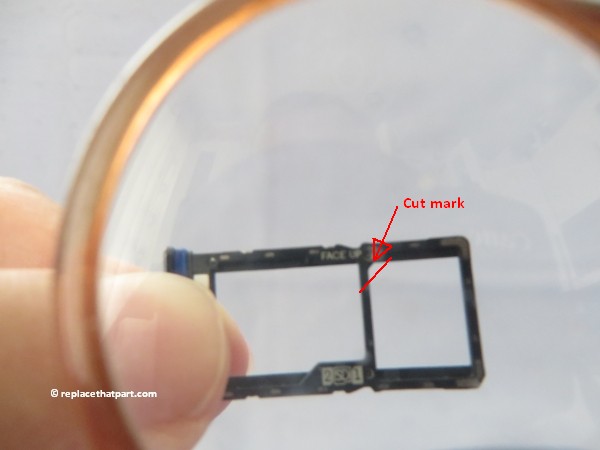
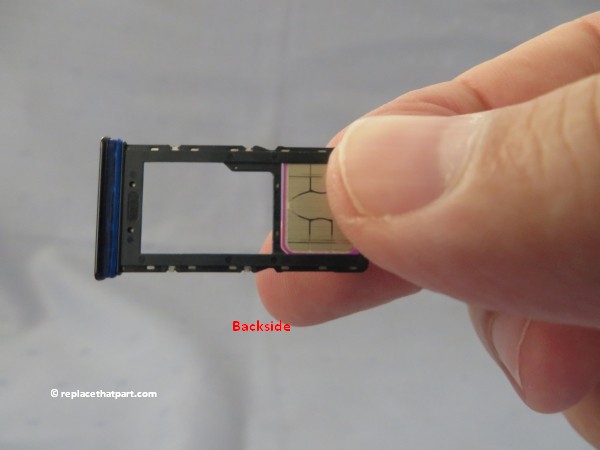
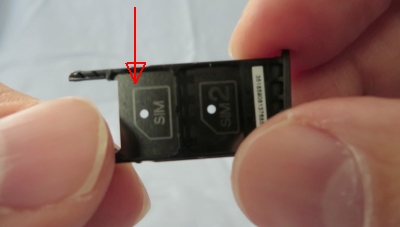
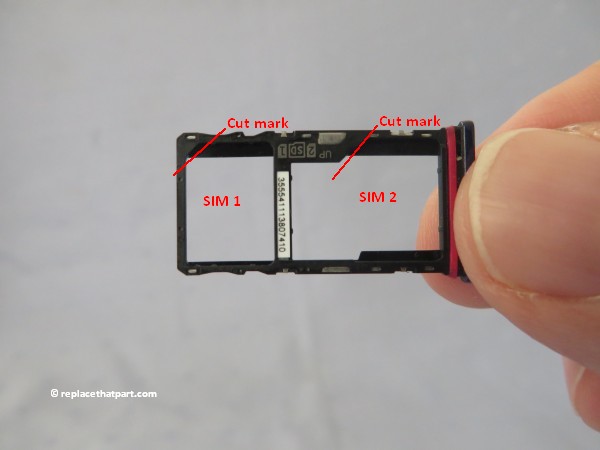
5. Put in the SIM card with the gold contacts facing DOWN in the RIGHT side of the tray. Because of the indentation on the cards, you should only be able to place the cards in the tray in one way. Push down gently on the card until it’s a fixed in the plastic of the tray. It should fit perfectly.
motorola moto g9 play how to insert or remove sim cards and sd memory card 07

motorola moto g9 play how to insert or remove sim cards and sd memory card 08

motorola moto g9 play how to insert or remove sim cards and sd memory card 09

Second SIM
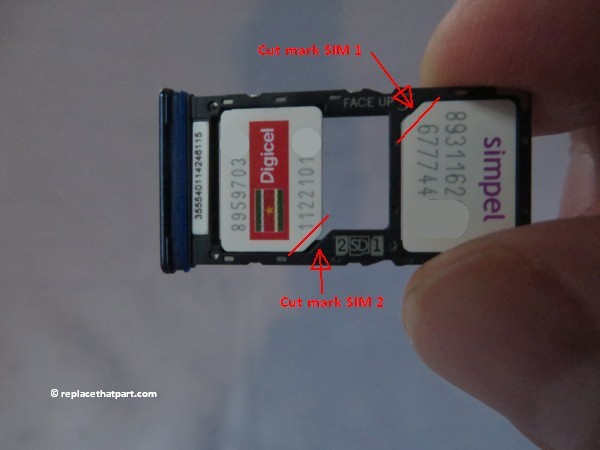
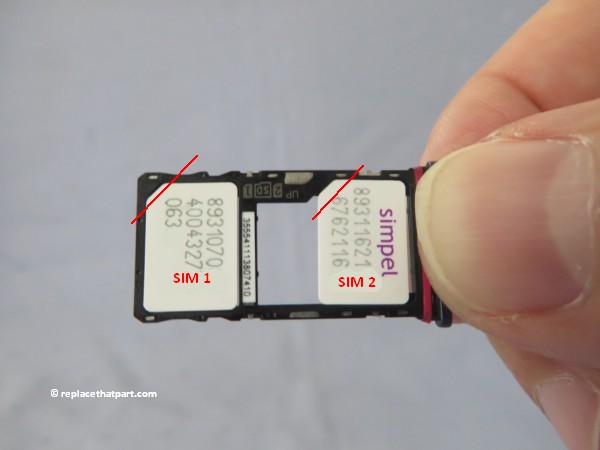
5b. Put in an optional second SIM card with the gold contacts facing DOWN in the RIGHT side of the tray. Because of the indentation on the cards, you should only be able to place the cards in the tray in one way. The second card fits into the tray in the same way as the first SIM. Push down gently on the card until it’s fixed in the plastic of the tray.
motorola moto g9 play how to insert or remove sim cards and sd memory card 10

Note that if you put two SIM cards into the SIM tray, you CAN NOT put in an optional SD Memory card into the tray. It’s either a second SIM OR an SD card.

microSD card
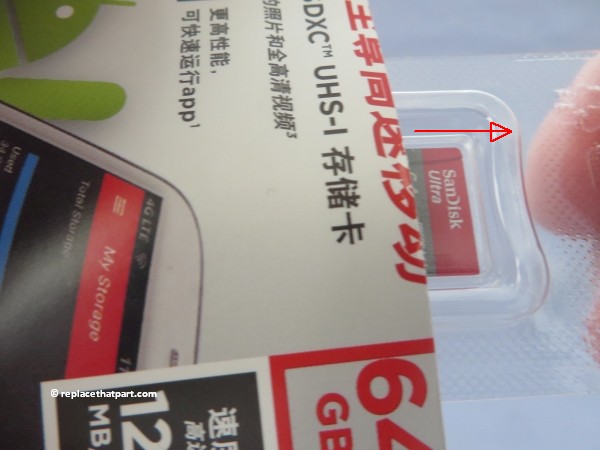
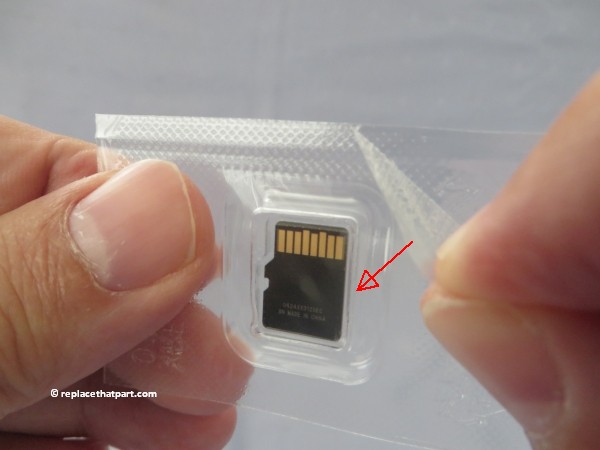
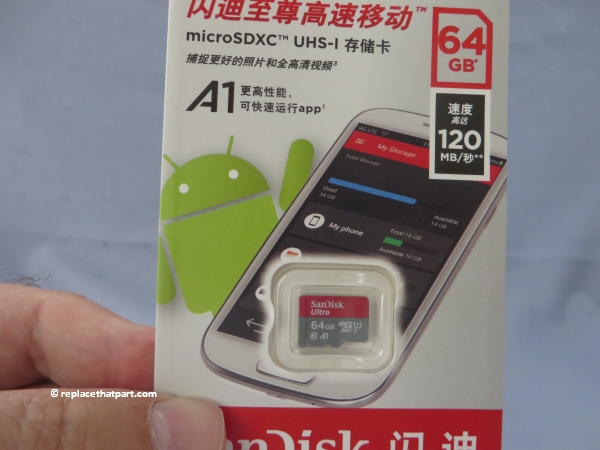
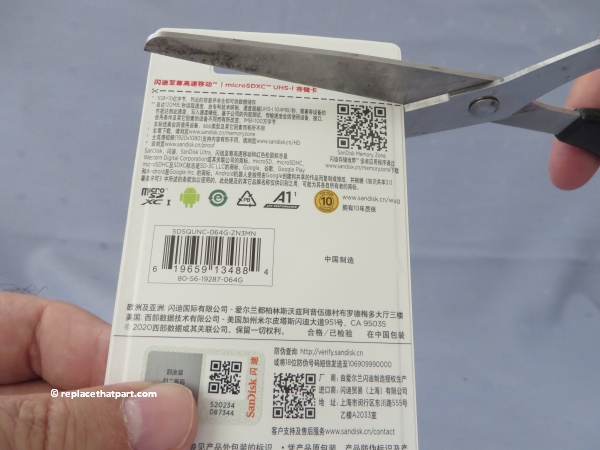
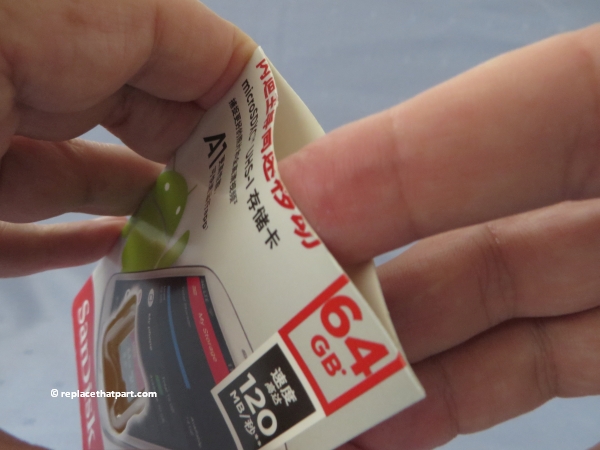
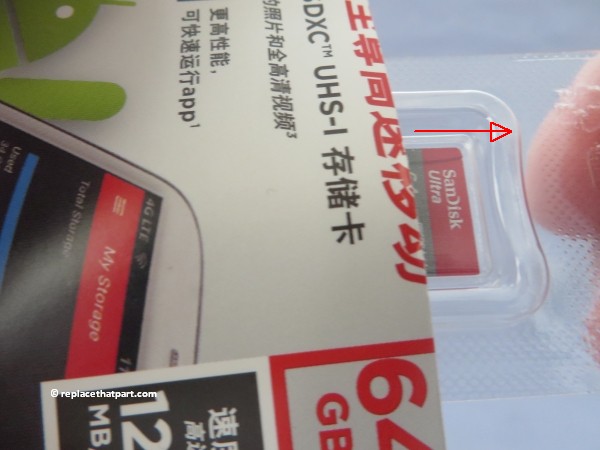
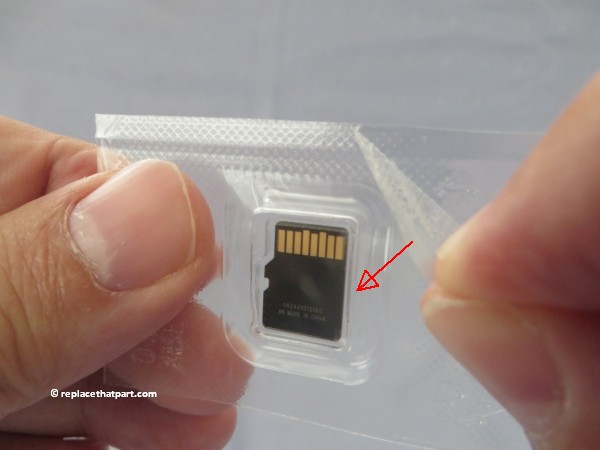
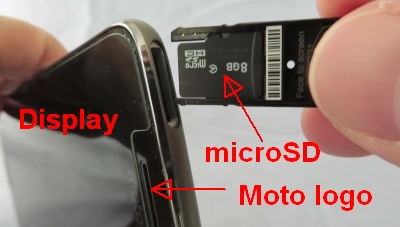
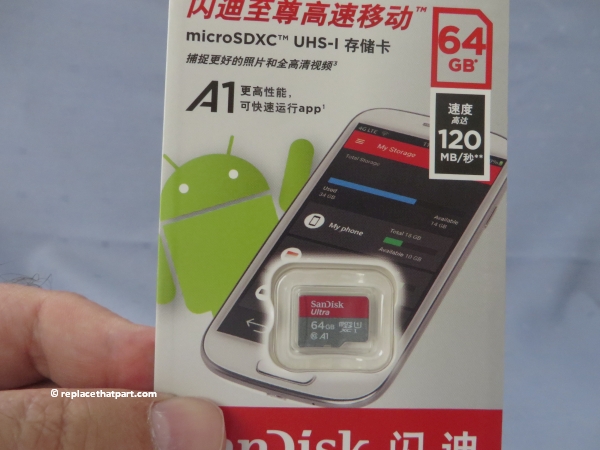
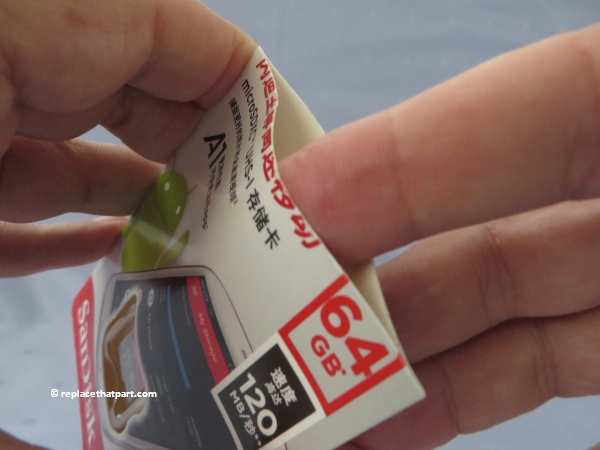
5c. If you choose to put an optional SD card in the tray, open the package as shown below.
motorola moto g9 play how to insert or remove sim cards and sd memory card 11

motorola moto g9 play how to insert or remove sim cards and sd memory card 12

motorola moto g9 play how to insert or remove sim cards and sd memory card 13

motorola moto g9 play how to insert or remove sim cards and sd memory card 14

motorola moto g9 play how to insert or remove sim cards and sd memory card 15

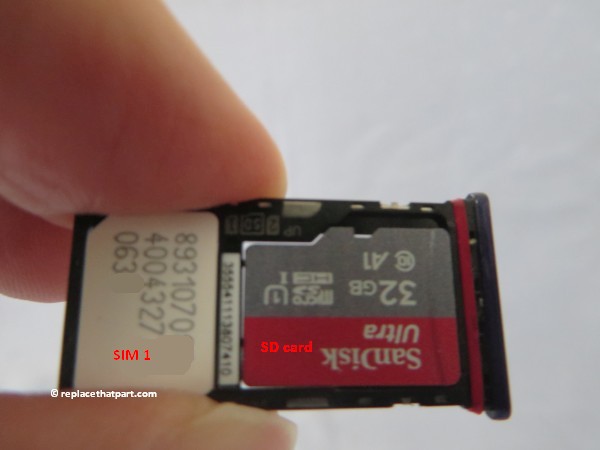
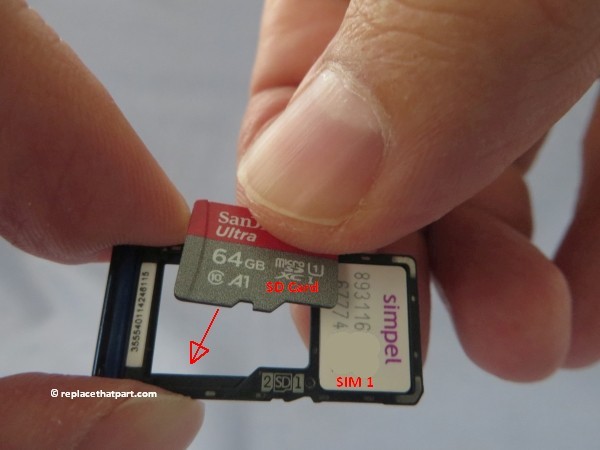
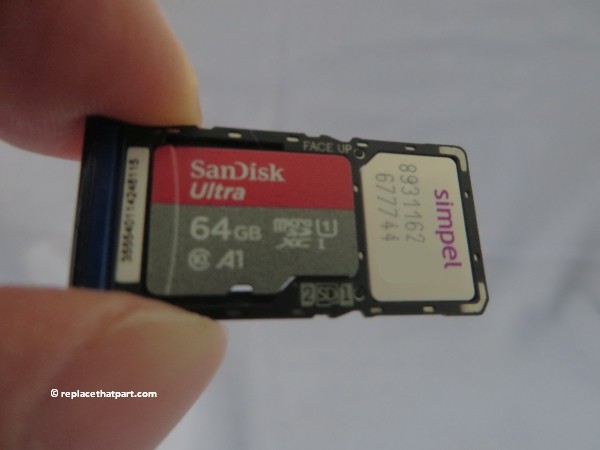
5d. You should place the SD card at the RIGHT side of the tray (where otherwise the second SIM would be), also with the contacts facing DOWN. Gently push down on the card until it’s fixed in the plastic of the tray.
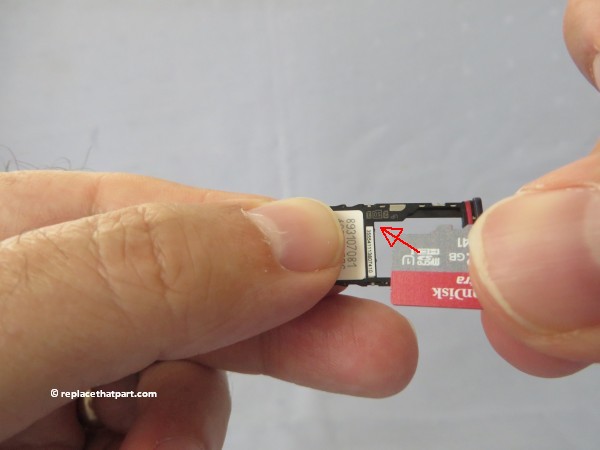
motorola moto g9 play how to insert or remove sim cards and sd memory card 16

motorola moto g9 play how to insert or remove sim cards and sd memory card 17

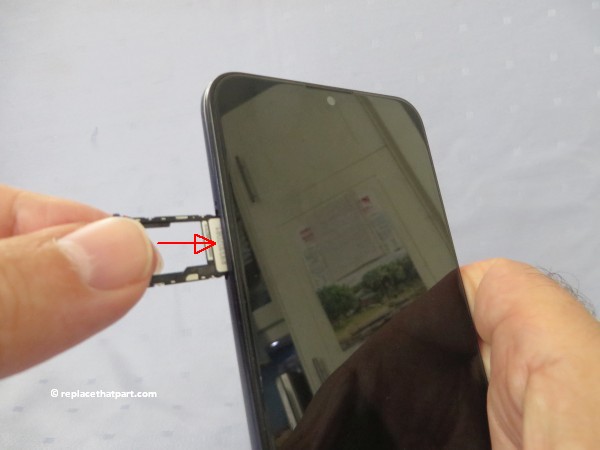
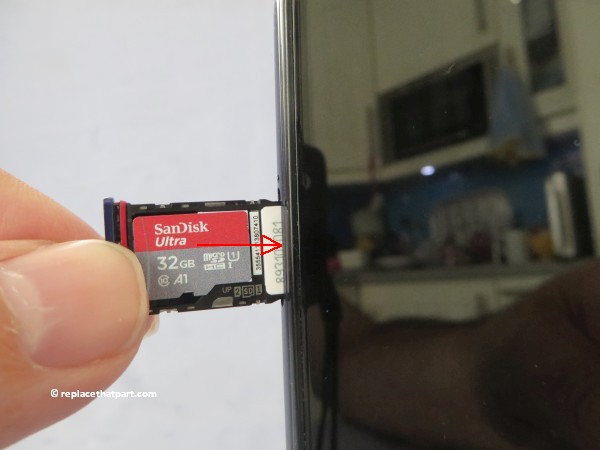
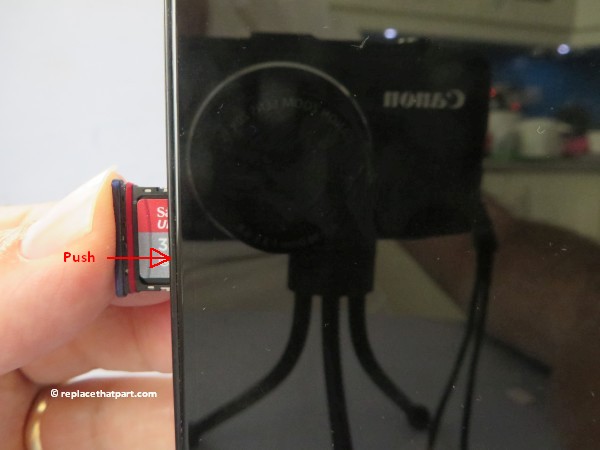
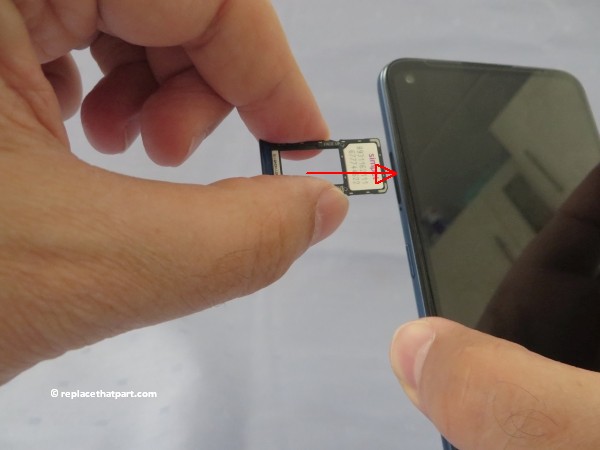
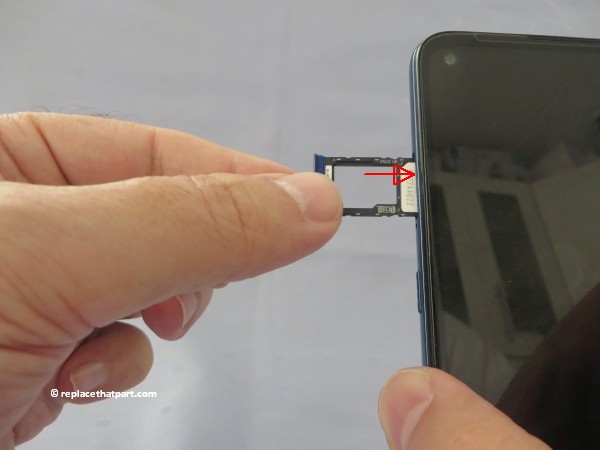
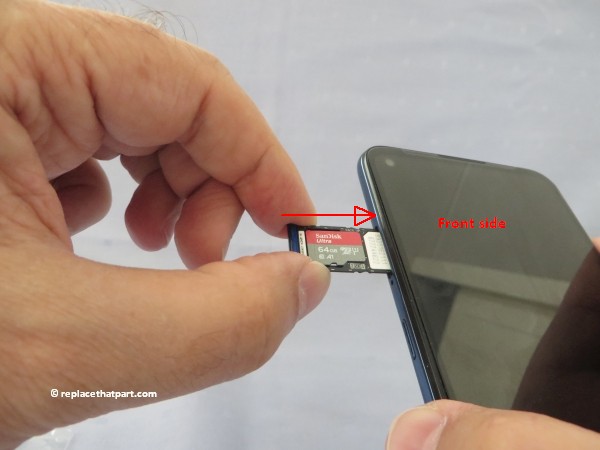
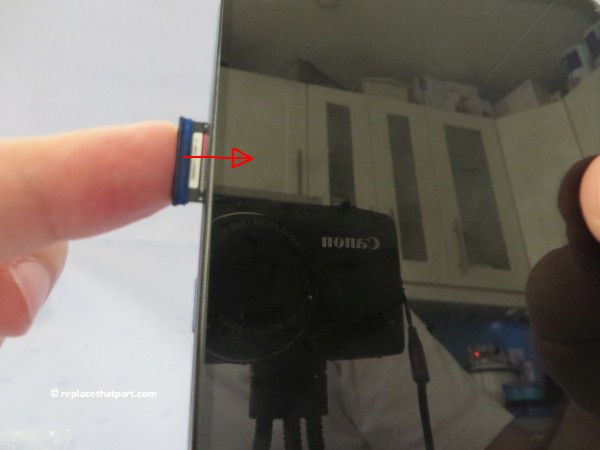
6. Hold your phone with the front (glass) side up. Gently push the tray back into your phone until it stops. The colored part of the card with the SIM card data is on top, the gold contacts are at the back. Do so gently. It should slide in perfectly, without any major obstruction.
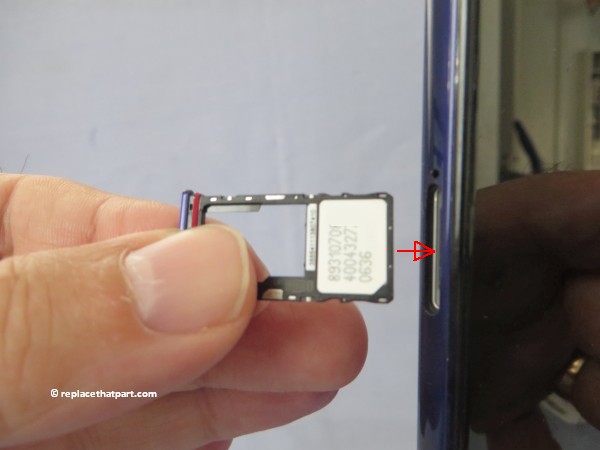
motorola moto g9 play how to insert or remove sim cards and sd memory card 18

motorola moto g9 play how to insert or remove sim cards and sd memory card 19

motorola moto g9 play how to insert or remove sim cards and sd memory card 20

motorola moto g9 play how to insert or remove sim cards and sd memory card 21

motorola moto g9 play how to insert or remove sim cards and sd memory card 22

7. Press and hold the Power button for a couple of seconds. Doing so will turn your Moto back on.

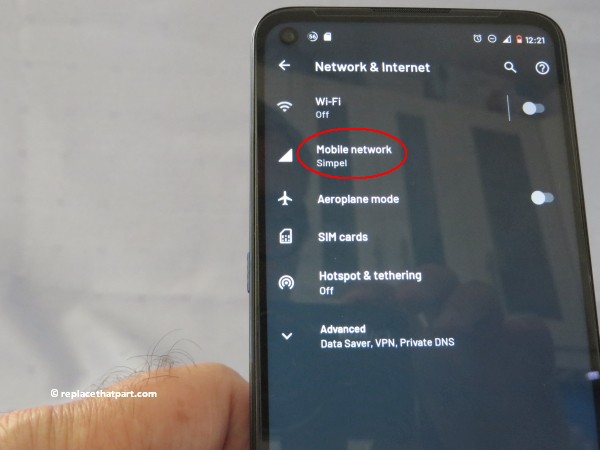
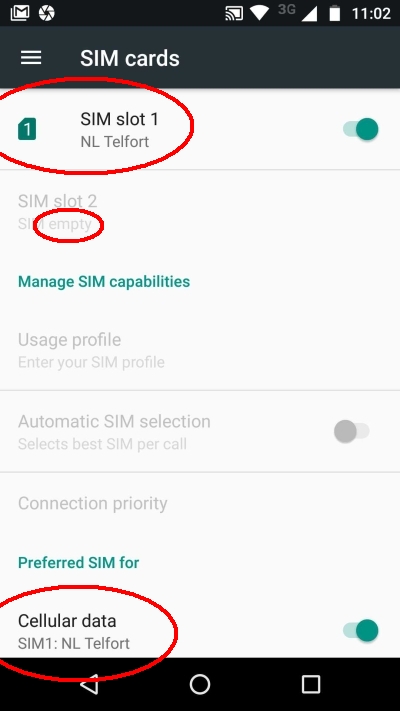
8. Check if your SIM card is recognized by the device. The name of your carrier should be visible in the Network & Internet and SIM cards sections of the Options menu.
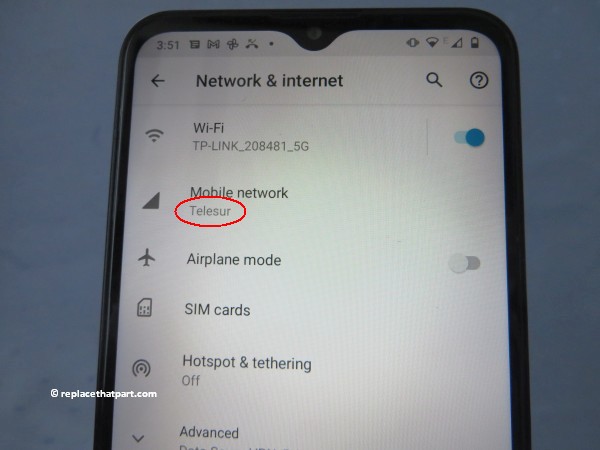
motorola moto g9 play how to insert or remove sim cards and sd memory card 23

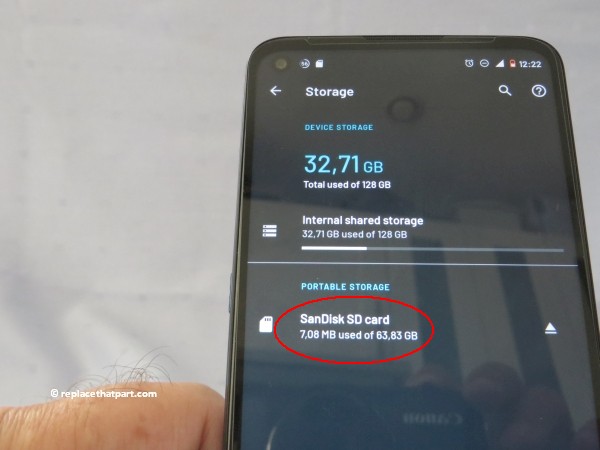
9. Check if your SD card is recognized by the device, if you’ve installed one. The name of your card should be visible in the Storage section of the Options menu. It’s displayed at the bottom under Portable storage.
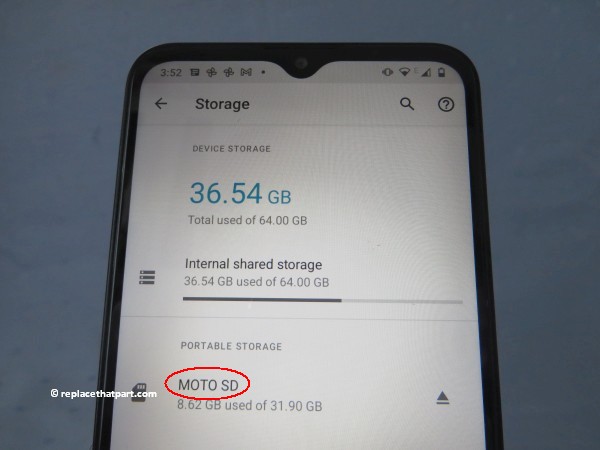
motorola moto g9 play how to insert or remove sim cards and sd memory card 24

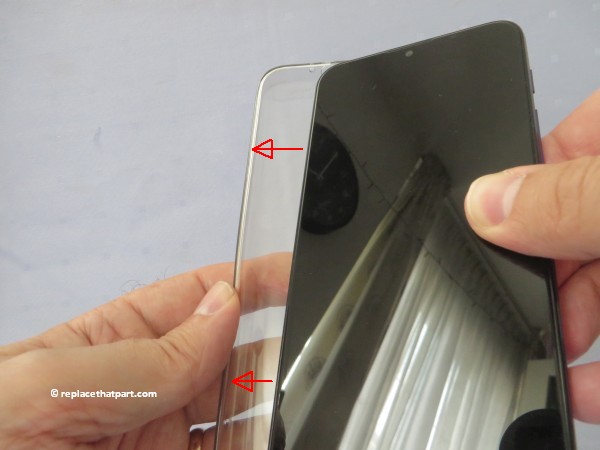
10. Replace the protective cover or case, if you use one.
motorola moto g9 play how to insert or remove sim cards and sd memory card 25

Remove a SIM Card or Memory Card from your Motorola Moto G9 Play
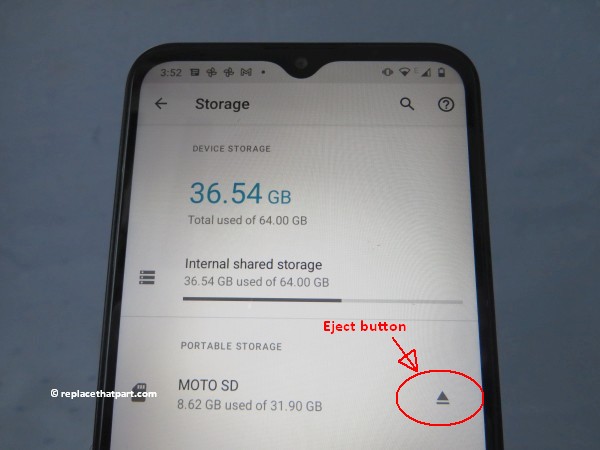
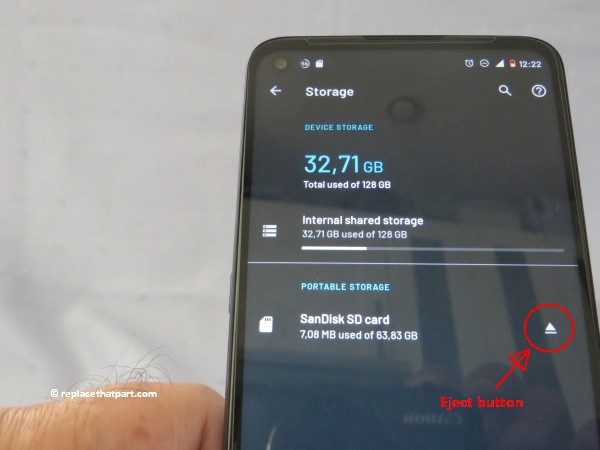
1. Before removing the microSD card, first unmount (eject) it for safe removal. This will tell the phone to stop communicating or transferring information from the memory card to the device, or vise versa from the phone to the memory card, and allow you to remove your memory card safely. Go to Settings > tap Storage. Scroll down to Portable storage and tap the Eject button. The eject button is the little triangle at the right of the name of your microSD card.
motorola moto g9 play how to insert or remove sim cards and sd memory card 26

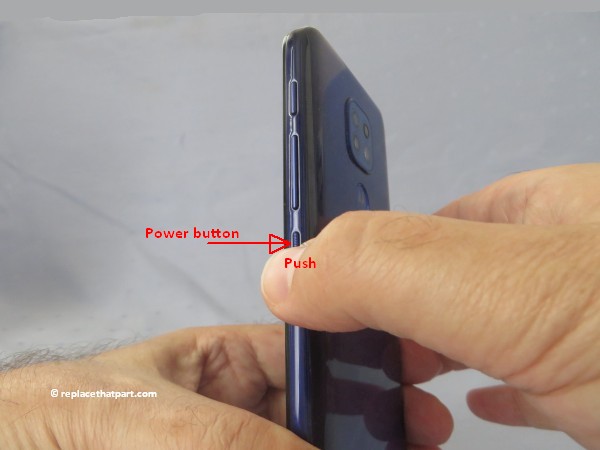
2. Turn off the power so that you won’t lose any stored information. If the device is on, press and hold the Power button for a couple of seconds. Tap Power off to turn off the phone.

If you do not unmount your SD card or power off the phone before removing your memory card then you can corrupt any files that might have been transferring when you removed the card and run the risk of damaging the memory card.
motorola moto g9 play how to insert or remove sim cards and sd memory card 27

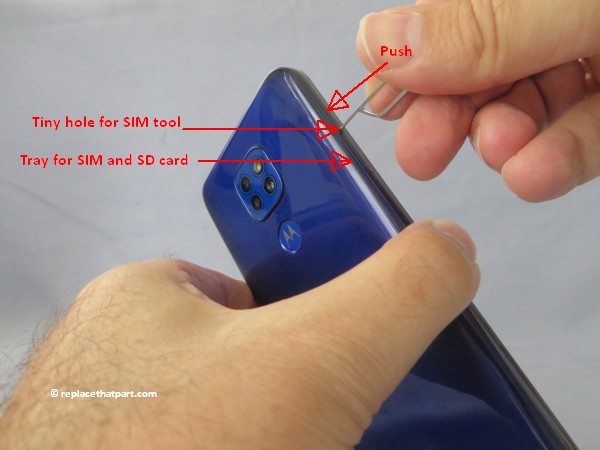
3. Insert the SIM tool into the tiny hole just above the tray to pop out the tray. Some force may be needed. Just push the tool inward. By pushing the SIM tool inward the tray is unlocked and pops out a little.
motorola moto g9 play how to insert or remove sim cards and sd memory card 28

4. Pull the tray out and away from the device. Do so gently, since both the SIM card and its tray are fragile.
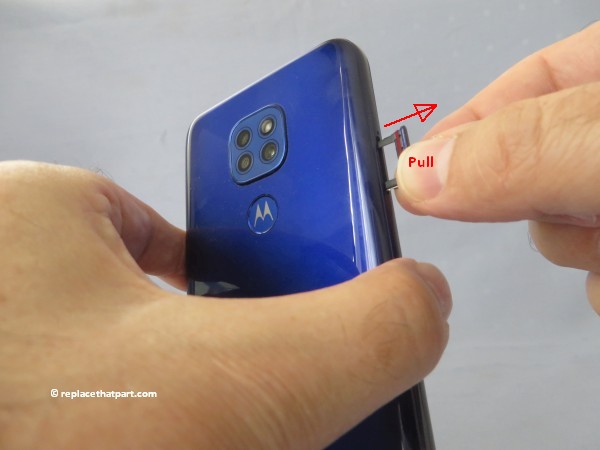
motorola moto g9 play how to insert or remove sim cards and sd memory card 29

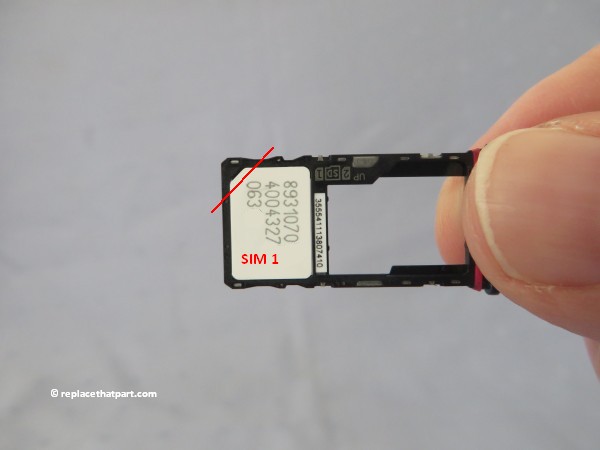
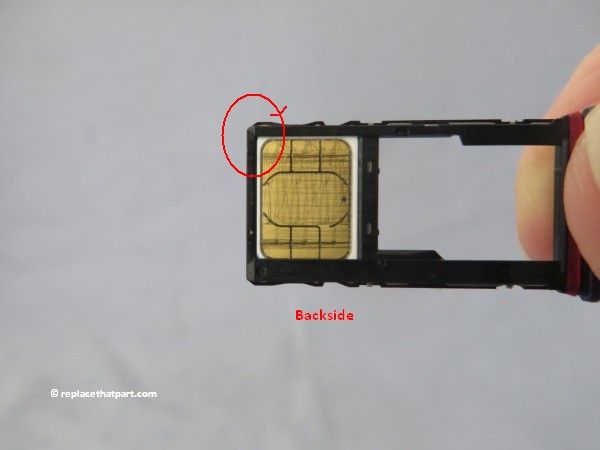
5. Remove the SIM card(s) or memory card from the tray. Make sure to store it safely as it’s small and easy to lose.
How to Insert or Remove a SIM Card and Memory Card into a Motorola Moto G9 Plus Smartphone – Tutorial

Which SIM Card do I need for my Motorola Moto G9 Plus Smartphone?

Make sure you use the correct size SIM card. Depending on the model of smartphone, there are three sizes of SIM card that can potentially be used in a phone: Standard SIM, Micro SIM and Nano SIM. The three SIM card types work in exactly the same way from a technical perspective. They just differ in the amount of plastic housing that surrounds the metallic chip. If your SIM card is too big for your phone’s SIM card slot, you can cut it with a SIM card cutter.

The Combi SIM is a Micro SIM card within a Standard SIM-sized unit, so if you need the smaller size of card you simply break the additional plastic away from around the Micro SIM card. This type of card allows networks to cater for more phone users with a single card. A Trio SIM is a Standard, a Micro and a Nano in one. Most of the pay-as-you-go SIM cards you buy from convenience stores operate under this format as they’re more useful to more users.

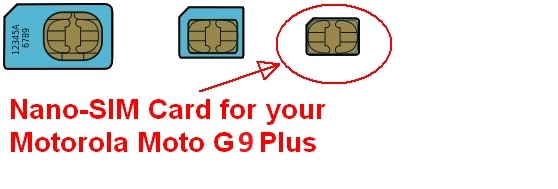
The Motorola Moto G9 Plus only accepts Nano-SIM Cards.
motorola moto g9 plus how to insert or remove sim cards and sd memory card 01

You can use two SIM cards with different phone numbers in a Motorola Moto G9 Plus. However it’s a hybrid slot, that means the second SIM card slot is also where you place your microSD card. You cannot insert two SIM cards and one microSD card at the same time. You must choose between one SIM card and a microSD card, or two SIM cards. The Motorola Moto G9 Plus support DSDS (Dual SIM Dual Standby), which doesn’t allow two calls on two different SIM cards, but allows you to forward calls that come in on SIM card 1 to SIM card 2 when SIM card 1 is occupied and vice versa. This function is called Dual SIM reachability.

Which Memory Card do I need for my Motorola Moto G9 Plus Smartphone?

Make sure you purchase the right Memory Card for your Smartphone. Your Motorola Moto G9 Plus built-in memory is usually 128 GB. Users who demand more memory from their Phone can install an external microSD (sometimes named microSDHC (High-Capacity) or microSDXC (eXtended-Capacity) memory card with a maximum capacity of 512 GB. Class 2, 4, 6 or 10 cards will all work.
motorola moto g9 plus how to insert or remove sim cards and sd memory card 02

[wbcr_html_snippet]: PHP snippets error (not passed the snippet ID)

Portable storage
When you insert an SD card in a smartphone for the first time, you can sometimes choose to either use the card as Portable Storage or Internal Storage. Your Motorola Moto G9 Plus uses the card as portable storage for media files like photos, videos, and music. Because it’s portable, you can easily swap the card and its content between devices. After you insert the card, you might want to update settings within media apps (like camera, music, and podcast apps), so they use the card to store content you create or download. You can’t store apps on the SD card because it is portable storage.

Many microSD Cards come with an SD Card adapter for compatibility with SD-enabled devices, such as cameras, camcorders and (notebook) computers. Memory cards usually come pre-formatted and do not need to be formatted out of the box. MicroSDHC/MicroSDXC host devices are required to accept older MicroSD cards. If you insert a card formatted with an unsupported file structure, your Motorola Moto G9 Plus will ask you to reformat the memory card. Formatting your memory card on a PC may cause incompatibilities with your device. It’s recommended to format the memory card only on the device.

We recommend storing multimedia files (such as music, videos and pictures) on an external memory card in your device to free up your device’s internal memory for applications. Plus, when you purchase a new Smartphone, you can simply swap your memory card between your old phone and your new device and all your data is back immediately.

motorola moto g9 plus how to insert or remove sim cards and sd memory card 03

Insert a SIM Card and memory card
1. First, remove any protective case or cover, if you use any. Motorola includes a basic clear plastic one with the phone.
motorola moto g9 plus how to insert or remove sim cards and sd memory card 04

2. Turn off the power so that you won’t lose any stored information. If the device is on, press and hold the Power button for a couple of seconds. Tap Power off to turn off the phone.
motorola moto g9 plus how to insert or remove sim cards and sd memory card 05

3. Insert the SIM tool into the tiny hole just below the tray to pop out the tray. Some force may be needed. Just push the tool inward. By pushing the SIM tool inward the tray is unlocked and pops out a little.
motorola moto g9 plus how to insert or remove sim cards and sd memory card 06

4. Pull the tray out and away from the device. Do so gently, since the tray is fragile.
motorola moto g9 plus how to insert or remove sim cards and sd memory card 07

5. Put in the SIM card with the gold contacts facing DOWN in the RIGHT side of the tray. Because of the indentation on the cards, you should only be able to place the cards in the tray in one way. Push down gently on the card until it’s a fixed in the plastic of the tray. It should fit perfectly.
motorola moto g9 plus how to insert or remove sim cards and sd memory card 08

motorola moto g9 plus how to insert or remove sim cards and sd memory card 09

motorola moto g9 plus how to insert or remove sim cards and sd memory card 10

Second SIM
5b. Put in an optional second SIM card with the gold contacts facing DOWN in the LEFT side of the tray. Because of the indentation on the cards, you should only be able to place the cards in the tray in one way. The second card fits into the tray upside down, compared to the first SIM. Push down gently on the card until it’s fixed in the plastic of the tray.
motorola moto g9 plus how to insert or remove sim cards and sd memory card 11

Note that if you put two SIM cards into the SIM tray, you CAN NOT put in an optional SD Memory card into the tray. It’s either a second SIM OR an SD card.

microSD card
5c. If you choose to put an optional SD card in the tray, open the package as shown below.
motorola moto g9 plus how to insert or remove sim cards and sd memory card 12

motorola moto g9 plus how to insert or remove sim cards and sd memory card 13

motorola moto g9 plus how to insert or remove sim cards and sd memory card 14

motorola moto g9 plus how to insert or remove sim cards and sd memory card 15

motorola moto g9 plus how to insert or remove sim cards and sd memory card 16

5d. You should place the SD card at the LEFT side of the tray (were otherwise the second SIM would be), also with the contacts facing DOWN. Gently push down on the card until it’s fixed in the plastic of the tray.
motorola moto g9 plus how to insert or remove sim cards and sd memory card 17

motorola moto g9 plus how to insert or remove sim cards and sd memory card 18

6. Hold your phone with the front (glass) side up. Gently push the tray back into your phone until it stops. The colored part of the card with the SIM card data is on top, the gold contacts are at the back. Do so gently. It should slide in perfectly, without any major obstruction.
motorola moto g9 plus how to insert or remove sim cards and sd memory card 19

motorola moto g9 plus how to insert or remove sim cards and sd memory card 20

motorola moto g9 plus how to insert or remove sim cards and sd memory card 21

motorola moto g9 plus how to insert or remove sim cards and sd memory card 22

motorola moto g9 plus how to insert or remove sim cards and sd memory card 23

7. Press and hold the Power button for a couple of seconds. Doing so will turn your moto back on.

8. Check if your SIM card is recognized by the device. The name of your carrier should be visible in the Network & Internet and SIM cards sections of the Options menu.
motorola moto g9 plus how to insert or remove sim cards and sd memory card 24

9. Check if your SD card is recognized by the device, if you’ve installed one. The name of your card should be visible in the Storage section of the Options menu. It’s displayed at the bottom under Portable storage.
motorola moto g9 plus how to insert or remove sim cards and sd memory card 25

10. Replace the protective cover or case, if you use one.
motorola moto g9 plus how to insert or remove sim cards and sd memory card 26

Remove a SIM Card or Memory Card from your Motorola Moto G9 Plus
1. Before removing the microSD card, first unmount (eject) it for safe removal. This will tell the phone to stop communicating or transferring information from the memory card to the device, or vise versa from the phone to the memory card, and allow you to remove your memory card safely. Go to Settings > tap Storage. Scroll down to Portable storage and tap the Eject button. The eject button is the little triangle at the right of the name of your microSD card.
motorola moto g9 plus how to insert or remove sim cards and sd memory card 27

2. Turn off the power so that you won’t lose any stored information. If the device is on, press and hold the Power button for a couple of seconds. Tap Power off to turn off the phone.

If you do not unmount your SD card or power off the phone before removing your memory card then you can corrupt any files that might have been transferring when you removed the card and run the risk of damaging the memory card.
motorola moto g9 plus how to insert or remove sim cards and sd memory card 28

3. Insert the SIM tool into the tiny hole just below the tray to pop out the tray. Some force may be needed. Just push the tool inward. By pushing the SIM tool inward the tray is unlocked and pops out a little.
motorola moto g9 plus how to insert or remove sim cards and sd memory card 29

4. Pull the tray out and away from the device. Do so gently, since both the SIM card and its tray are fragile.
motorola moto g9 plus how to insert or remove sim cards and sd memory card 30

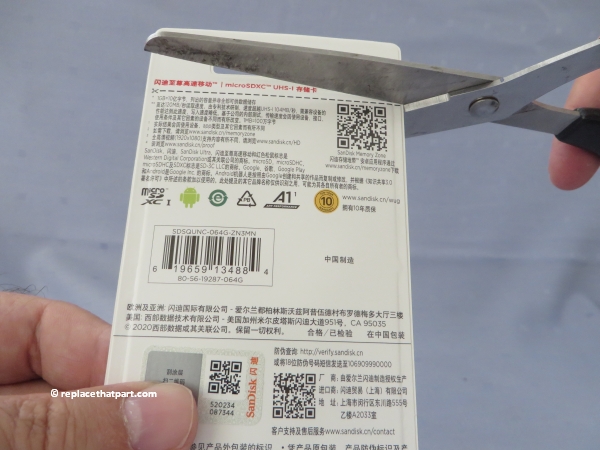
5. Remove the SIM card(s) or memory card from the tray. Make sure to store it safely as it’s small and easy to lose.
How to Insert a SIM Card and Memory Card into a Motorola Moto G5 Plus Smartphone – Tutorial

Which Memory Card do I need for my Motorola Moto G5 Plus Smartphone?
Make sure you purchase the right Memory Card for your Smartphone. Your Motorola Moto G5 Plus built-in memory is usually 32 GB or 64GB, depending on the model. Users who demand more memory from their Phone can install an external microSDHC (High-Capacity) or microSDXC (eXtended-Capacity) memory card with a maximum capacity of 128 GB.

When you insert an SD card for the first time, you can choose to either use the card as Portable Storage or Internal Storage.

A. Portable Storage
Select this mode if you frequently swap your SD card between devices, use your SD card for media storage (such as pictures, movies, music) only. Only pictures and media can be stored on the card. Downloaded applications, their data, is always internal. They CAN NOT be moved to the card. The card is readable by other devices. Content on the card is not encrypted by default.

For the Portable Storage mode, you need at least a Class 2, 4, 6 or 10 card. A popular memory card for this mode is for example: Samsung EVO 32GB Class 10 Micro SDHC Card with Adapter (MB-MP32DA/AM) and SanDisk Ultra 16GB Ultra Micro SDHC UHS-I/Class 10 Card with Adapter .

B. Internal Storage
Select this mode if you want to completely extend your device storage with the card, and need the card to store large applications, games, and their data. The SD card can become your device primary storage. Downloaded applications, their data and media CAN be moved to the card. The card is not readable by other devices. The card is always encrypted, and can not be decrypted on any other device.

For the Internal Storage mode a high-speed card (UHS-1) is strongly recommended. Class 4 and Class 2 micro SD cards are NOT recommended for adopted internal storage usage. The performance of these cards is typically 10x slower than internal storage performance. High speed card are identified by these logos:


(#ad or paid links)

A popular memory card for this model is for example: SanDisk 64GB Ultra MicroSDHC UHS-I Memory Card with Adapter.

Many microSD Cards come with an SD Card adapter for compatibility with SD-enabled devices, such as cameras, camcorders and (notebook) computers. Memory cards usually come pre-formatted and do not need to be formatted out of the box. MicroSDHC/MicroSDXC host devices are required to accept older MicroSD cards.

If you insert a card formatted with an unsupported file structure, your Motorola Moto G5 Plus will ask you to reformat the memory card. Formatting your memory card on a PC may cause incompatibilities with your device. It’s recommended to format the memory card only on the device.

We recommend storing multimedia files (such as music, videos and pictures) on an external memory card in your device to free up your device’s internal memory for applications. Plus, if you buy a new Smartphone, you can simply swap your memory card between your old phone and your new device and all your data is back immediately.

Which SIM Card do I need for my Motorola Moto G5 Plus Smartphone?
Make sure you use the correct size SIM card. Depending on the model of smartphone, there are three sizes of SIM card that can potentially be used in a phone: Standard SIM, Micro SIM and Nano SIM. The three SIM card types work in exactly the same way from a technical perspective. They just differ in the amount of plastic housing that surrounds the metallic chip. The Combi SIM is a Micro SIM card within a Standard SIM-sized unit, so if you need the smaller size of card you simply break the additional plastic away from around the Micro SIM card. This type of card allows networks to cater for more phone users with a single card. A Trio SIM is a Standard, a Micro and a Nano in one. Most of the pay-as-you-go SIM cards you buy from convenience stores operate under this format as they’re more useful to more users.

If your SIM card is too big for your phone’s SIM card slot, a bit of DIY can come to the rescue. While you need to be very careful, you can turn a Standard SIM into a Micro or Nano SIM simply by trimming it. This can save you getting a new SIM when you upgrade phones to a model which uses a different card standard. There are a host of tutorials you can follow online and on YouTube, but do so at your own risk – if you damage the chip, the SIM won’t work at all. Motorola does NOT recommend cutting the card.

The Motorola Moto G5 Plus only accepts Nano-SIM Cards!

There is a single-SIM and dual-SIM version of the Motorola Moto G5 Plus. The US version of the Moto G5 Plus is Single-SIM only and does NOT support Dual-SIM.

Insert a SIM Card and memory card
1. Turn off the power so that you won’t lose any stored information. If the device is on, press and hold the Power button. Tap Power off to turn off the phone.

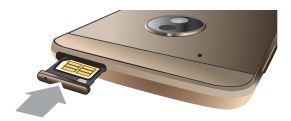
2. With the phone facing down, insert the SIM tool into the tray hole to pop out the tray. Some force may be needed. Just push the tool inward. By pushing the SIM tool inward the tray is unlocked and pops out.

3. Pull the tray out and away from the device. Do so gently, since both the SIM card and its tray are fragile.

A. Singe-SIM (US) Version
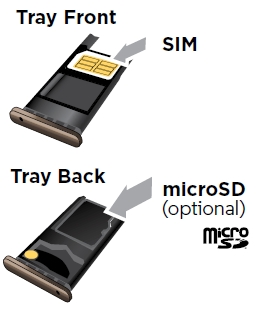
4. Put in the SIM card with the gold contacts facing UP. Because of the indentation on the card, you should only be able to place the card in the tray in one way. Push down on the card down until it’s fixed in the plastic of the tray.
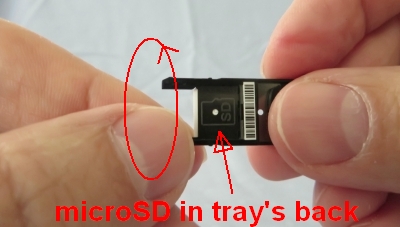
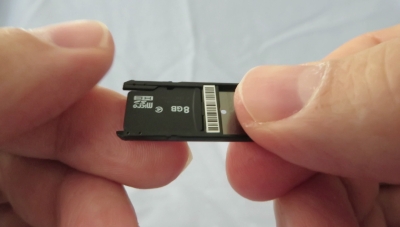
5. Turn the tray and put in an optional microSD card in the tray’s back (marked with SD) with the contacts facing DOWN. Push down on the card it’s fixed in the plastic of the tray.

B. Dual-SIM Version
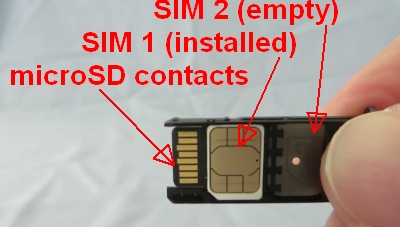
4. Put in the SIM card with the gold contacts facing UP in the LEFT side of the tray marked with SIM. Because of the indentation on the cards, you should only be able to place the cards in the tray in one way. Push down on the card until it’s fixed in the plastic of the tray.

4b. Put in an optional second SIM card with the gold contacts facing UP in the RIGHT side of the tray marked with SIM2. Because of the indentation on the cards, you should only be able to place the cards in the tray in one way. Push down on the card with with your thumb until it’s fixed in the plastic of the tray.
5. Turn the tray around and put in an optional microSD card in the tray’s back (marked with SD) with the contacts facing DOWN. Push down on the card until it’s fixed in the plastic of the tray.

6. Push the tray back into your phone. The SIM card is at the back, the microSD card is on top.

7. Press and hold the Power button. Doing so will turn your Moto back on.
8. Check if your microSD card is recognized by the device. The name of your card should be visible in the Storage section of the Options menu. It’s displayed at the bottom under Portable storage.

9. Check if your SIM card is recognized by the device. The name of your carrier should be visible in the SIM cards section of the Options menu.

Remove a SIM Card or Memory Card from your Motorola Moto G5 Plus
1. Before removing the microSD card, first unmount (eject) it for safe removal. This will tell the phone to stop communicating or transferring information from the memory card to the device, or vise versa from the phone to the memory card, and allow you to remove your memory card safely. Go to Settings > tap Storage. Scroll down to Portable storage and tap the Eject button. The eject button is the little triangle at the right of the name of your microSD card.

2. Turn off the power so that you won’t lose any stored information. If the device is on, press and hold the Power button. Tap Power off to turn off the phone.

If you do not unmount your SD card or power off the phone before removing your memory card then you can corrupt any files that might have been transferring when you removed the card and run the risk of damaging the memory card.

3. With the phone facing down, insert the SIM tool into the tray hole to pop out the tray. Some force may be needed. Just push the tool inward. By pushing the SIM tool inward the tray is unlocked and pops out.

4. Pull the tray out and away from the device. Do so gently, since both the SIM card and its tray are fragile.

5. Remove the SIM card or memory card from the tray. Make sure to store it safely as it’s small and easy to lose.
How to Remove a Memory Card from your Medion AKOYA S2217 Laptop – Tutorial

The Medion AKOYA S2217 is a great social-TV laptop for the sofa, an excellent holiday laptop and could even serve as a kids homework PC although please note that there’s no free Office 365 license included. The base model however only has 32 GB of internal storage, which makes it a poor choice for storing multimedia files, such as music, videos and pictures. There’s also a 64 GB version of the same model available. Windows 10 (32-bit) uses at least 16 GB of the SSD. We recommend storing multimedia files on an external memory card in your device to free up your device’s internal memory for applications. Plus, if you buy a new laptop, you can simply put your external memory card in your new device and all your private data is back immediately.

Which Memory Card do I need for my Medion AKOYA S2217 Laptop laptop?

Make sure you purchase the right memory card for your laptop. While many laptops have an SD card reader, the Medion AKOYA S2217 is a small 11.6 inch laptop which comes with a microSDHC card reader/writer. A microSD card or microSDHC (High-Capacity) memory card is the same type of card usually used for smartphones. Many micro SD Cards come with an SD card adapter for compatibility with SD-enabled devices, such as cameras, camcorders and computers. Memory cards usually come pre-formatted and do not need to be formatted out of the box. The slot is at the outside of the device, at the left side (near the Caps Lock key).

Make also sure you purchase a fast memory card. The SD Association defines standard speed classes indicating minimum performance to record video. The class indicates the minimum writing speed: Class 2 = 2 MB/s, Class 4 = 4 MB/s, Class 6 = 6 MB/s, Class 10 = 10 MB/s. A fast Class 10 card is recommended. A class 10 card will play video files on the Medion AKOYA S2217 fine. SDHC cards are usually shipped preformatted with the FAT file system and will work out of the box.

Popular memory cards for this laptop include, but are not limited to: SanDisk Ultra 32GB microSDHC UHS-I Card with Adapter, Grey/Red, Standard Packaging and Samsung EVO 32GB Class 10 Micro SDHC Card with Adapter.

Remove a Memory Card

1. Before removing a memory card, first eject it for safe removal.
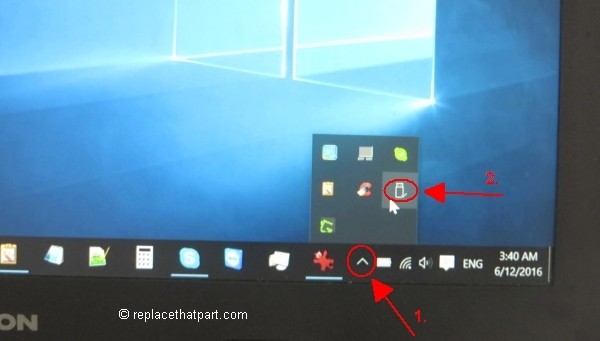
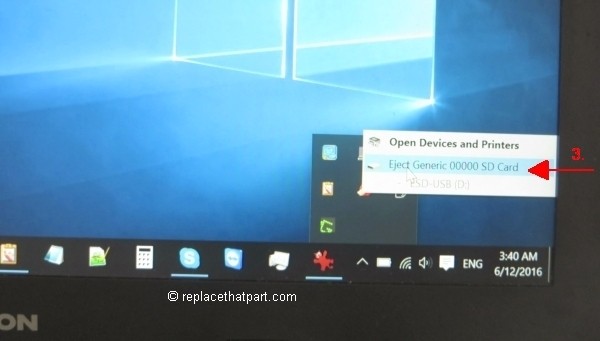
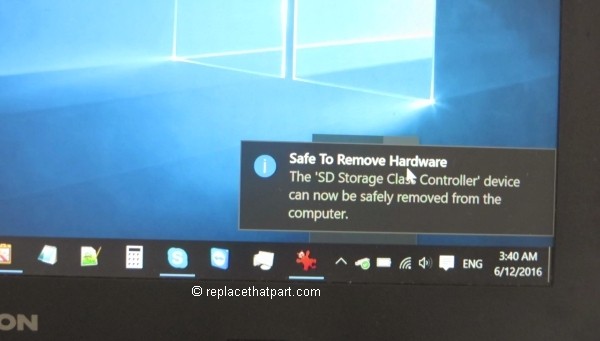
You should be able to eject external devices from the arrow in the taskbar on the right side of the screen. Ejecting the memory card before removing it, is strongly recommended. It’s to ensure that nothing is being written to the memory card. Remove a card without first stopping it can result in data corruption. Even if the card reader doesn’t appear to be in-use, it may still be in-use. A program in the background or a cache may be writing to the drive. To eject your memory card from your Medion AKOYA S2217 Laptop:
– Click on the upwards arrow left from the battery icon.
– Click on the black USB flash drive icon.
– Click Eject Generic 00000 SD Card or something similar.
remove a memory card from your medion akoya s2217 laptop_01

remove a memory card from your medion akoya s2217 laptop_02

remove a memory card from your medion akoya s2217 laptop_03

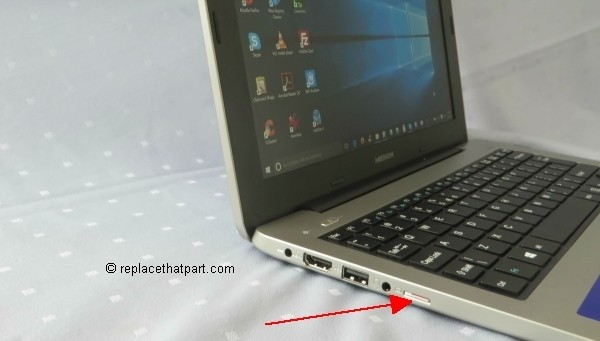
2. Locate the memory card slot. It’s at the outside of the device, at the left side (near the Caps Lock key).
remove a memory card from your medion akoya s2217 laptop_04

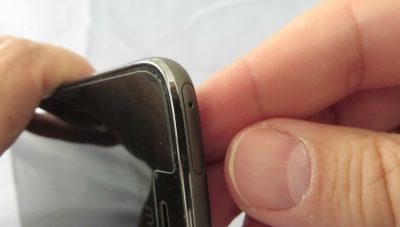
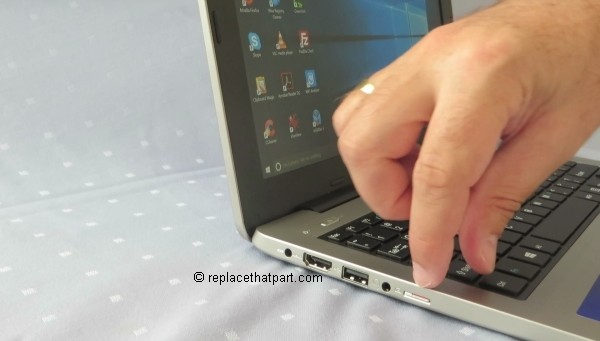
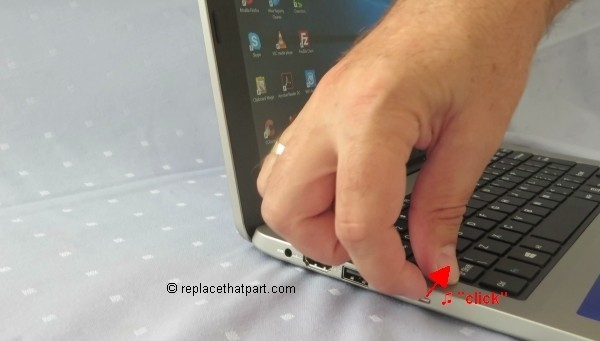
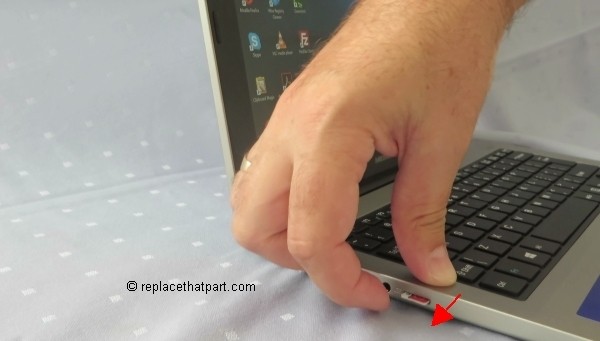
3. Use your finger and fingernail to push the microSD card into the socket to release the safety catch. Push it in as far as it will go. You hear a slight “click“, which means the card is in its unlocked position.
remove a memory card from your medion akoya s2217 laptop_05

remove a memory card from your medion akoya s2217 laptop_06

remove a memory card from your medion akoya s2217 laptop_07

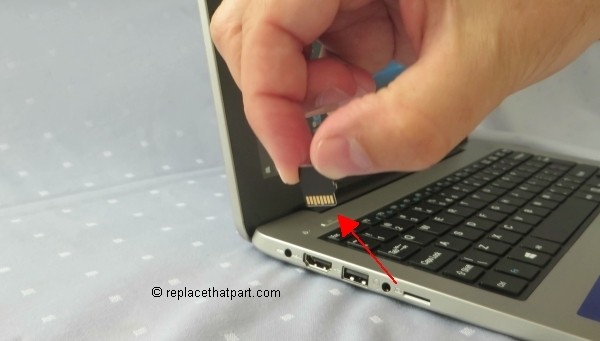
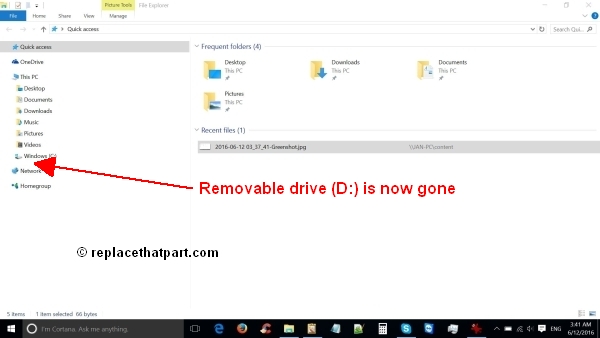
4. Pull the memory card out of the memory card slot. You removable drive (D:) is now gone.
remove a memory card from your medion akoya s2217 laptop_08

remove a memory card from your medion akoya s2217 laptop_09