How to Replace an Empty Film Cartridge in a Fujifilm INSTAX® Mini 11 Instant Camera – Tutorial

Fujifilm INSTAX® Mini 11
The Fujifilm INSTAX Mini 11 is one of the most popular cameras for instant photography. An instant camera is a camera which uses self-developing film to create a chemically developed print shortly after taking the picture. The Fujifilm INSTAX Mini 11 is available in several cool and modern colors. The Mini 11 is pleasing to look at, and is straightforward to use. The camera is loaded with ready-to-use pre-loaded plastic film cartridges (not included), enough for 10 pictures per cartridge.

The Fujifilm INSTAX Mini 11 is the successor to the Fujifilm INSTAX Mini 9. The Mini 11 has a a more compact design, is now fully automatic and takes better photos. A new selfie mode is an other major advantage of Mini 11. Just pull out the lens a little further and use the little selfie mirror on the front of the camera.

At the touch of a button, you get printed photos with roughly the size of a credit card. This model is perfect for parties, festivals or a day out. It’s a perfect fun camera. Don’t just take pictures, but give them away immediately. They will develop automatically within minutes! The Fujifilm INSTAX Mini 11 is also easy to use for children, making it a great birthday or Christmas gift. Your children will love getting one, for sure.

Check te price of the Fujifilm INSTAX Mini 11 at Amazon.com .
Check te price of the Fujifilm INSTAX Mini 11 at Bol.com .

Fujifilm Instant INSTAX® MINI Film
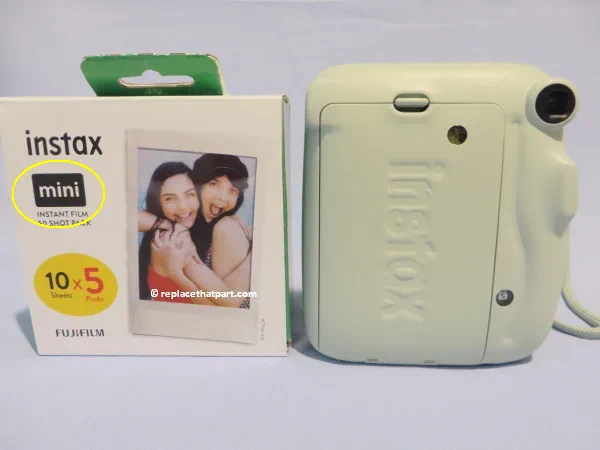
Note: the camera does not come with film cartridges in it’s box, you have to order these separately. For this camera, you need Fujifilm Instant INSTAX MINI Film. One film cartridge is enough for ten pictures. Cartridges are sold in boxes of 2 or 5 cartridges.

The Fujifilm Mini 11 camera only accepts MINI Film. The Fujifilm INSTAX WIDE and INSTAX SQUARE film are meant for different camera and printer models. Besides the standard white film, many other types of film and paper designs are available, like Stone Gray, Spray Art, Blue Marble, Macaron, Rainbow, Candy Pop, Monochrome, Black Border, Confetti, Sky Blue, Pink Lemonade, and Mermaid Tail.
replace an empty film cartridge in a fujifilm instax mini 11 tutorial 01

Check the price of a convenient Box of 5 INSTAX Mini Film Cartridges
(50 exposures) (Amazon's choice).
Check te price of a convenient Box of 5 INSTAX Mini Film Cartridges
(50 exposures) at Bol.com .

How do I replace an empty Fujifilm Instant INSTAX® Mini 11 film cartridge?

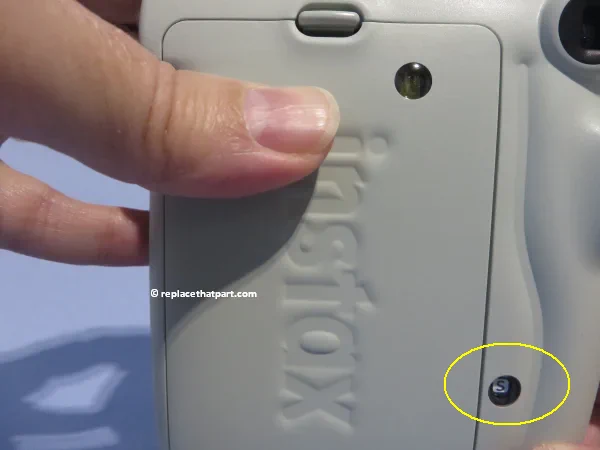
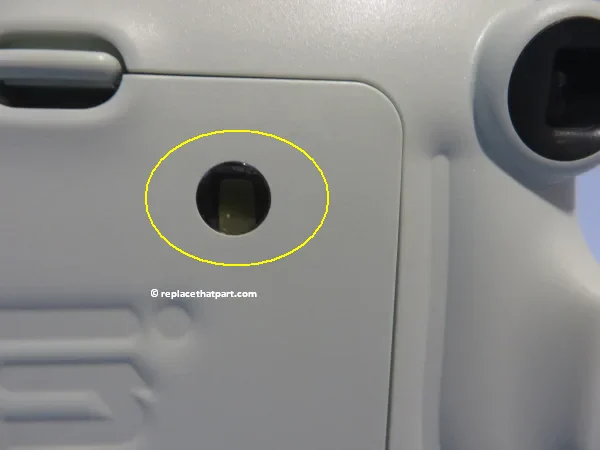
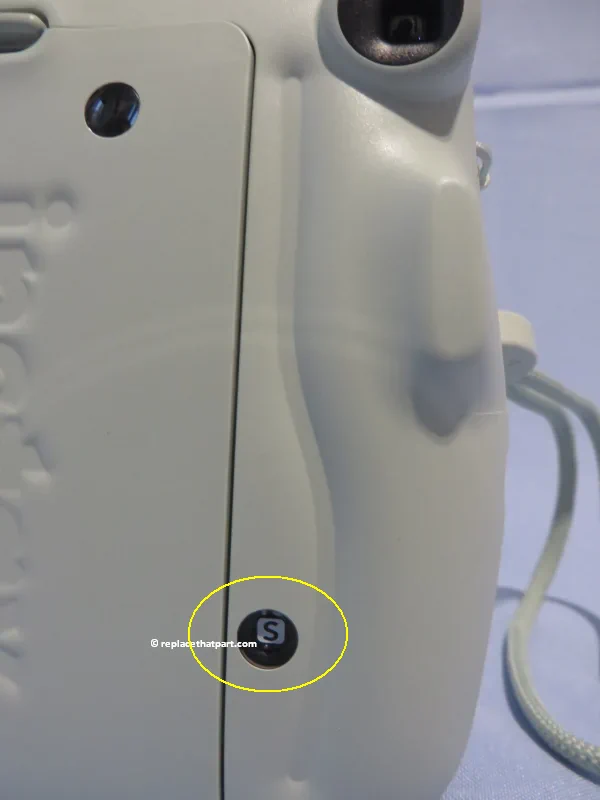
1. Make 100% sure there isn’t any unused film currently in the camera. Otherwise, you might exposure the film and probably ruin it. You can check this by looking at the small window to the left of the viewfinder. If it is yellow, then there is an empty or full plastic film cartridge inside your camera. Make sure the film counter on the bottom right of the camera displays an ‘S‘, after taking the last picture (1), which means all the film has been used and the empty cartridge should be replaced with a new one. Never open the back cover, when there are unused pictures left in the camera.
replace an empty film cartridge in a fujifilm instax mini 11 tutorial 02

replace an empty film cartridge in a fujifilm instax mini 11 tutorial 03

2. Make sure the 2 AA-size alkaline batteries (penlite) are installed into the battery compartment. Once installed the batteries will usually have enough power to be used for approximately 10 INSTAX Mini film packs (100 exposures). The batteries are placed in a dedicated battery compartment. This means you can replace the batteries, while there’s still film in the Fujifilm INSTAX Mini 11. When you replace the batteries, always keep the camera OFF.

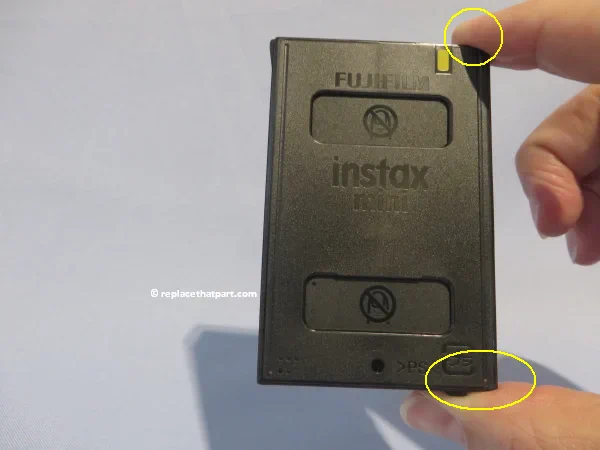
3. Remove the new cartridge from its packaging. Open the protective foil of the film package and take the cartridge out. Do this gently. Avoid bending the cartridge or put pressure on it. Do not try to open the plastic cartridge, it should be installed into the camera complete and unopened. Once out of the protective foil, hold the cartridge by it’s sides.
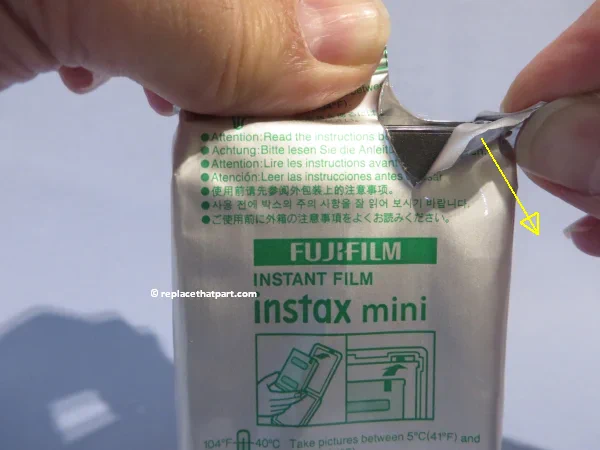
replace an empty film cartridge in a fujifilm instax mini 11 tutorial 04

replace an empty film cartridge in a fujifilm instax mini 11 tutorial 05

4. The camera should still be OFF. On the back of the Mini 11, you will see a small latch to open the film compartment. Open the film door of the camera by pulling the latch on the film door to the right and pulling the film door away from the camera. Be careful to hold the film camera by the body and not the film door as it could break.
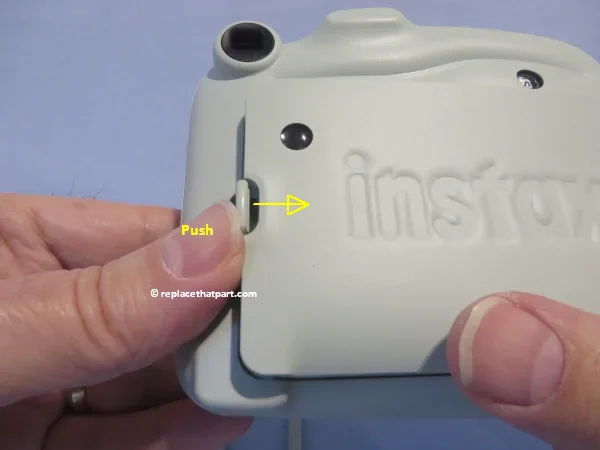
replace an empty film cartridge in a fujifilm instax mini 11 tutorial 06

replace an empty film cartridge in a fujifilm instax mini 11 tutorial 07

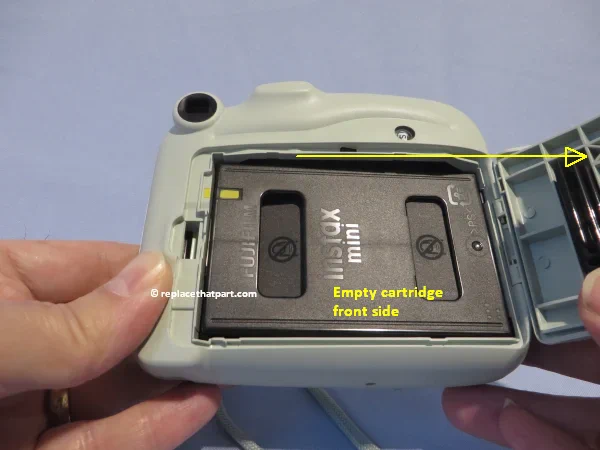
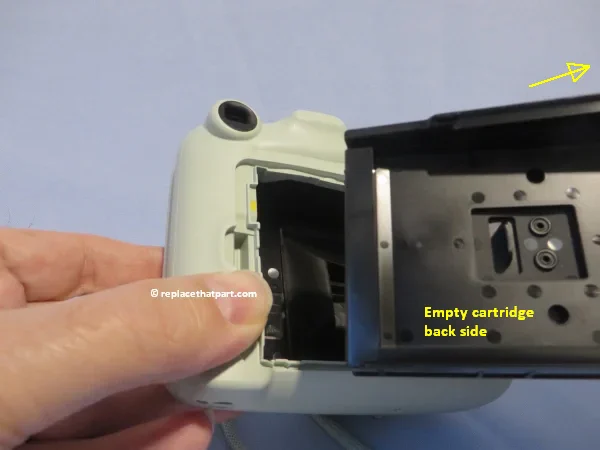
5. Remove the empty plastic film cartridge from the device by lifting it out of the cartridge compartment and discard the remnants in the trash.
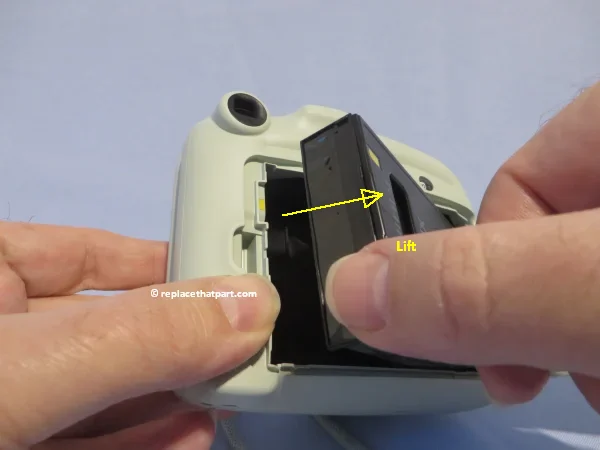
replace an empty film cartridge in a fujifilm instax mini 11 tutorial 08

replace an empty film cartridge in a fujifilm instax mini 11 tutorial 09

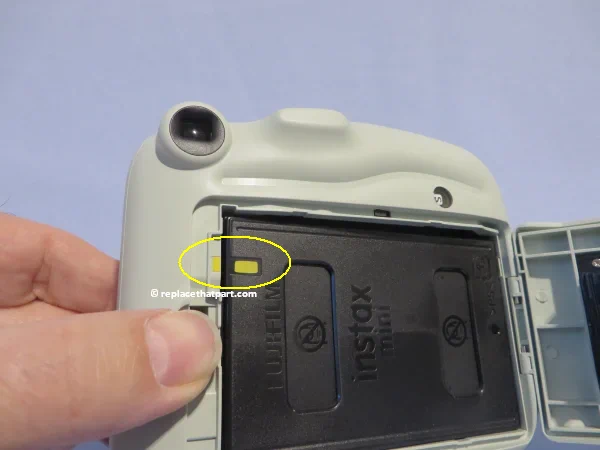
6. Align the new cartridge correctly. Place your new plastic film cartridge with the yellow mark on the film pack lined up to the yellow mark on the inside of the camera.
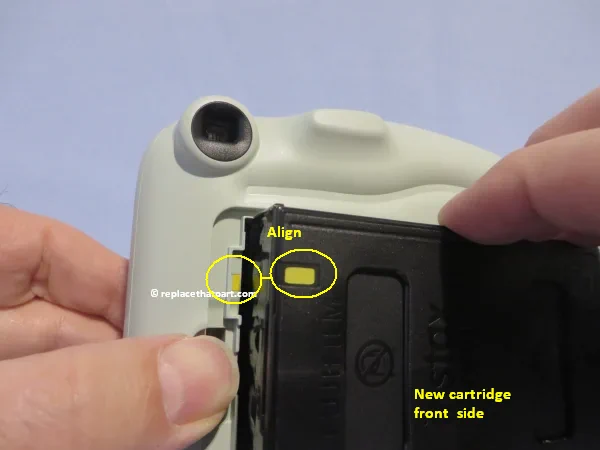
replace an empty film cartridge in a fujifilm instax mini 11 tutorial 10

replace an empty film cartridge in a fujifilm instax mini 11 tutorial 11

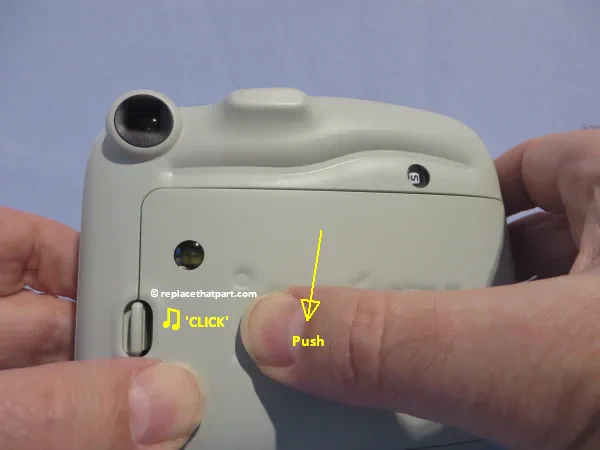
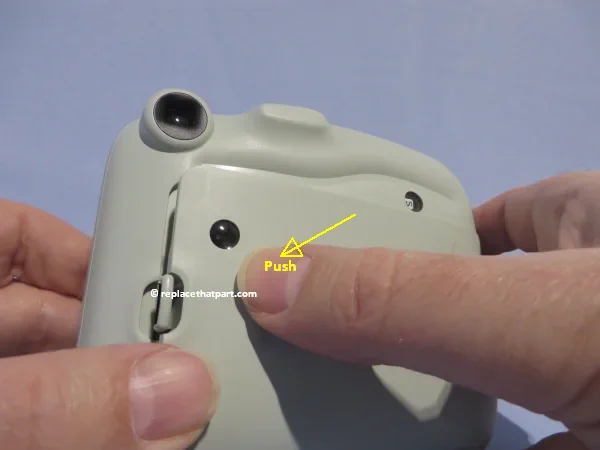
7. Close the film door (back cover) by pushing it down until you hear a click. The back cover is now locked.
replace an empty film cartridge in a fujifilm instax mini 11 tutorial 12

replace an empty film cartridge in a fujifilm instax mini 11 tutorial 13

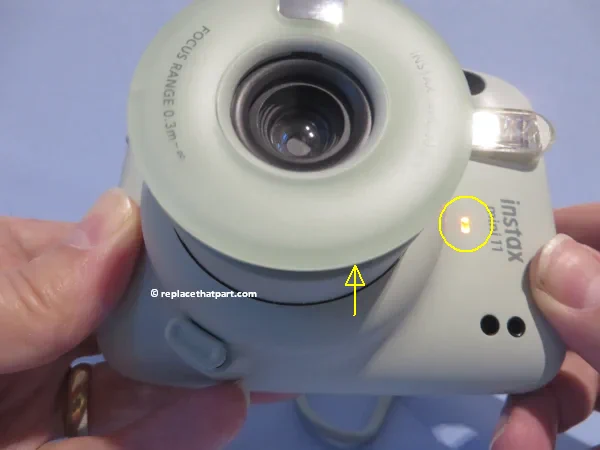
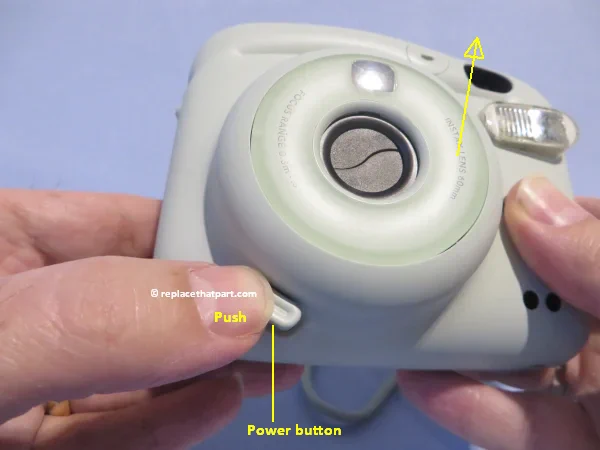
8. Press the large power button near the lens to turn the camera ON. The lens barrel extends and the orange LED on the camera lights up. At this point, the film counter at the backside still displays an ‘S’.
replace an empty film cartridge in a fujifilm instax mini 11 tutorial 14

replace an empty film cartridge in a fujifilm instax mini 11 tutorial 15

replace an empty film cartridge in a fujifilm instax mini 11 tutorial 16

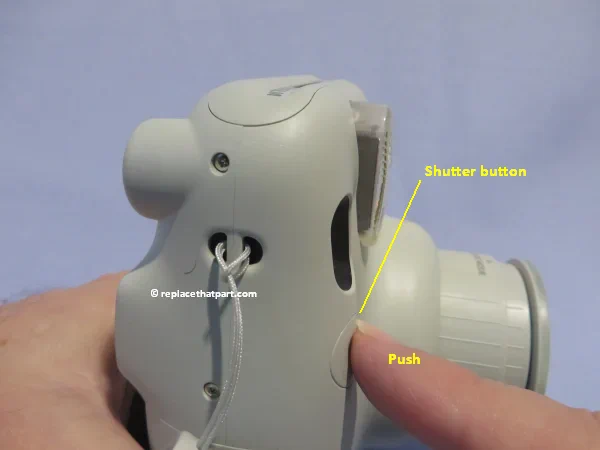
9. Press the shutter button once. By doing this, you do NOT yet take the first picture. The first time the shutter button is used after installing a new film cartridge, it will only eject the black protective covering (darkslide) that protects your film from light while loading it into your camera. It will slowly be pushed out from the film ejection slot.
replace an empty film cartridge in a fujifilm instax mini 11 tutorial 17

replace an empty film cartridge in a fujifilm instax mini 11 tutorial 18

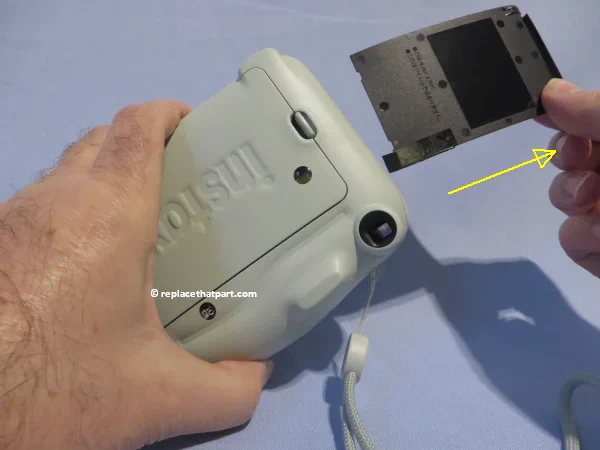
10. Remove the plastic protective cartridge cover (darkslide), once it’s fully pushed out of the film ejection slot and discard the cover in the trash.
replace an empty film cartridge in a fujifilm instax mini 11 tutorial 19

11. Now the Fujifilm INSTAX Mini 11 has been reloaded, check if the film counter on the bottom right of the camera indicates ten (10) again.
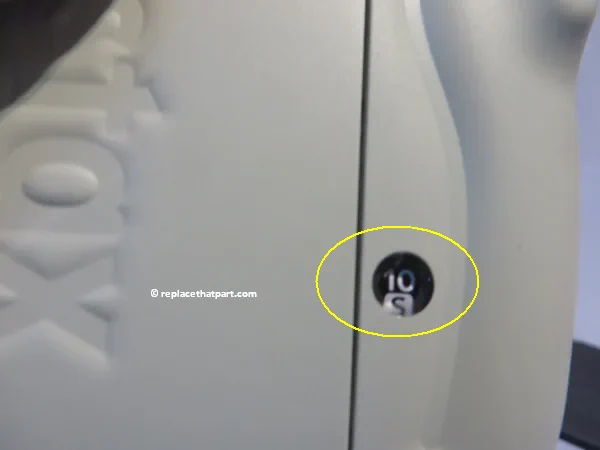
replace an empty film cartridge in a fujifilm instax mini 11 tutorial 20

Your camera is ready for use again and you can take an other series of ten pictures. Have fun!
How to Replace an Empty Ink Cartridge in the HP Deskjet 2723e All-in-One Printer – an Illustrated Tutorial in 10 Steps

Check the price of the HP Deskjet 3772e at Amazon.com .


Make sure you purchase the right ink cartridges for your specific printer and printer region or have your old ones refilled. Cartridges are not compatible between different brands, and often not within the same brand. HP often designs its inkjet hardware to use country-specific consumables. When you unbox a new HP inkjet printer and set it up, you install a set of ink tanks that ship with the printer. As you turn on the device and get ready to use it, an initialization sequence localizes it to the country associated with the ink cartridges you installed. HP recommends that you use original HP ink cartridges.

XL (Extra Large) cartridges cost more but do provide better value in the long run. They will be able to print almost 2 times as many pages as a regular cartridge. Our advice is that if you print often, go with XL. However, ink can dry up. So if you are not a frequent printer, go with the regular cartridges.

You can check the estimated ink levels from the printer software, printer control panel or HP Smart.

To check the ink levels from the printer control panel
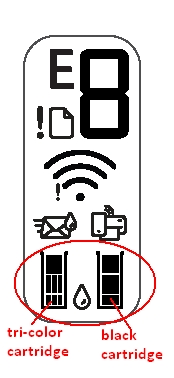
The ink level icons on the printer display show an estimate of ink remaining in the cartridges. The left ink icon shows the estimated ink level of the tri-color cartridge, and the right icon shows the estimated ink level of the black cartridge.
hp deskjet 2723e replace the ink cartridges 01

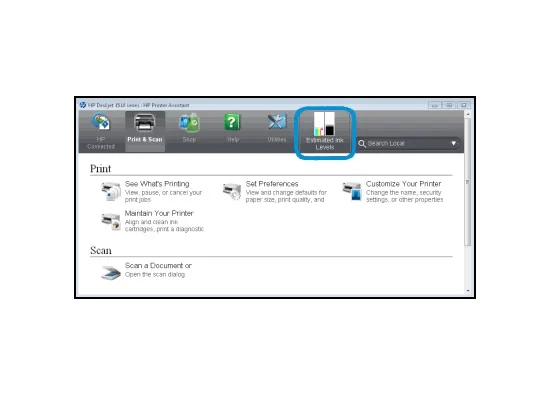
To check the ink levels from the HP printer software (Windows)
Open the HP printer software.
– In the printer software, click the Estimated Levels tab.

To check the ink levels from the HP Smart app
Open HP Smart app. Check the estimated ink levels at the right side of the printer image.

Ink level warnings and indicators provide estimates for planning purposes only. When you receive a low-ink warning message, consider having a replacement cartridge available to avoid possible printing delays. You do not have to replace the cartridges until the print quality is unacceptable.

Use the single-cartridge mode to operate the HP All-in-One with only one print cartridge. The single-cartridge mode is initiated when a print cartridge is removed from the print cartridge carriage.

Which ink cartridges do I need for my HP Deskjet 2723e All-in-One Printer?

For your US HP DeskJet 2723e All-in-One Printer you need HP 67 Black AND HP 67 Tri-color cartridges OR the XL versions: HP 67XL Black AND HP 67XL Tri-color cartridges. Check the price of HP 67 cartridges at Amazon.com .

For your European or UK HP DeskJet 2723e All-in-One Printer you need HP 305 Black AND HP 305 Tri-color cartridges OR the XL versions: HP 305XL Black AND HP 305XL Tri-color cartridges.
Try Amazon's ink selector tool to find compatible ink cartridges for your printer.

Replace the ink cartridges

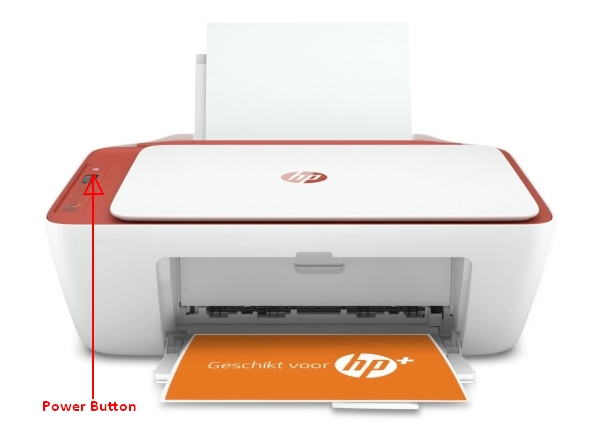
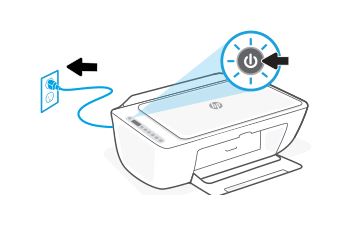
1. Press the Power button to turn on the printer, if it is not already turned on. Wait until the printer is idle and silent before continuing.
hp deskjet 2723e replace the ink cartridges 02

hp deskjet 2723e replace the ink cartridges 03

2. Load unused plain white Letter or A4-sized paper into the input tray.
hp deskjet 2723e replace the ink cartridges 04

Remove cartridge
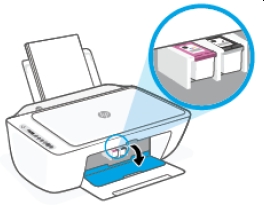
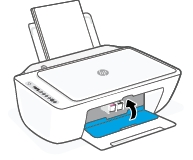
3. Reach inside the printer, grasp the handle, and then lower the ink cartridge access door. The carriage moves to the center of the printer. Wait until the printer is idle and silent before continuing.
hp deskjet 2723e replace the ink cartridges 05

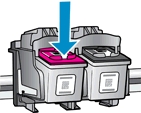
4. Lightly press down on the cartridge to release it, and then pull the cartridge out of its slot.
hp deskjet 2723e replace the ink cartridges 06

Insert the new cartridge
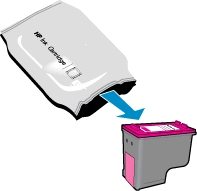
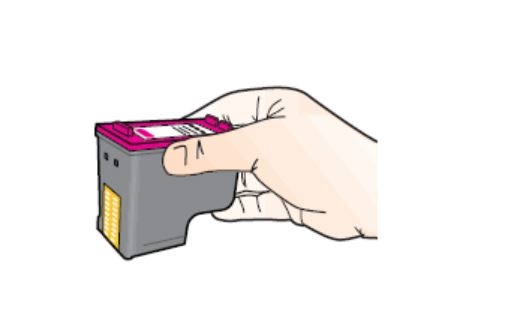
5. Remove the new cartridge from its packaging. Be careful to only touch the black plastic on the ink cartridge by holding the ink cartridge by its sides.
hp deskjet 2723e replace the ink cartridges 07

hp deskjet 2723e replace the ink cartridges 08

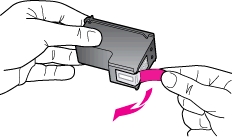
6. Pull the coloured tab to remove the plastic tape.
hp deskjet 2723e replace the ink cartridges 09


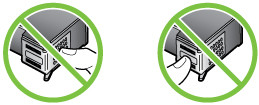
Do NOT:
– Remove the copper electrical strip.
– Touch the copper-colored contacts or the ink nozzles.
– Replace the protective tape on the contacts.
do not touch contacts

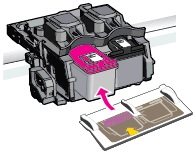
7. Hold the cartridge by its sides with the nozzles toward the printer, and then insert the cartridge into its slot at a slight upward angle. Make sure that the icon on the cartridge matches the icon on the slot. The tri-color cartridge goes in the slot on the left, and the black cartridge goes in the slot on the right.
hp deskjet 2723e replace the ink cartridges 10

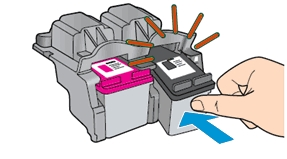
8. Push the cartridge forward until it snaps into place.
hp deskjet 2723e replace the ink cartridges 11

9. Repeat step 4 through 8 to replace the other cartridge, if necessary.
10. Close the cartridge access door.
hp deskjet 2723e replace the ink cartridges 12

Align the cartridges

To achieve the best print quality, it is always useful to align the ink cartridges. If an Alignment Page prints, follow the instructions on the page to align the cartridges and complete the installation.

You can always print the alignment page from the HP Smart app or from the printer software.

A. To print the alignment page from the printer software:

Open the printer software.
– In the printer software, click Print & Scan.
– Click Maintain Your Printer to access the printer toolbox.
– Click Align Cartridges on the Device Services tab.

The printer prints an alignment page.
hp deskjet 2723e replace the ink cartridges 13

– Follow the onscreen instructions to align the cartridges.
– Recycle or discard the cartridge alignment sheet later.

How to Replace the Battery of a Digital Refrigerator Thermometer – an Illustrated Tutorial in 8 Steps

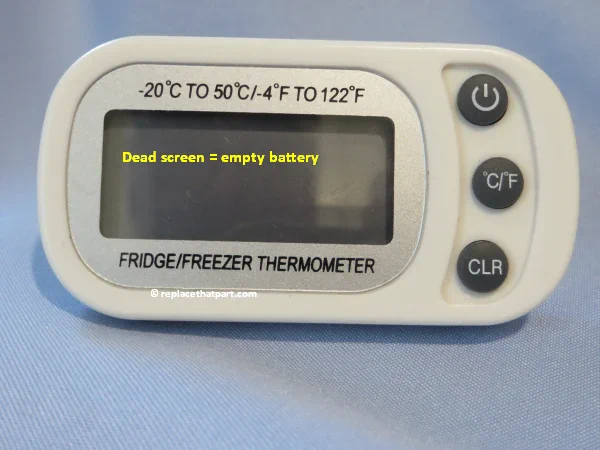
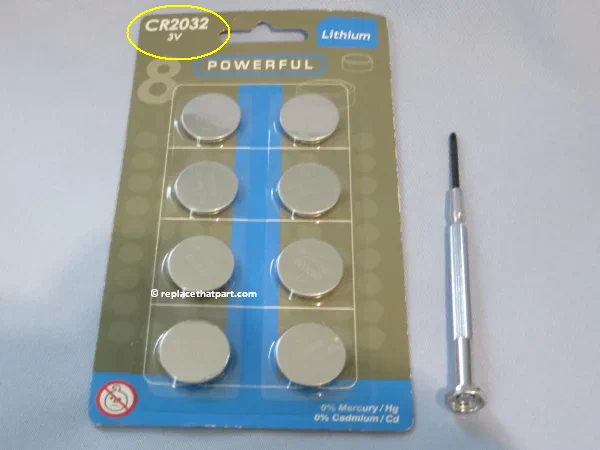
When you have placed a digital thermometer inside your refrigerator to monitor the temperature, you might notice that after many months of use, the LCD screen stops working. Fortunately, fixing this is usually easy, as this is often due to an empty battery. You just have to replace the empty battery and this does not require special skills. The only things you need is a small precision screwdriver and a new coin cell battery. Just follow the steps below.
how to replace the battery of a digital refrigerator thermometer 01

The thermometer we used for this manual is available on Amazon under the brand names AOUCE and Unigear.

Necessities

how to replace the battery of a digital refrigerator thermometer 02

Replacing the battery

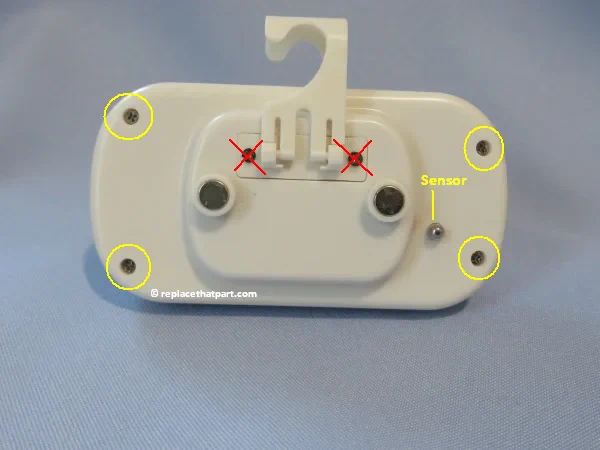
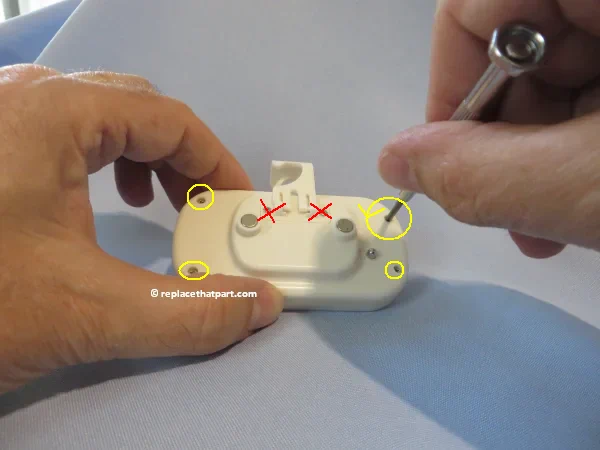
1. localize the 4 little Philips screws at the edges of the backside of the device.
how to replace the battery of a digital refrigerator thermometer 03

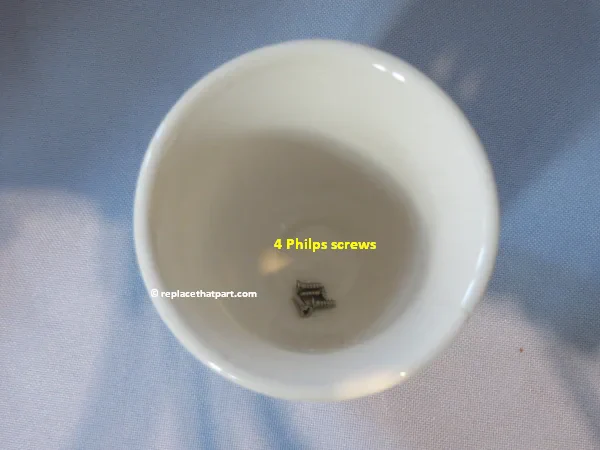
2. Remove the 4 screws one by one by turning the screwdriver counterclockwise. Set the little screws apart and make sure you won’t loose them by putting them in an egg cup or something.
how to replace the battery of a digital refrigerator thermometer 04

how to replace the battery of a digital refrigerator thermometer 05

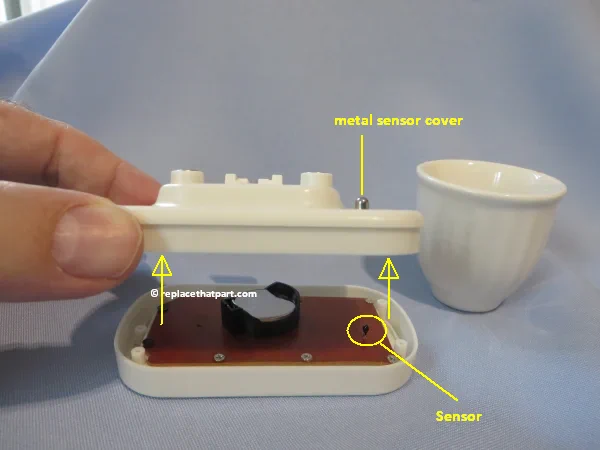
3. Gently remove the backside of the device by lifting it in an upward direction.
how to replace the battery of a digital refrigerator thermometer 06

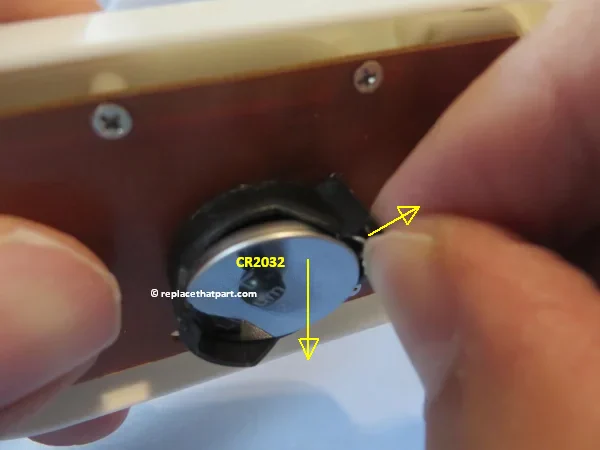
4. Use your finger nail to push the little metal tab at the right side of the battery compartment a little to the right. By doing this, the coin cell battery unlocks and can be removed from the battery compartment, using an other finger.
how to replace the battery of a digital refrigerator thermometer 07

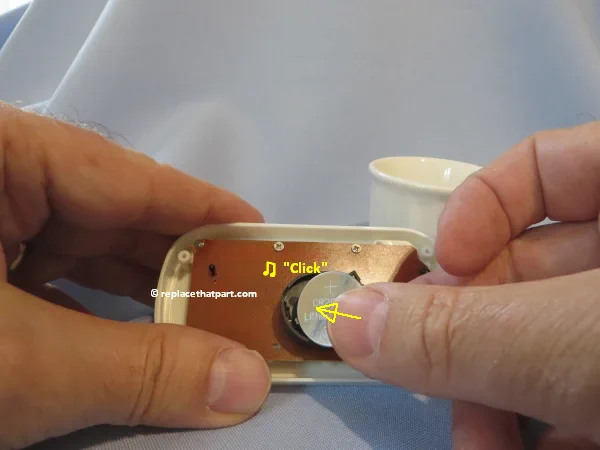
5. Take a new CR2032 battery from it’s packaging. The + plus side is on top. Now push the coin cell battery gently in the empty battery compartment until it clicks into place.
how to replace the battery of a digital refrigerator thermometer 08

6. Replace the back cover of the device.
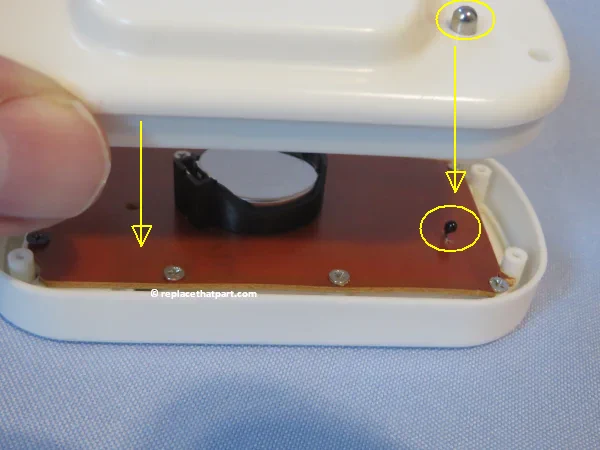
! Important: do this gently and make sure the little sensor on the circuit board exactly fits into the metal sensor-cover on the outside of the back cover. If you don’t do this gently and precisely, the sensor might bend or break.
how to replace the battery of a digital refrigerator thermometer 09

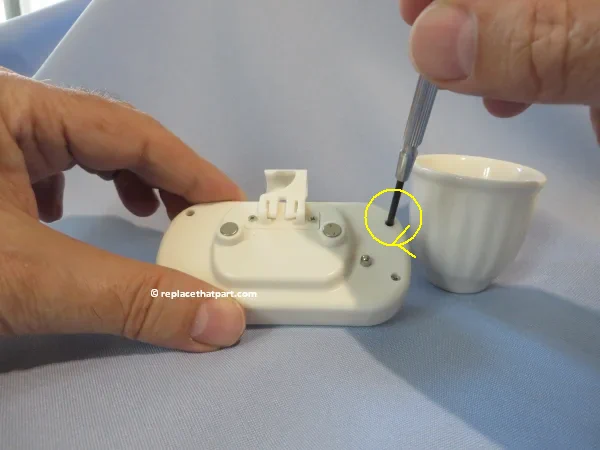
7. Replace the 4 screws one by one into the back by turning the screwdriver clockwise.
how to replace the battery of a digital refrigerator thermometer 10

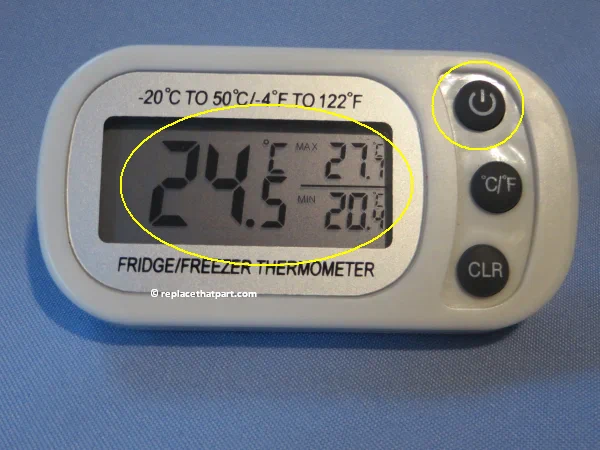
8. Now the LCD display should start to work again. This might take a while. If necessary, push the power button.
how to replace the battery of a digital refrigerator thermometer 11

Your digital refrigerator thermometer is ready for use again!

How to Replace an Empty Ink Cartridge in the HP ENVY Inspire 7955e All-in-One Printer – an Illustrated Tutorial in 11 Steps

Check the price of the HP ENVY Inspire 7955e at Amazon.com .


Make sure you purchase the right ink cartridges for your specific printer and printer region or have your old ones refilled. Cartridges are not compatible between different brands, and often not within the same brand. HP often designs its inkjet hardware to use country-specific consumables. When you unbox a new HP inkjet printer and set it up, you install a set of ink tanks that ship with the printer. As you turn on the device and get ready to use it, an initialization sequence localizes it to the country associated with the ink cartridges you installed. HP recommends that you use original HP ink cartridges.

XL (Extra Large) cartridges cost more but do provide better value in the long run. They will be able to print 3 times as many pages as a regular cartridge. Our advice is that if you print often, go with XL. However, ink can dry up. So if you are not a frequent printer, go with the regular cartridges.

You can check the estimated ink levels from the printer control panel, from the printer software or from the HP Smart app.
A. To check the estimated ink levels from the printer control panel:
– From the printer control panel, touch or swipe down the tab at the top of the screen to open the Dashboard
– Touch the Ink symbol to check the estimated ink levels.
hp envy inspire 7955e how to replace the ink cartridges 01

B. To check the ink levels from the printer software (Windows):
– Open the HP printer software.
– In the printer software, click Estimated Levels at the top of the window.
hp envy inspire 7955e how to replace the ink cartridges 02

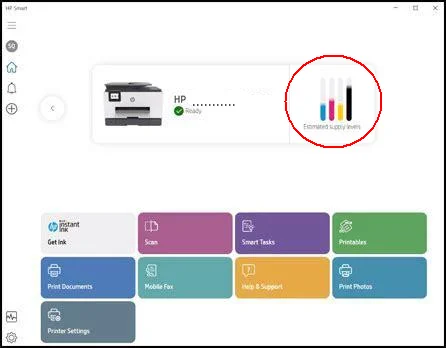
C. To check the ink levels from the HP Smart app:
Just view the estimated ink levels from the home screen.
hp envy inspire 7955e how to replace the ink cartridges 03

Ink level warnings and indicators provide estimates for planning purposes only. When you receive a low-ink warning message, consider having a replacement cartridge available to avoid possible printing delays. You do not have to replace the cartridges until the print quality is unacceptable.

Use the single-cartridge mode to operate the HP ENVY Inspire 7955e All-in-One printer with only one cartridge. The single-cartridge mode is initiated when an cartridge is removed from the cartridge carriage.

Which ink cartridges do I need for my HP ENVY Inspire 7955e All-in-One series Printer?

For your US HP ENVY Inspire 7955e All-in-One Printer you need HP 64 Black AND HP 64 Tri-color cartridges (OR the HP 64 XL versions). There are also combo packs available, like the HP 64 Black and Tri-Color Original Ink Cartridges, 2 Cartridges. Check the price of HP 64 cartridges at Amazon.com .
For your European or UK HP ENVY Inspire 7955e All-in-One Printer you need HP 303 Black AND HP 303 Tri-color cartridges (OR the HP 303 XL versions). There are also combo packs available, like the HP Z4B62EE 303 Photo Value Pack, Black and Tri-colour, Pack of 2.

Try Amazon's ink selector tool to find compatible ink cartridges for your printer.

Replace the ink cartridges

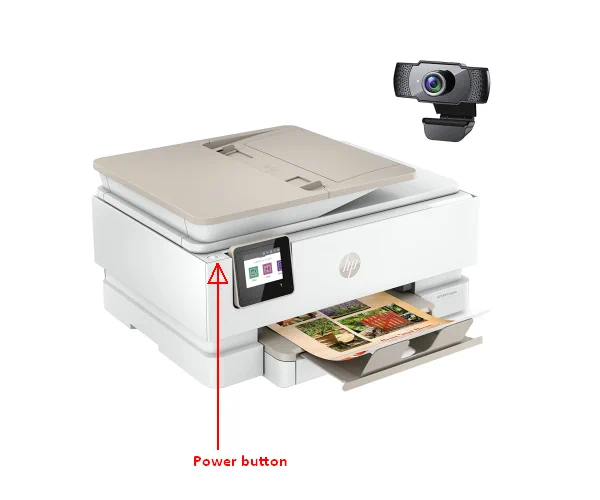
1. Press the Power button to turn on the printer, if it is not already turned on.
hp envy inspire 7955e how to replace the ink cartridges 04

2. Load unused plain white Letter or A4-sized paper into the main paper tray.
hp envy inspire 7955e how to replace the ink cartridges 05

Remove the empty cartridge
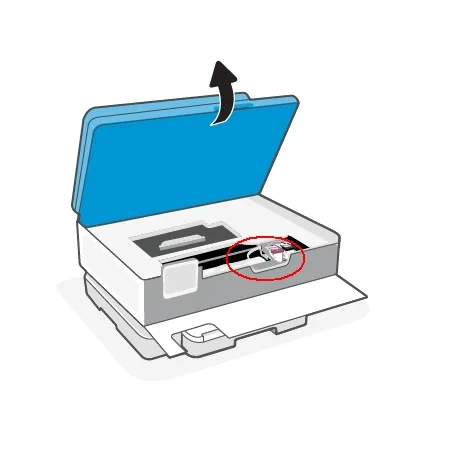
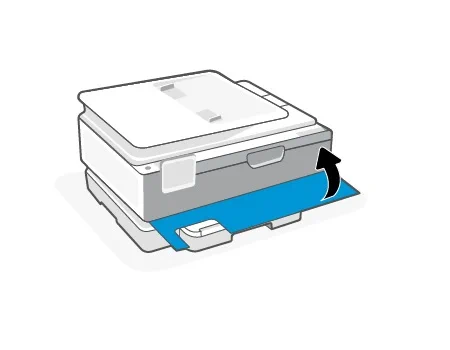
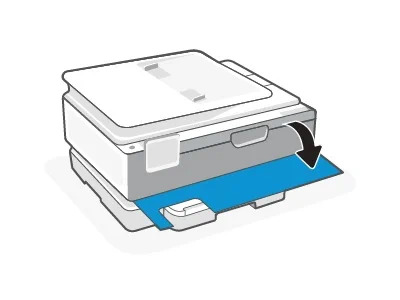
3. Open the front door as shown below.
hp envy inspire 7955e how to replace the ink cartridges 06

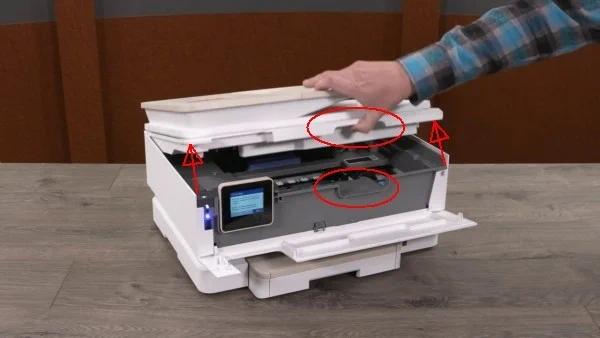
4. Open the cartridge access door by placing a thumb or two fingers under the small handle on the front of the cartridge access door and then lifting it up. Wait until the print cartridge cradle is idle and silent before you continue.
hp envy inspire 7955e how to replace the ink cartridges 07

hp envy inspire 7955e how to replace the ink cartridges 08

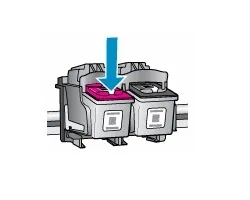
5. Lightly press down on the cartridge to release it, and then pull the cartridge toward you out of its slot. Set it aside for recycling.
– Remove the cartridge from the slot on the left to replace the tri-color cartridge.
– Remove the cartridge from the slot on the right to replace the black cartridge.
hp envy inspire 7955e how to replace the ink cartridges 09

Insert the new cartridge
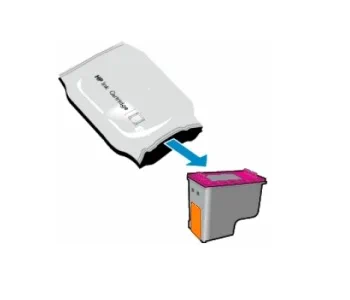
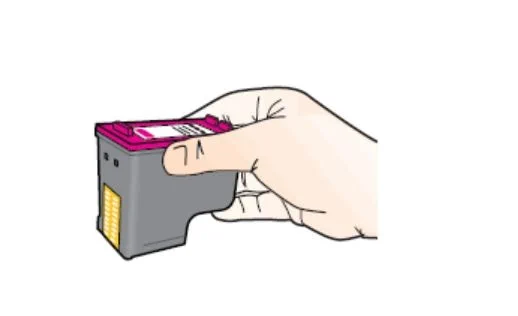
6. Remove the new cartridge from its package. Be careful to only touch the black plastic on the ink cartridge by holding the ink cartridge by its sides.
hp envy inspire 7955e how to replace the ink cartridges 10

hp envy inspire 7955e how to replace the ink cartridges 11

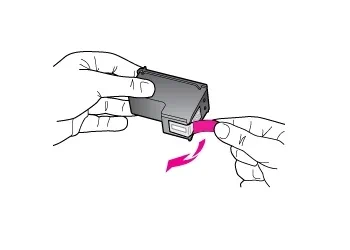
7. Pull the colored tab to remove the protective tape from the cartridge.
hp envy inspire 7955e how to replace the ink cartridges 12


Do NOT:
– Remove the copper electrical strip.
– Touch the copper-colored contacts or the ink nozzles.
– Replace the protective tape on the contacts.
do not touch contacts

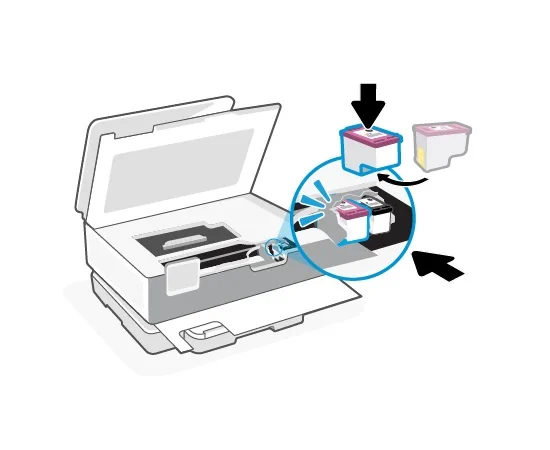
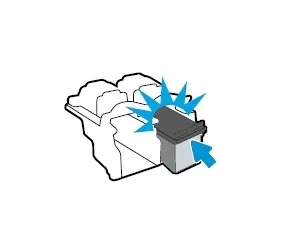
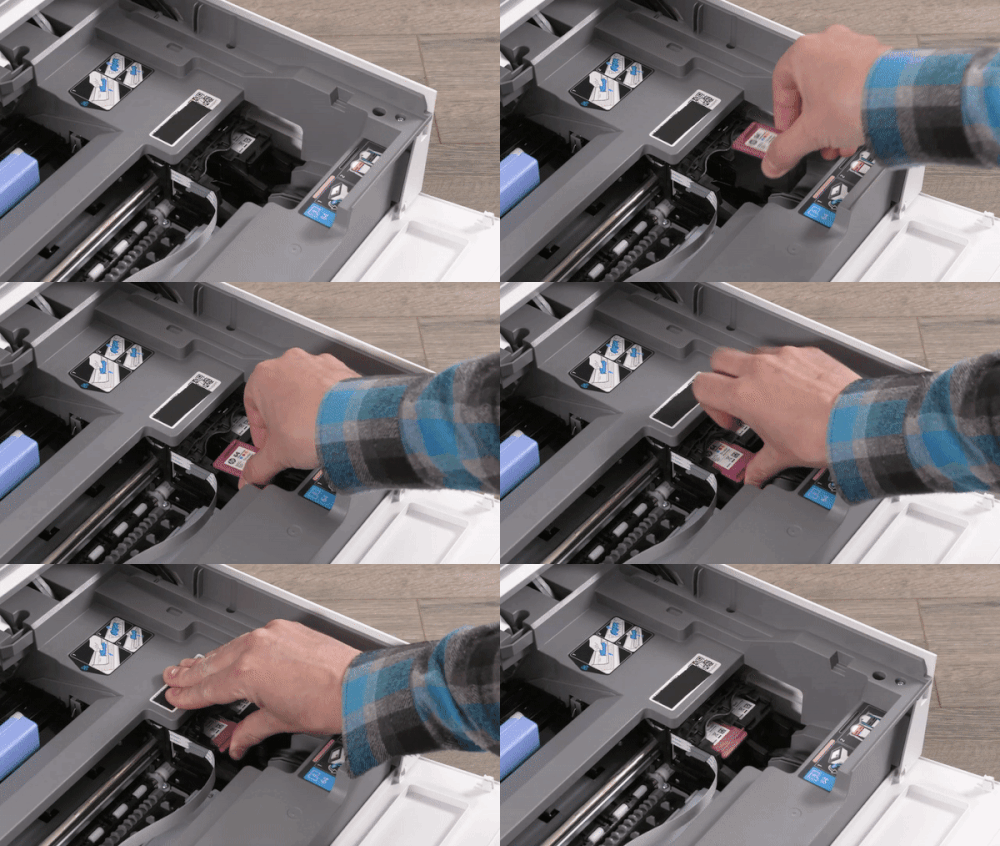
8. Hold the cartridge by its sides with the nozzles toward the printer, and then insert the cartridge into its slot at a slight upward angle. Make sure that the icon on the cartridge matches the icon on the slot.
– Insert the tri-color cartridge into the left slot.
– Insert the black cartridge into the right slot.
hp envy inspire 7955e how to replace the ink cartridges 13

hp envy inspire 7955e how to replace the ink cartridges 14

hp envy inspire 7955e how to replace the ink cartridges 15

9. Repeat steps 5 through 8 to replace the other cartridge, if necessary.

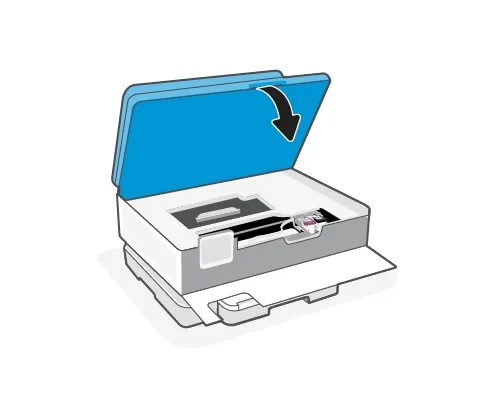
10. Close the cartridge access door. The printer starts an initialization process. It is normal for the printer to make noises during this process.
hp envy inspire 7955e how to replace the ink cartridges 16

11. Close the front door.
hp envy inspire 7955e how to replace the ink cartridges 17

Align the printhead only if necessary.
Clean the printhead if your printed output is streaked or has any incorrect or missing colors.

The printer automatically aligns the printhead during the initial setup. The printhead does not have to be realigned when cartridges are replaced. However, you might want to use this feature for print quality issues in printouts when the printer status page shows streaking or white lines through any of the blocks of color, or if you are having print quality issues with your printouts. Performing the cleaning and aligning procedures unnecessarily can waste ink and shorten the life of the cartridges.
From the printer control panel:
– Touch or swipe down the tab at the top of the screen to open the
Dashboard

– Touch Setup
– Touch Printer Maintenance
Select the desired option
– Follow the onscreen instructions