How to Replace an Empty Ink Cartridge in the HP Deskjet D4160 Printer series – an Illustrated Tutorial in 11 Steps

Make sure you purchase the right ink cartridges for your specific printer and printer region or have your old ones refilled. Cartridges are not compatible between different brands, and often not within the same brand. HP often designs its inkjet hardware to use country-specific consumables. When you unbox a new HP inkjet printer and set it up, you install a set of ink tanks that ship with the printer. As you turn on the device and get ready to use it, an initialization sequence localizes it to the country associated with the ink cartridges you installed.

HP recommends that you use original HP ink cartridges. XL (Extra Large) cartridges cost more but do provide better value in the long run. They will be able to print at least double the pages of a regular cartridge. However, (original) HP XL cartridges for the HP Deskjet D4160 Printer are NOT available in the US.

Three print cartridges can be used with the printer. For everyday printing: Use a black cartridge along with a tri-color cartridge. For printing quality color photos: Use a photo cartridge along with a tri-color cartridge. Always install the tri-color print cartridge in the left side of the print cartridge cradle. Install the black OR photo print cartridge in the right side of the print cartridge cradle.
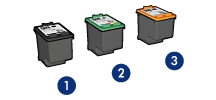
hp deskjet d4160_01
1 Black print cartridge
2 Tri-color print cartridge
3 Photo print cartridge

You can check the ink levels by using the software installed with the HP Deskjet. To check the ink levels:
– Open the printer Toolbox.
– Click the Estimated Ink Levels tab.

Ink level warnings and indicators provide estimates for planning purposes only. When you receive a low-ink warning message, consider having a replacement cartridge available to avoid possible printing delays. You do not have to replace the cartridges until the print quality is unacceptable. You’ll usually install both the black and tri-color cartridges in the Deskjet, but you can use the ink-backup mode to operate the HP Deskjet with only one print cartridge. The ink-backup mode is initiated when a print cartridge is removed from the print cartridge carriage. This printing mode lets you print with a single print cartridge, but it slows the product and affects the quality of printouts.

Which ink cartridges do I need for my HP Deskjet HP Deskjet D4160 Printer?

For your US HP Deskjet D4160 Printer you need
HP 98 Black AND HP 93 Tri-color cartridges.
For printing photos use HP 99 Photo Original cartridges.
For your European or UK HP Deskjet D4160 Printer you need HP 337 Black or HP 336 Black cartridges AND HP 343 Tri-color or HP 344 Tri-color cartridges.
For printing photos use HP 348 Photo cartridges.

Try Amazon's ink selector tool to find compatible ink cartridges for your printer.

Replace the ink cartridges

1. Press the Power button to turn on the printer, if it is not already turned on. It can take a few seconds for the printer to turn on after you press the Power button. Wait until the product is idle and silent before continuing.
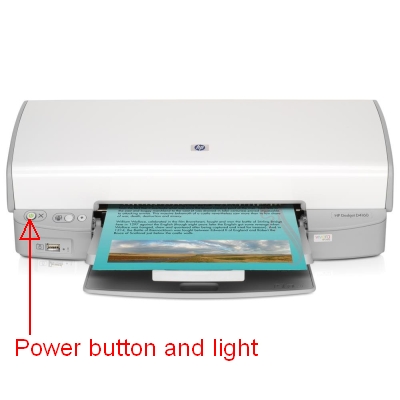
hp deskjet d4160_02

2. Load unused, plain white letter or A4-sized paper in the tray, if you have not already done so.

Remove the empty cartridge
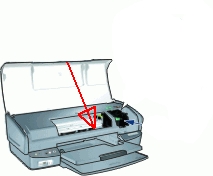
3. Open the printer cover. The carriage moves to the right side of the printer. Wait until the carriage is idle and silent before proceeding.
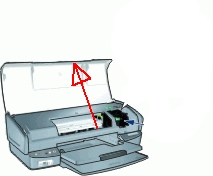
hp deskjet d4160_03

4. Press down on the cartridge to release it, and then pull it toward you out its slot. Remove the cartridge from the slot on the left to replace the tri-color cartridge. Remove the cartridge from the slot on the right to replace the black OR photo cartridge.
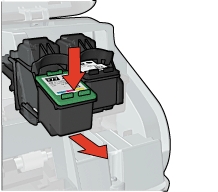
hp deskjet d4160_04

Insert the new cartridge
5. Remove the new cartridge from its packaging. Be careful to touch only the black plastic.
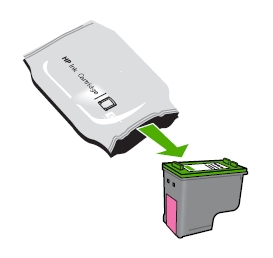
hp deskjet d4160_05


Do NOT:
– Remove the copper electrical strip.
– Touch the copper-colored contacts or the ink nozzles.
– Replace the protective tape on the contacts.
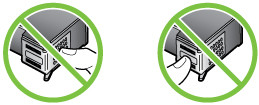
do not touch contacts

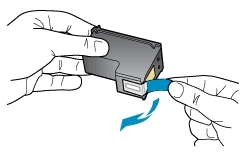
6. Gently remove the plastic tape on the cartridge by pulling the colored pull tab.
hp deskjet d4160_06

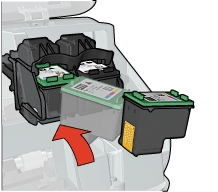
7. Hold the new cartridge by its sides. Hold the cartridge so that the copper strips are on the bottom and facing toward the printer. Slide the new print cartridge at a slight upward angle into the empty slot. Then gently push on the upper part of the print cartridge forward until it snaps into place. If you are installing the tri-color print cartridge, slide it into the left slot. If you are installing the black OR photo print cartridge, slide it into the right slot.
hp deskjet d4160_07

8. Repeat step 4 to 7 to replace the other cartridge, if needed.

9.Close the printer cover.
hp deskjet d4160_08

Align print cartridges
10. After installing a print cartridge, align the print cartridges to ensure the best print quality.
– Open the printer Toolbox.
– Click Align the Print Cartridges.
– Click Align, and then follow the onscreen instructions.
The HP Deskjet prints a test page, aligns the print cartridges, and calibrates the printer.
11. Recycle or discard the page.
How to Insert, Remove or Replace a Memory Card in your Samsung Galaxy Tab A 7.0 – Tutorial

Which Memory Card do I need for my Samsung Galaxy Tab A 7.0 tablet?

Make sure you purchase the right Memory Card for your tablet. Your Samsung Galaxy built-in memory is 8GB. Users who demand more memory from their tablet can install an external microSD or microSDHC (High-Capacity) memory card with a maximum capacity of 128 GB (according to Samsung). Do NOT buy an SD Card you need the MICRO version! A microSD card or microSDHC (High-Capacity) memory card is the same type of card usually used for smartphones. In the past the max. limit for microSDHC cards was often 32 GB. So for the best compatibility with other devices and to be safe, it might be wise to purchase a card with a maximum capacity of 32 GB. Many micro SD Cards come with an SD Card adapter for compatibility with SD-enabled devices, such as cameras, camcorders and (notebook) computers. Memory cards usually come pre-formatted and do not need to be formatted out of the box.

We recommend storing multimedia files (such as music, videos and pictures) on an external memory card in your device to free up your device’s internal memory for applications. Plus, if you buy a new tablet, you can simply put your external memory card in your new device and all your data is back immediately.

The SD Association defines standard speed classes indicating minimum performance to record video. The class indicates the minimum writing speed: Class 2 = 2 MB/s, Class 4 = 4 MB/s, Class 6 = 6 MB/s, Class 10 = 10 MB/s. A fast Class 10 card is the best option these days, especially for playing (HD) video.

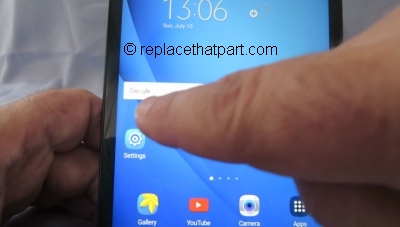
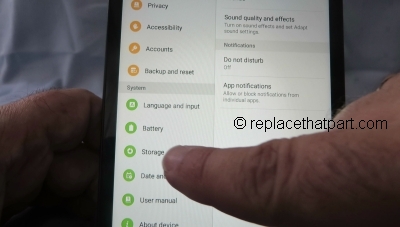
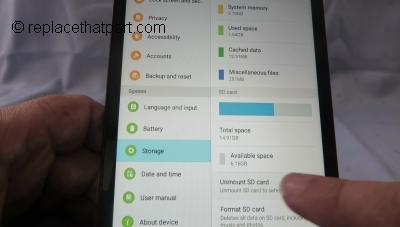
SDHC cards are shipped preformatted with the FAT file system. Your Samsung Galaxy Tab A 7.0 supports only the FAT file structure. If you insert a card formatted with a different file structure, your device will ask you to reformat the memory card. Formatting your memory card on a PC may cause incompatibilities with your device. Format the memory card only on the device. From a Home screen, tap Apps > Settings. Tap Storage > Format SD card and follow the prompts.

Popular memory cards for this tablet include, but are not limited to: Samsung EVO 32GB Class 10 Micro SDHC Card with Adapter (MB-MP32DA/AM) and SanDisk Ultra 16GB Ultra Micro SDHC UHS-I/Class 10 Card with Adapter.

A. Insert a Memory Card

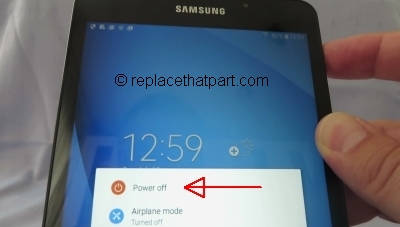
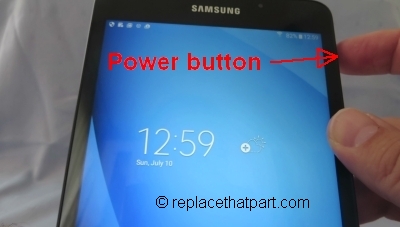
1. Turn off the power so that you won’t lose any stored information. If the device is on, press and hold the power button on the right side of the device and then tap Power off.
insert a memory card in your samsung galaxy tab a_01

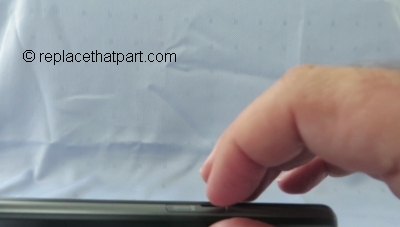
insert a memory card in your samsung galaxy tab a_02

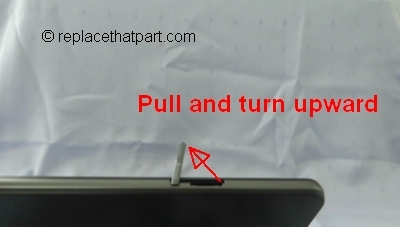
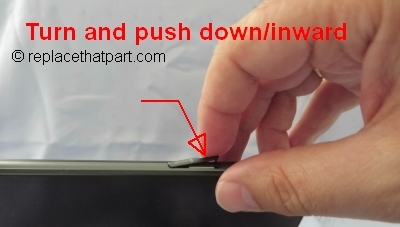
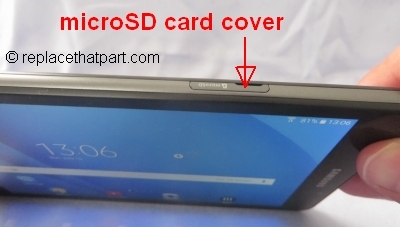
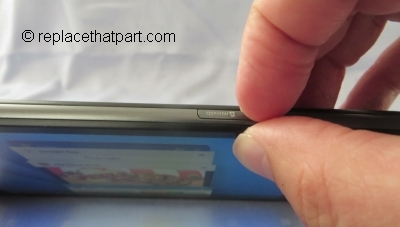
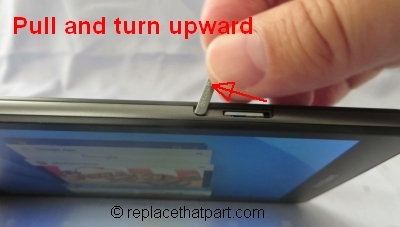
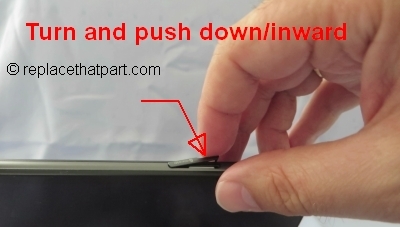
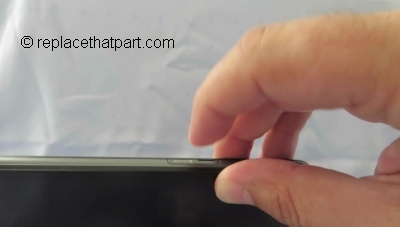
2. Locate and open the microSD card cover on the upper-left side of your device. Use your finger nail to gently pull the cover out and turn it upward.
insert a memory card in your samsung galaxy tab a_03

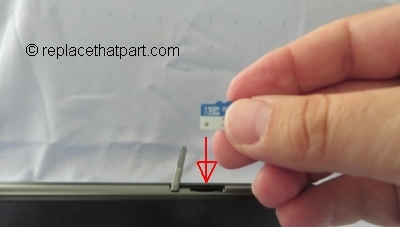
insert a memory card in your samsung galaxy tab a_04

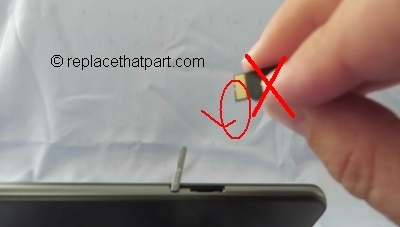
3. Insert a microSD card with the gold-coloured contacts facing downwards, label side up, and then push the memory card inward until it clicks and locks into place. The card is now in its locked position.
insert a memory card in your samsung galaxy tab a_05

insert a memory card in your samsung galaxy tab a_06

insert a memory card in your samsung galaxy tab a_07

Important: You can easily damage the memory card and card slot by improper operation. Please be careful when inserting, removing, or handling it. Do not over-insert the card as this can damage the contact pins.

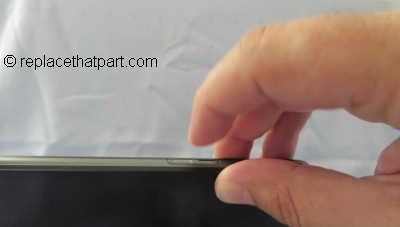
4. Close the microSD card cover.
insert a memory card in your samsung galaxy tab a_08

insert a memory card in your samsung galaxy tab a_09

5. Press and hold the power button to turn the device on. When you install a memory card, it is automatically mounted (connected to the device) and prepared for use.

B. Remove a Memory Card

1. Ensure that the device is not currently accessing the memory card. Do not remove a memory card while the device is transferring or accessing information, as this could result in loss of data or damage to the memory card or device.

2. Before removing a memory card, first unmount it for safe removal.
In the application list, select Settings > Storage > Unmount SD card > OK. Unmounting an SD card may stop some applications from functioning until you mount the SD card again.
remove a memory card from your samsung galaxy tab a_01

remove a memory card from your samsung galaxy tab a_02

remove a memory card from your samsung galaxy tab a_03

3. Locate and open the microSD card cover. It’s on upper-left side of your device. Use your finger nail to gently pull the cover out and turn it upward.
remove a memory card from your samsung galaxy tab a_04

remove a memory card from your samsung galaxy tab a_05

remove a memory card from your samsung galaxy tab a_06

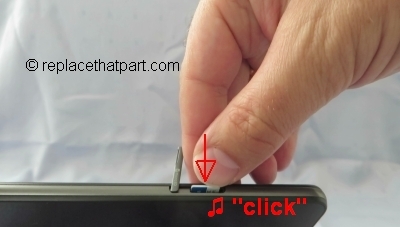
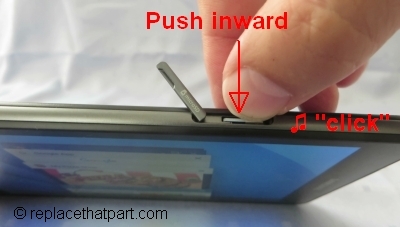
4. Use your fingernail (or a removal tool) to push the microSD card into the socket to release the safety catch. Push it in as far as it will go. You hear a slight “click“, which means the card is in its unlocked position.
remove a memory card from your samsung galaxy tab a_07

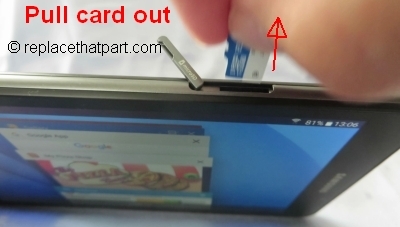
5. Pull the memory card out of the memory card slot. You removable drive is now gone.
remove a memory card from your samsung galaxy tab a_08

6. Close the microSD card cover.
remove a memory card from your samsung galaxy tab a_09

remove a memory card from your samsung galaxy tab a_10

How to Replace an Empty Ink Cartridge in the HP Officejet 4620 e-All-in-One series – an Illustrated Tutorial in 8 Steps

Make sure you purchase the right ink cartridges for your specific printer and printer region or have your old ones refilled. Cartridges are not compatible between different brands, and often not within the same brand. HP often designs its inkjet hardware to use country-specific consumables. When you unbox a new HP inkjet printer and set it up, you install a set of ink tanks that ship with the printer. As you turn on the device and get ready to use it, an initialization sequence localizes it to the country associated with the ink cartridges you installed.

HP recommends that you use original HP ink cartridges. XL (Extra Large) cartridges cost more but do provide better value in the long run. They will be able to print at least double the pages of a regular cartridge. Our advice is that if you print often, go with XL. However, ink can dry up. So if you are not a frequent printer, go with the regular cartridges.

You can check the estimated ink levels from the printer control panel, printer software or the embedded Web server (EWS). Ink level warnings and indicators provide estimates for planning purposes only. When you receive a low-ink warning message, consider having a replacement cartridge available to avoid possible printing delays. You do not have to replace the cartridges until the print quality is unacceptable.

To check the estimated ink levels from the printer control panel:
– From the Home screen, press the Setup button (wrench icon).
– Using the buttons on the right, select Ink Information, and then select Estimated Ink Levels.

Which ink cartridges do I need for my HP Officejet 4620 e-All-in-One printer?

For your US HP Officejet 4620 e-All-in-One printer you need HP 564 Black AND HP 564 Cyan/Magenta/Yellow cartridges. Check the price of HP 564 cartridges at Amazon.com .
There are also Combo Packs (4 cartridges in one pack) available, like the HP 564XL Black 564 Color Ink Cartridges Combo Pack.
For your European or UK HP Officejet 4620 e-All-in-One printer you need HP 364 cartridges. There are also Combo Packs (4 cartridges in one pack) available, like the HP 364 Black, Cyan, Magenta, Yellow – Original Ink Cartridge Combo Content Pack – Standard Capacity.

Try Amazon's ink selector tool to find compatible ink cartridges for your printer.

Replace the ink cartridges.

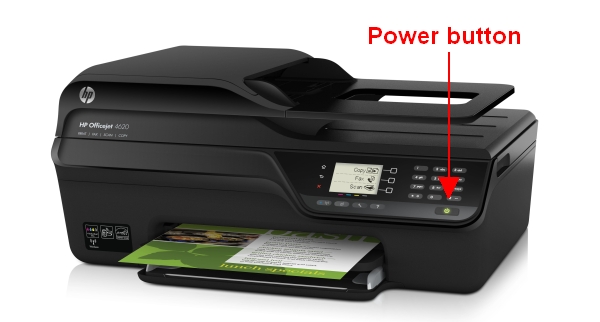
1. Check that power is on. If the product is off, press the Power button to turn on the product. Wait until the product is idle and silent before continuing.
hp officejet 4620_01

Remove the old cartridge
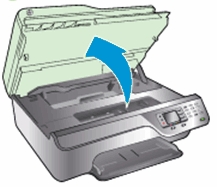
2. Open the cartridge access door.
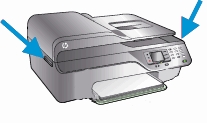
Locate the two slots on the sides of the printer. Place your fingers in the slots, and then lift to open the ink cartridge access door. The carriage moves into the carriage access area. Wait until the carriage is idle and silent before you proceed.
hp officejet 4620_02

hp officejet 4620_03

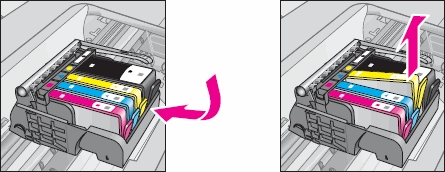
3. Press the tab on the front of the cartridge inward to release it, and then pull up on the cartridge to remove it from the slot.
hp officejet 4620_04

Insert the new cartridge
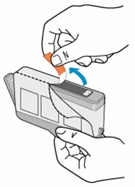
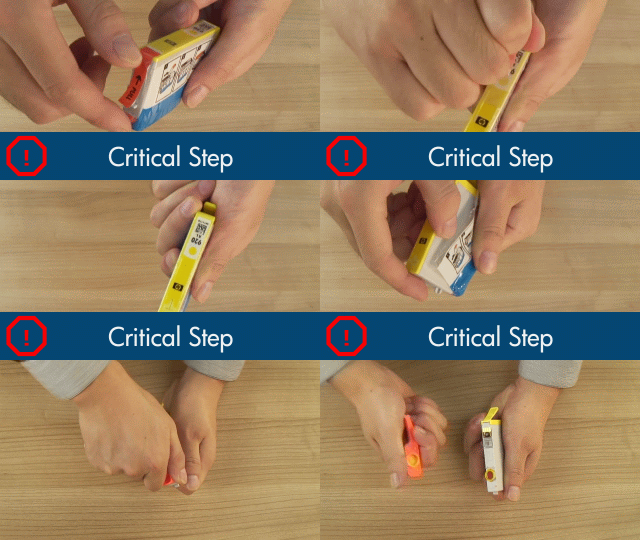
4. Remove the new ink cartridge from its packaging by pulling the orange pull-tab straight back to remove the plastic wrap from the ink cartridge. Make sure you remove the orange pull-tab completely. When you remove the plastic wrap, the paper label on the top of the cartridge tears slightly, which is necessary to vent the cartridge. Do not touch the copper-colored electrical contacts and ink port.
hp officejet 4620_05

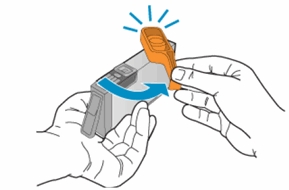
5. Remove the orange cap from the cartridge. Twist the cap counter-clockwise until it snaps off. A forceful twist may be required to remove the cap.
hp officejet 4620_06

hp cartridge01

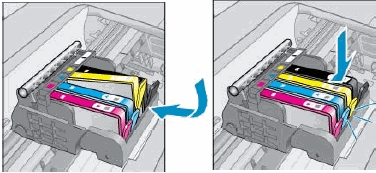
6. Hold the ink cartridge so that the ink cartridge contacts are facing down and toward the printer. Match the colored dot on the ink cartridge with the dot of the same color on the carriage. Slide the new ink cartridge into its slot, and then gently press the ink cartridge down until it clicks into place and is seated firmly in the slot.
hp officejet 4620_07

7. Repeat step 3 to 6 for each ink cartridge you are replacing.

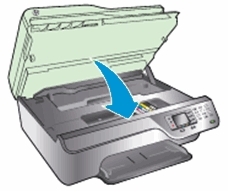
8. Close the cartridge access door.
hp officejet 4620_08

Align the printhead only if necessary.
The printer automatically aligns the printhead during the initial setup. However, you might want to use this feature for print quality issues in printouts where straight lines look wavy or jagged. You can align the printhead from the printer’s control panel, from the Toolbox (Windows) or HP Utility (OS X) and from the embedded web server (EWS).

How to Remove a Memory Card from your Medion AKOYA S2217 Laptop – Tutorial

The Medion AKOYA S2217 is a great social-TV laptop for the sofa, an excellent holiday laptop and could even serve as a kids homework PC although please note that there’s no free Office 365 license included. The base model however only has 32 GB of internal storage, which makes it a poor choice for storing multimedia files, such as music, videos and pictures. There’s also a 64 GB version of the same model available. Windows 10 (32-bit) uses at least 16 GB of the SSD. We recommend storing multimedia files on an external memory card in your device to free up your device’s internal memory for applications. Plus, if you buy a new laptop, you can simply put your external memory card in your new device and all your private data is back immediately.
Which Memory Card do I need for my Medion AKOYA S2217 Laptop laptop?

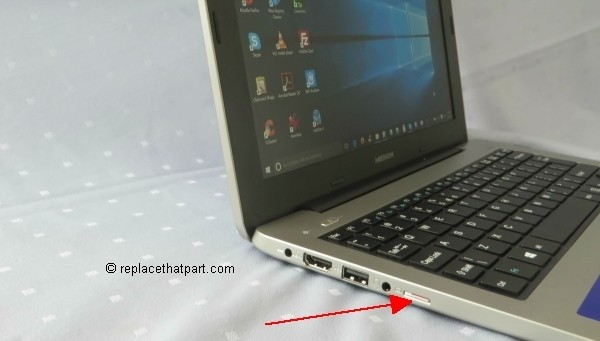
Make sure you purchase the right memory card for your laptop. While many laptops have an SD card reader, the Medion AKOYA S2217 is a small 11.6 inch laptop which comes with a microSDHC card reader/writer. A microSD card or microSDHC (High-Capacity) memory card is the same type of card usually used for smartphones. Many micro SD Cards come with an SD card adapter for compatibility with SD-enabled devices, such as cameras, camcorders and computers. Memory cards usually come pre-formatted and do not need to be formatted out of the box. The slot is at the outside of the device, at the left side (near the Caps Lock key).

Make also sure you purchase a fast memory card. The SD Association defines standard speed classes indicating minimum performance to record video. The class indicates the minimum writing speed: Class 2 = 2 MB/s, Class 4 = 4 MB/s, Class 6 = 6 MB/s, Class 10 = 10 MB/s. A fast Class 10 card is recommended. A class 10 card will play video files on the Medion AKOYA S2217 fine. SDHC cards are usually shipped preformatted with the FAT file system and will work out of the box.

Popular memory cards for this laptop include, but are not limited to: SanDisk Ultra 32GB microSDHC UHS-I Card with Adapter, Grey/Red, Standard Packaging and Samsung EVO 32GB Class 10 Micro SDHC Card with Adapter.

Remove a Memory Card

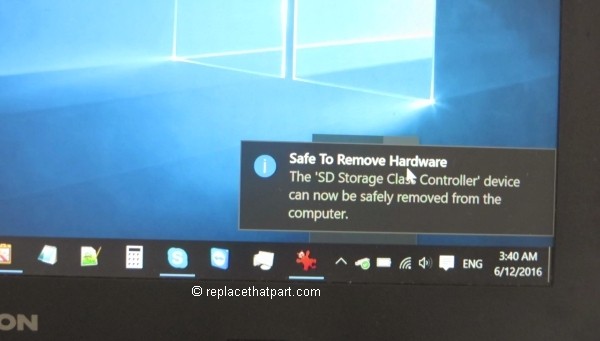
1. Before removing a memory card, first eject it for safe removal.
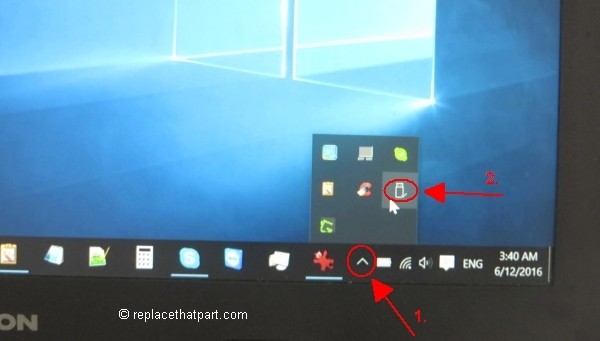
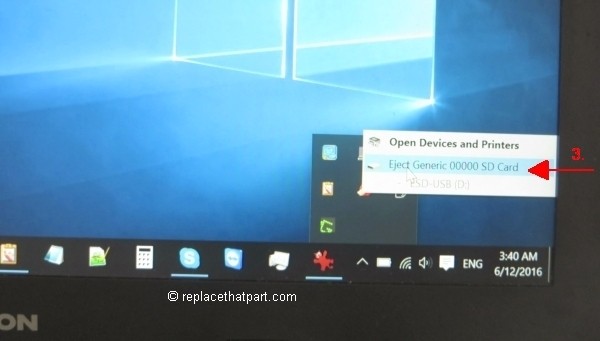
You should be able to eject external devices from the arrow in the taskbar on the right side of the screen. Ejecting the memory card before removing it, is strongly recommended. It’s to ensure that nothing is being written to the memory card. Remove a card without first stopping it can result in data corruption. Even if the card reader doesn’t appear to be in-use, it may still be in-use. A program in the background or a cache may be writing to the drive. To eject your memory card from your Medion AKOYA S2217 Laptop:
– Click on the upwards arrow left from the battery icon.
– Click on the black USB flash drive icon.
– Click Eject Generic 00000 SD Card or something similar.
remove a memory card from your medion akoya s2217 laptop_01

remove a memory card from your medion akoya s2217 laptop_02

remove a memory card from your medion akoya s2217 laptop_03

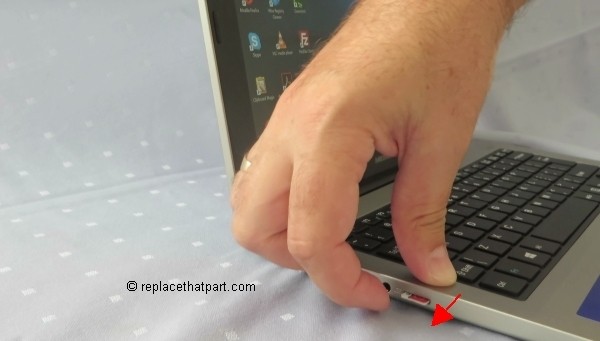
2. Locate the memory card slot. It’s at the outside of the device, at the left side (near the Caps Lock key).
remove a memory card from your medion akoya s2217 laptop_04

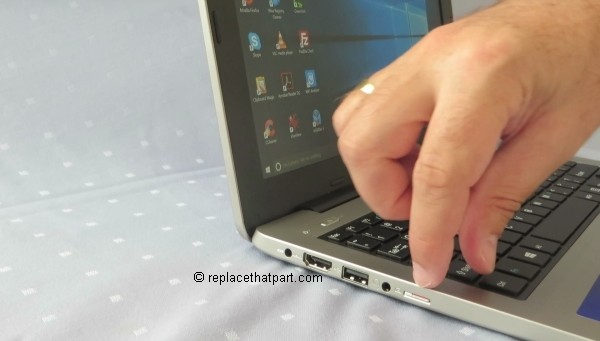
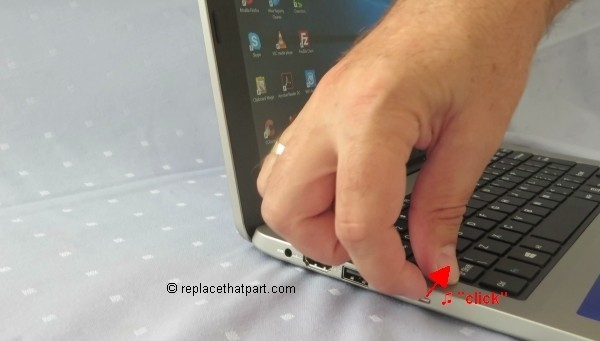
3. Use your finger and fingernail to push the microSD card into the socket to release the safety catch. Push it in as far as it will go. You hear a slight “click“, which means the card is in its unlocked position.
remove a memory card from your medion akoya s2217 laptop_05

remove a memory card from your medion akoya s2217 laptop_06

remove a memory card from your medion akoya s2217 laptop_07

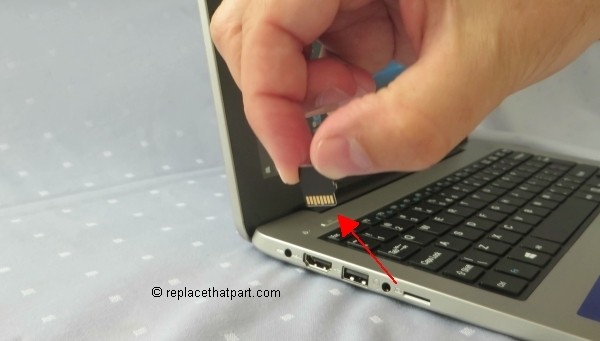
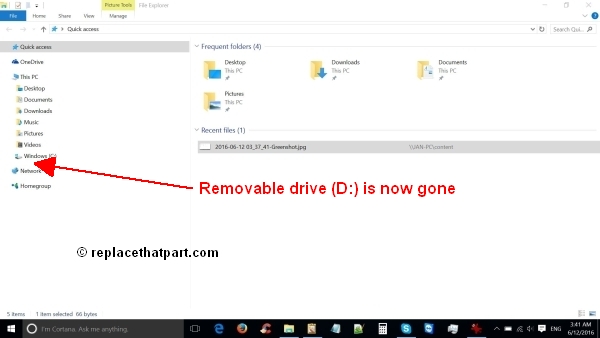
4. Pull the memory card out of the memory card slot. You removable drive (D:) is now gone.
remove a memory card from your medion akoya s2217 laptop_08

remove a memory card from your medion akoya s2217 laptop_09