Replace an Empty Ink Cartridge in the Canon PIXMA TR150 Mobile Printer – an Illustrated Tutorial in 10 Steps

Check the price of the Canon Pixma TR150 Wireless Mobile Printer at Amazon.com .


Make sure you purchase the right ink cartridges for your specific printer and printer region or have your old ones refilled. Cartridges are not compatible between different brands, and often not within the same brand. Canon recommends that you use original Canon ink cartridges. If the cartridges are labeled as Canon FINE Cartridges, the cartridges have a mechanical printhead built into the cartridge, instead of being installed into the printer.

Check the estimated ink levels
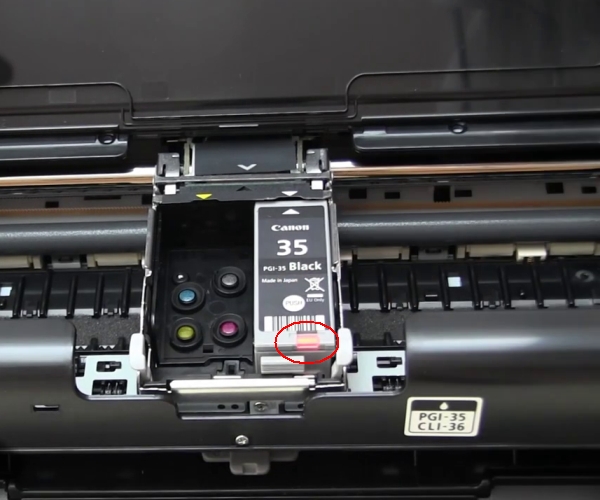
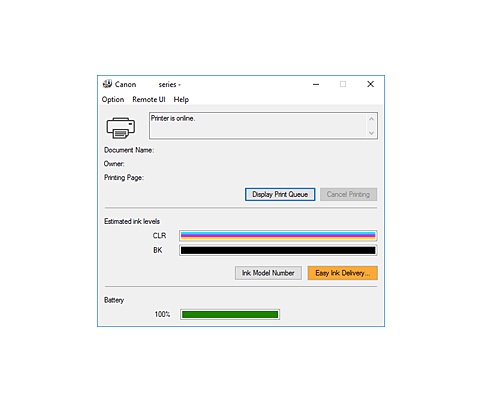
You can check the estimated ink levels from the Canon printer software and from the LCD display on the printer. The red lights (LEDs) on the front side of the ink cartridge also give an indication of the ink status. The ink level detector is mounted on the printer to detect the remaining ink level. The printer considers as ink is full when a new cartridge is installed, and then starts to detect a remaining ink level. If you install a used cartridge, the indicated ink level of it may not be correct. In such case, refer to the ink level information only as a guide.

Red Ink lights (LEDs) on the cartridge
Lights continuously: The ink tank is correctly installed.
Flashing slowly (3-second intervals): The ink is running low. Purchase or prepare a new ink tank. You might need one soon.
Flashing fast (1-second intervals): Ink has run out.
Off: The ink tank or the ink head is not installed properly or the function for detecting the remaining ink level is disabled.
canon pixma tr150 replace the ink cartridges 01

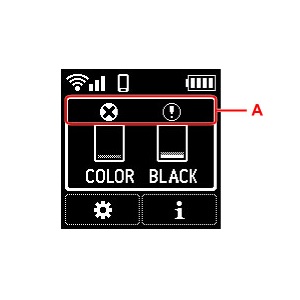
To check the ink status from the LCD
The status of used ink appears on the HOME screen. A symbol appears in the area A if there is any information about the remaining ink level.
canon pixma tr150 replace the ink cartridges 02

The ink is running low. Purchase or prepare a new ink tank. You might need one soon.
canon pixma tr150 replace the ink cartridges 03

Ink has run out. Replace the empty ink tank with a new ink tank.
canon pixma tr150 replace the ink cartridges 04

To check the ink levels from the printer software (Windows):
Open the printer driver setup window:
– Select the print command from your application software. The Print command can generally be found in the File menu.
Select your printer model, and click Preferences or Properties. The printer driver’s setup screen appears.

You can also display the printer driver’s setup screen by clicking the printer icon:
– Select Control Panel -> Hardware and Sound -> Devices and Printers.
Right-click the icon of your model. When the menu appears, select Printing preferences.

Canon IJ Status Monitor
The Canon IJ Status Monitor displays the printer status and the printing progress. You can also use it to check the remaining ink level and the cartridge types for your model. The Canon IJ Status Monitor launches automatically when print data is sent to the printer. When launched, the Canon IJ Status Monitor appears as a button on the task bar. Click the button of the status monitor displayed on the task bar. The Canon IJ Status Monitor appears. To open the Canon IJ Status Monitor when the printer is not printing, open the printer driver setup window and click View Printer Status on the Maintenance tab.
canon pixma tr150 replace the ink cartridges 05

canon pixma tr150 replace the ink cartridges 06

Canon sells most of their cartridges in a standard yield size and a high yield or XL. Some printers also use extra-high yield, or XXL cartridges. However, at the time of writing, only standard yield cartridges for this printer are available, no XL or XXL versions. A new Canon printer usually includes a complete set of starter ink cartridges. Starter cartridges are filled with less ink than a standard yield cartridge. However, it appears that this printer ships with regular standard yield ink cartridges.

Ink level warnings and indicators provide estimates for planning purposes only. When you receive a low-ink warning message, consider having a replacement cartridge available to avoid possible printing delays. You do not have to replace the cartridges until the print quality is unacceptable.

Single cartridge
If an ink cartridge runs out of ink, you can print with either the color or black ink cartridge. However the print quality may be reduced compared to when printing with both cartridges. We recommend to use a new ink cartridge in order to obtain optimum qualities. Even when printing with one cartridge only, print with leaving the empty ink cartridge installed. If either the color ink cartridge or black ink cartridge isn’t installed, an error occurs and the printer can’t print.

Which ink cartridges do I need for my Canon PIXMA TR150 Printer?

For your US Canon PIXMA TR150 Printer you need a Canon PGI-35 black cartridge AND a Canon CLI-36 color cartridge. The cartridges mentioned above are also available in three-in-one valuepacks. At the time of writing, XL versions of these cartridges are NOT available.

Try Amazon's ink selector tool to find compatible ink cartridges for your printer.

Replace the ink cartridges

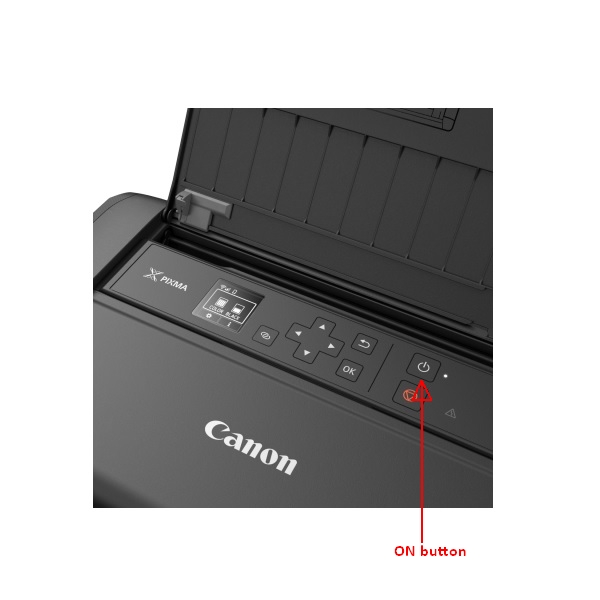
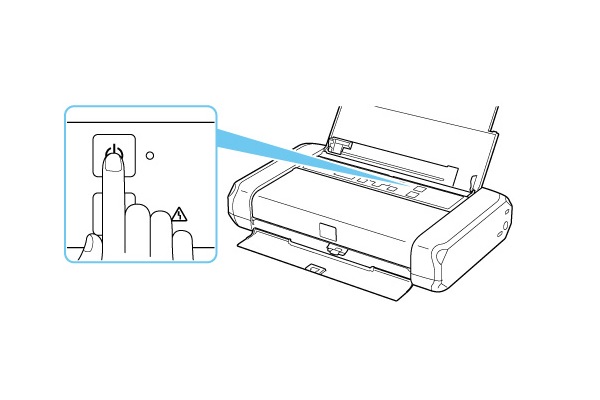
1. Press the ON button to turn on the printer, if it is not already turned on. Wait until the printer is idle and silent before continuing.
canon pixma tr150 replace the ink cartridges 07

canon pixma tr150 replace the ink cartridges 08

2. Load unused plain white Letter or A4-sized paper on the rear tray.
Open the rear tray cover (A). The paper output slot cover will open automatically.
Pull out the paper support (B) until the arrow (>) mark is aligned with the arrow (<) mark. - Slide the paper guide (C) to the left, and load the paper against the far right (D) of the rear tray with the print side facing you.
Slide the paper guide to the right to align it with the paper stack.
Set the paper thickness lever (H) to the right.
– After closing the feed slot cover, the paper setting confirmation screen for the rear tray appears on the LCD. If page size and media type on LCD match size and type of paper loaded in rear tray, select OK. If not, select Change to change the settings in accordance with the size and type of the loaded paper.
canon pixma tr150 replace the ink cartridges 09

4. Open the print head cover. The cartridge holder moves to the replacement position. Wait until the printer is idle and silent before continuing.
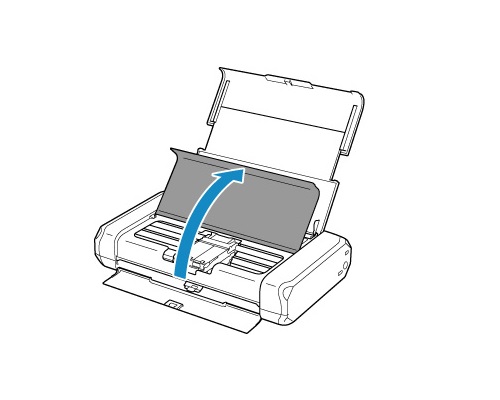
canon pixma tr150 replace the ink cartridges 10

5. Remove the empty cartridge.
Push the tab (A) and lift the ink tank to remove.
– Pull the cartridge toward you out of its slot.
– Set the empty cartridge aside for recycling.

Do not touch the print head lock lever at the sides of the print head holder. If you pull up the print head lock lever, lock it again. Do not remove both ink tanks at the same time. Be sure to replace ink tanks one by one when replacing both ink tanks.
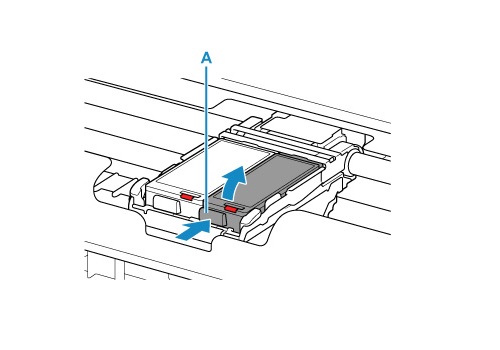
canon pixma tr150 replace the ink cartridges 11

6. Prepare a new cartridge.
– Remove the new cartridge from its packaging. Be careful to only touch the black plastic on the ink cartridge by holding the ink cartridge by its sides.
Remove the protective cap (C) gently from the bottom of the ink tank.
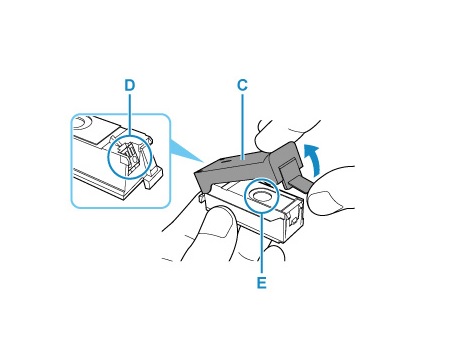
canon pixma tr150 replace the ink cartridges 12


Do NOT:
– Touch the electrical contacts on the ink tank.
– Touch the inside of the protective cap or the open ink port.
– Reattach the protective cap once you have removed it.

7. Install the new cartridge.
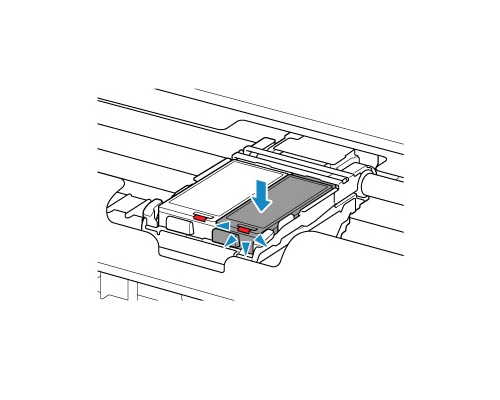
Insert the front end of the new ink tank into the print head at a slant. Align the Down-arrow mark on the print head with the Up-arrow mark on the new ink cartridge.
The tri-color cartridge goes in the slot on the left.
The black cartridge goes in the slot on the right.
Press the PUSH mark on the ink tank until the ink tank snaps firmly into place with a click.
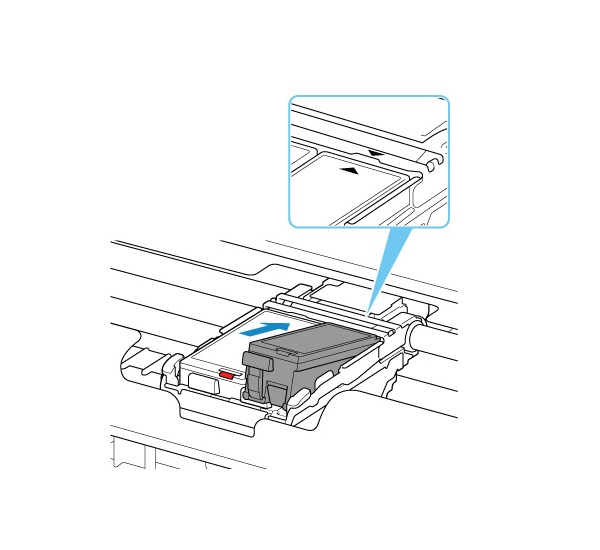
canon pixma tr150 replace the ink cartridges 13

canon pixma tr150 replace the ink cartridges 14

canon pixma tr150 replace the ink cartridges 15

8. Check if the cartridge is installed correctly. If both the print head and the new cartridge are installed correctly, then the ink lamp at the front site of the new ink cartridge lights up continuously (does not blink).

9. Repeat step 5 through 8 to replace the other cartridge, if necessary. Install both ink tanks to print. The printer cannot be used unless two ink tanks are installed.
The tri-color cartridge goes in the slot on the left.
The black cartridge goes in the slot on the right.

10. Close the cover.

Align the print head only if necessary.
– Press Setup > Maintenance on the LCD panel.
– Select Print Head Alignment – Auto. The confirmation screen will appear. Then, select Yes and press OK. The print head alignment sheet is printed, and the print head is aligned automatically. This may take 4 to 5 minutes. When the completion message appears, select OK.
– Discard or recycle the alignment page.
How to Replace the battery of a Nokia 105 / TA-1037 Cell Phone – Tutorial

Make sure you purchase the right battery for your Smartphone. Batteries are not compatible between different brands, and often not among phones within the same brand. It’s recommended that you use a genuine Nokia 105 battery.
Which battery do I need for my Nokia 105 / TA-1037 Cell Phone?
For your Nokia 105 / TA-1037 Cell Phone you need a a lithium-ion rechargeable battery (sometimes called a Li-ion battery or LIB): Nokia BL-5C Battery, 3.7V 1020mAh, 3.8Wh.

(#ad or paid link)

Replace the Battery

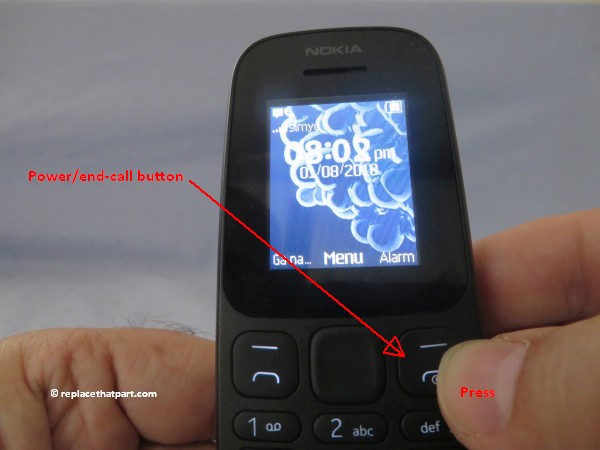
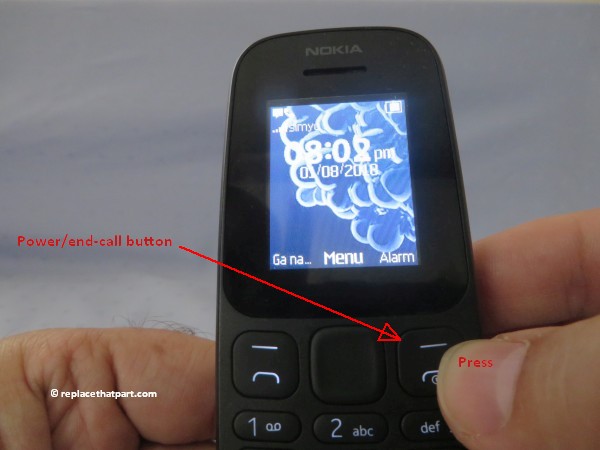
1. Turn off the power so that you won’t lose any stored information. If the device is on, press and hold the power/end-call button for a couple of seconds, until the phone shuts down.
nokia 105 ta 1037 how to replace the battery 01

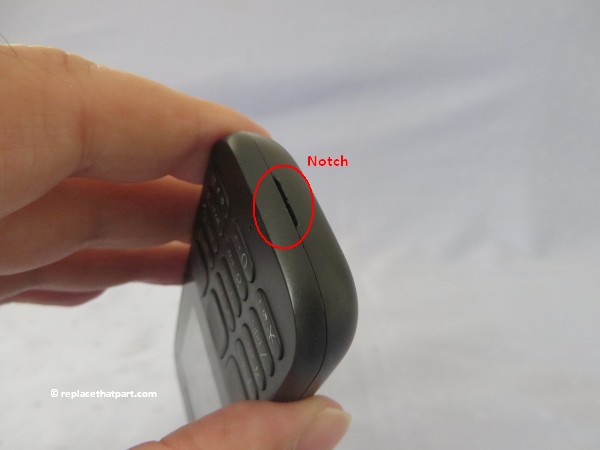
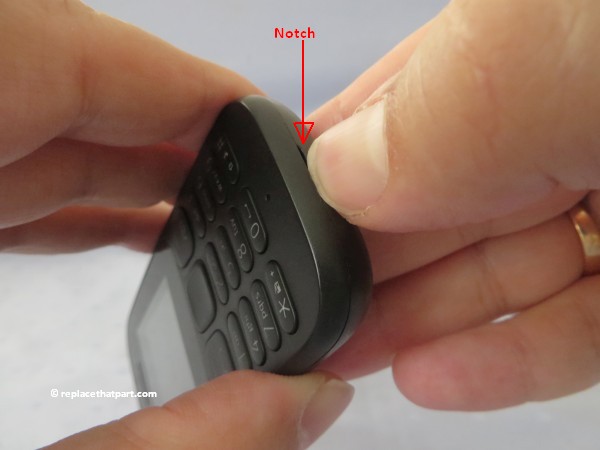
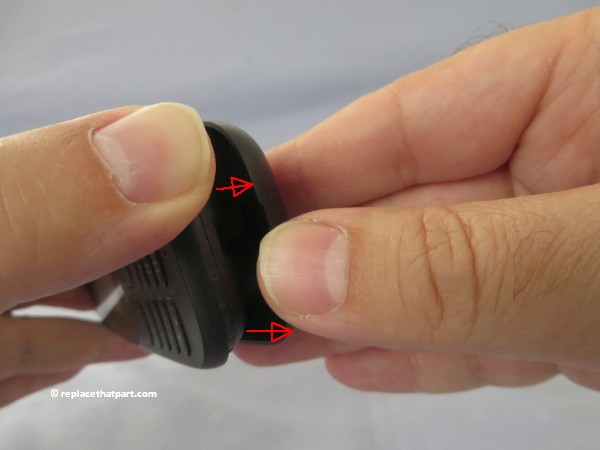
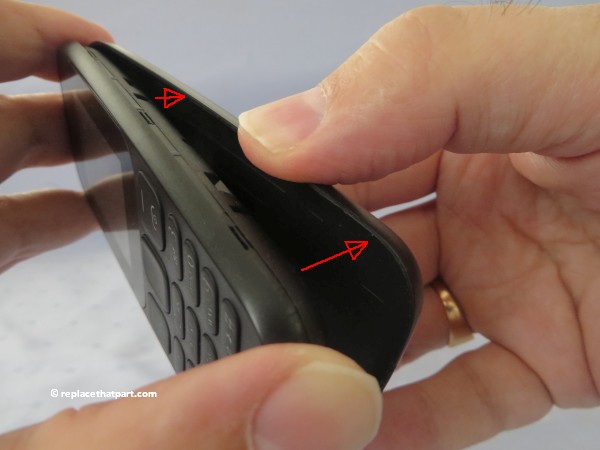
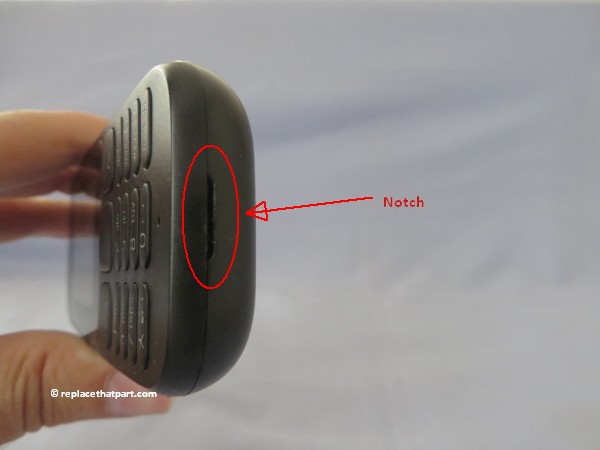
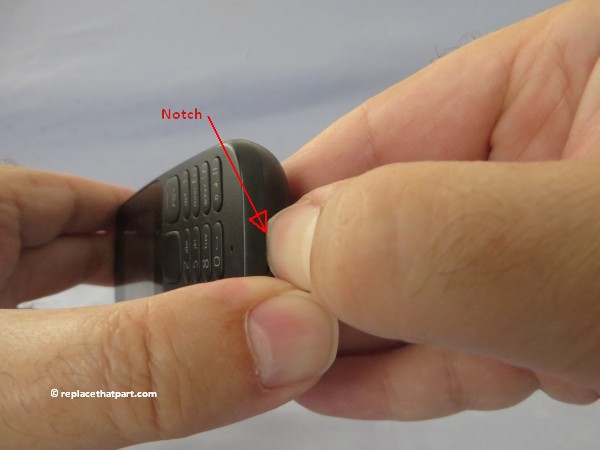
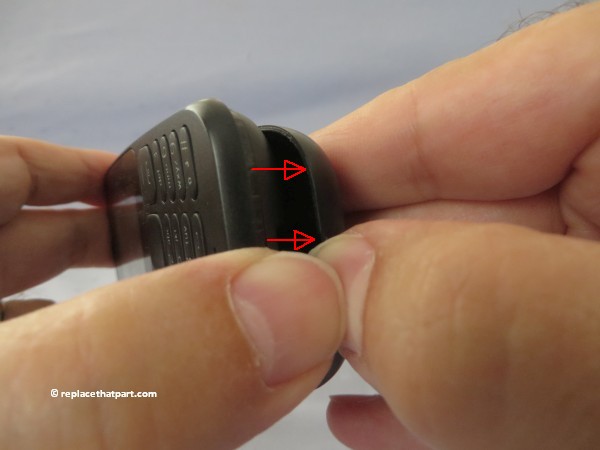
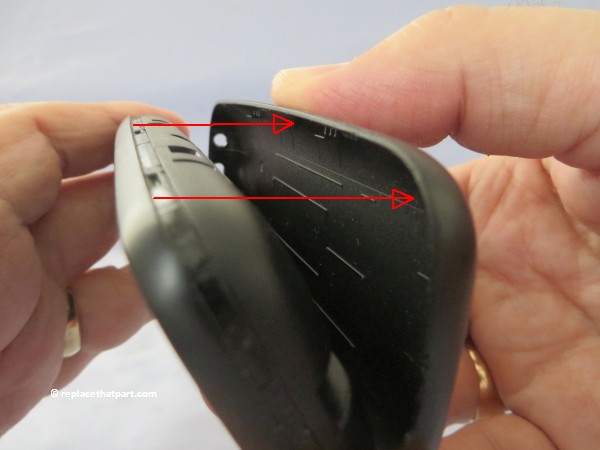
2. Remove the back cover. Hold the device in one hand and find the small notch that will help you to release the cover. It’s on the the bottom of the phone. Insert a fingernail into the notch. Lift upwards gently to pop the phone open. Some force is probably needed. Be careful not to damage your fingernails when you remove the back cover. Also, be certain not to bend or twist the back cover excessively. Doing so may damage the cover.
nokia 105 ta 1037 how to replace the battery 02

nokia 105 ta 1037 how to replace the battery 03

nokia 105 ta 1037 how to replace the battery 04

nokia 105 ta 1037 how to replace the battery 05

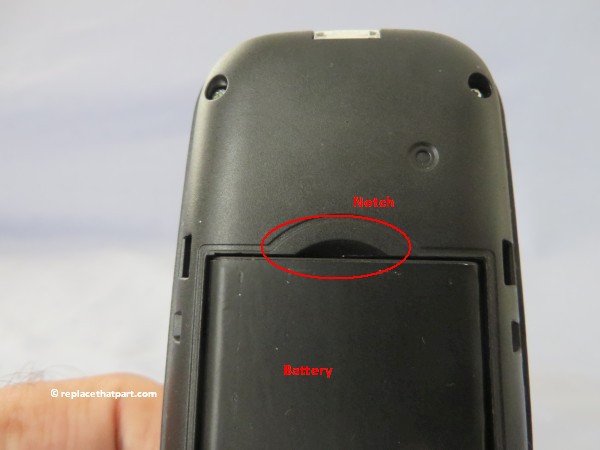
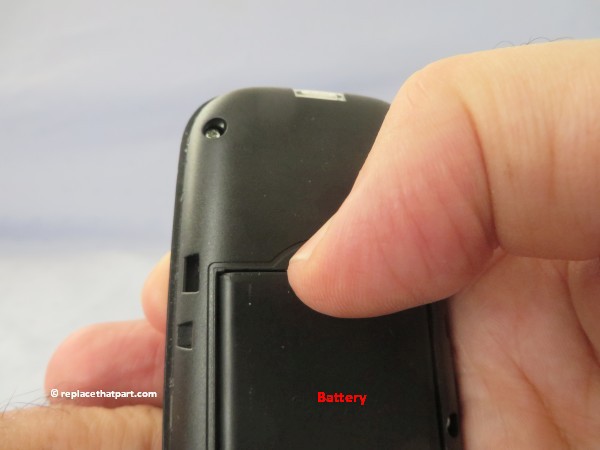
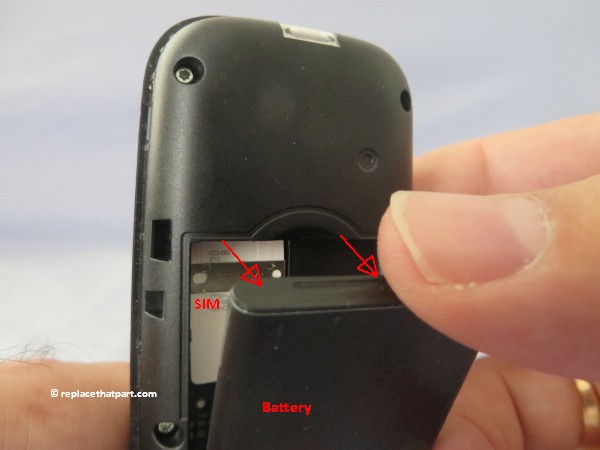
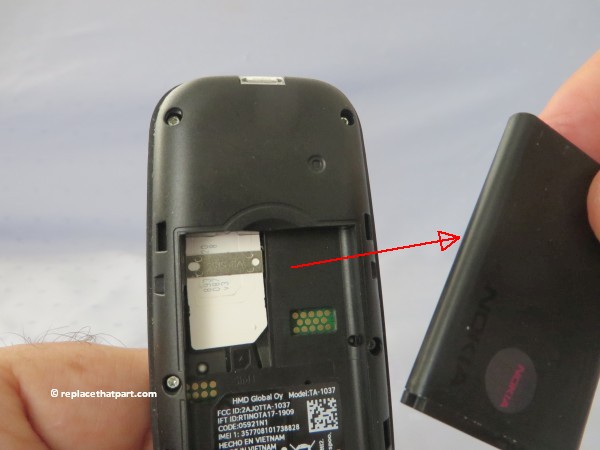
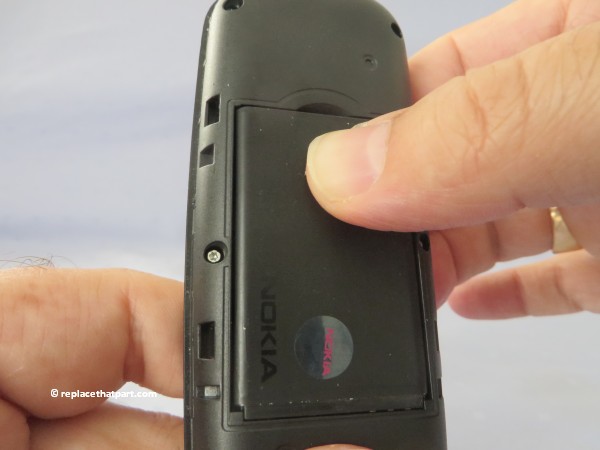
3. Remove the battery. Using your nail or finger, lift up the battery via the small notch at the top of the battery compartment and lift the battery out of the phone.
nokia 105 ta 1037 how to replace the battery 06

nokia 105 ta 1037 how to replace the battery 07

nokia 105 ta 1037 how to replace the battery 08

nokia 105 ta 1037 how to replace the battery 09

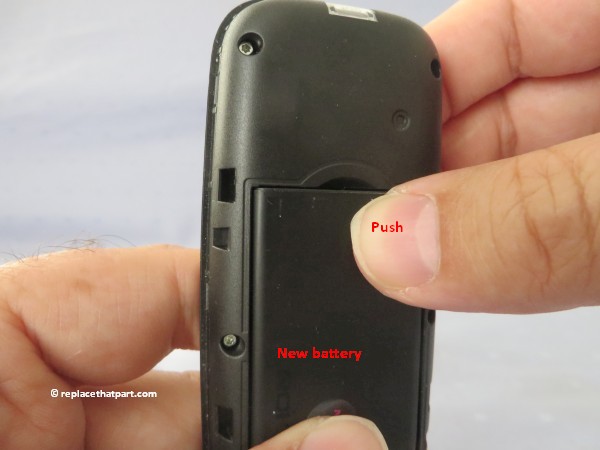
4. Install the new battery
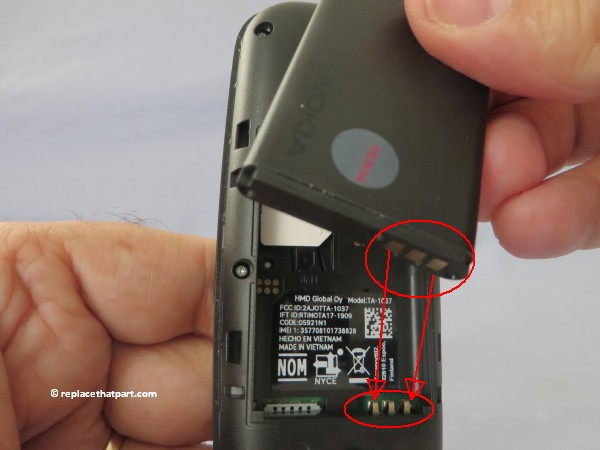
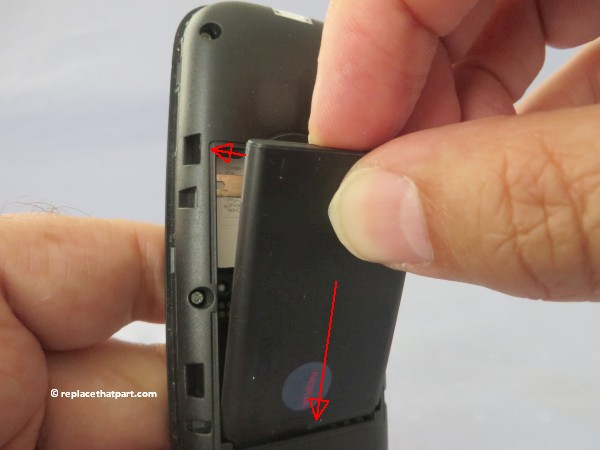
Turn the battery if necessary. The Nokia logo should be on top and in the LEFT bottom corner. Align the three gold colored contacts with the three prongs on the bottom-right side of the battery slot, as shown in the pictures below. Slide the battery into the battery housing cavity and press down gently to secure it in place. It should fit easily and exactly.
nokia 105 ta 1037 how to replace the battery 10

nokia 105 ta 1037 how to replace the battery 11

nokia 105 ta 1037 how to replace the battery 12

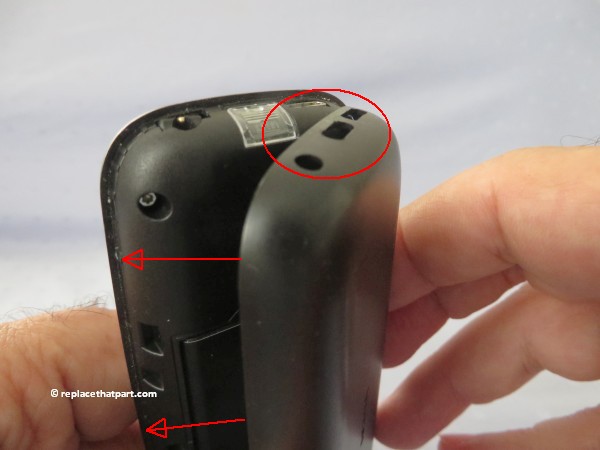
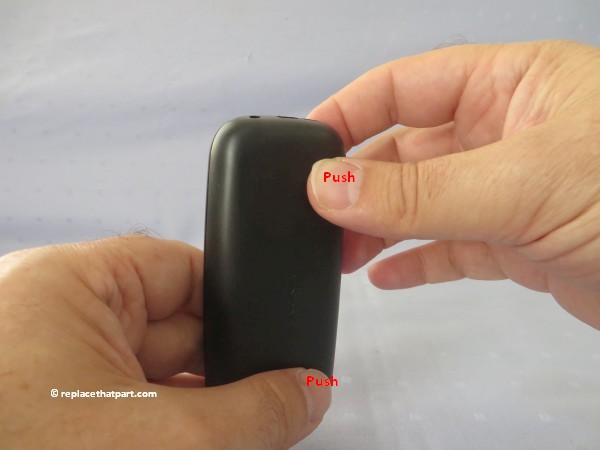
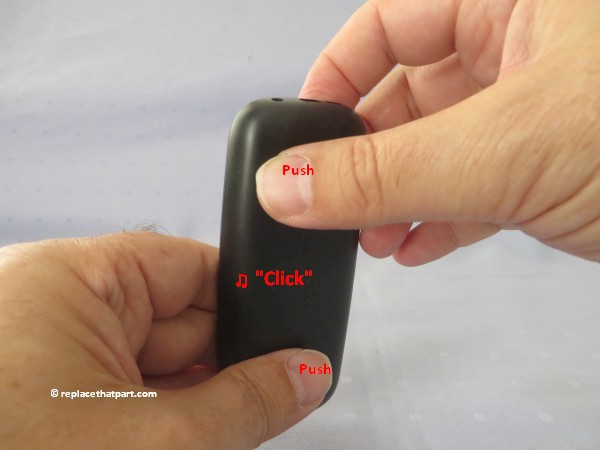
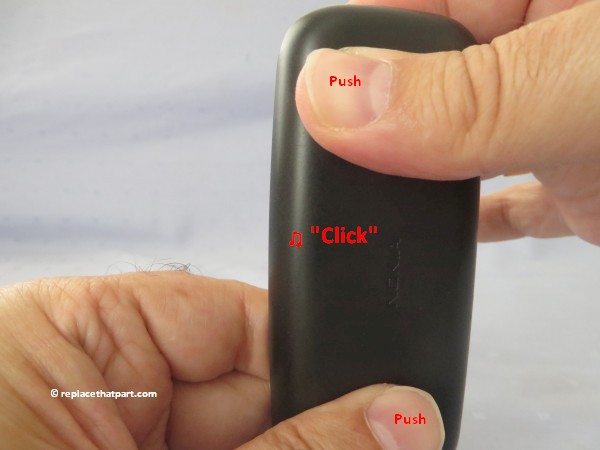
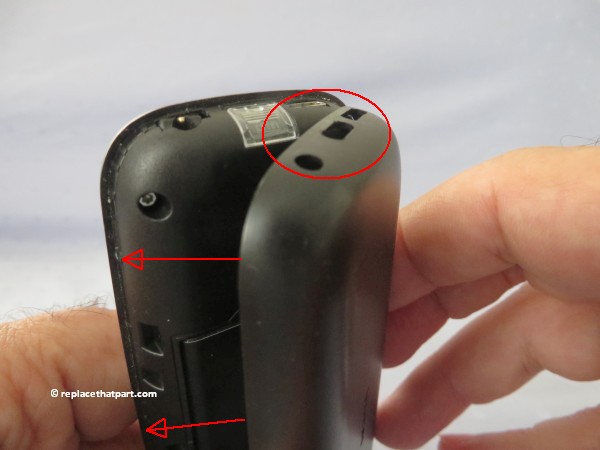
5.Replace the back cover. The 3 holes should be on top. Gently press the cover down and around the sides of the phone until it clicks into place.
nokia 105 ta 1037 how to replace the battery 13

nokia 105 ta 1037 how to replace the battery 14

nokia 105 ta 1037 how to replace the battery 15

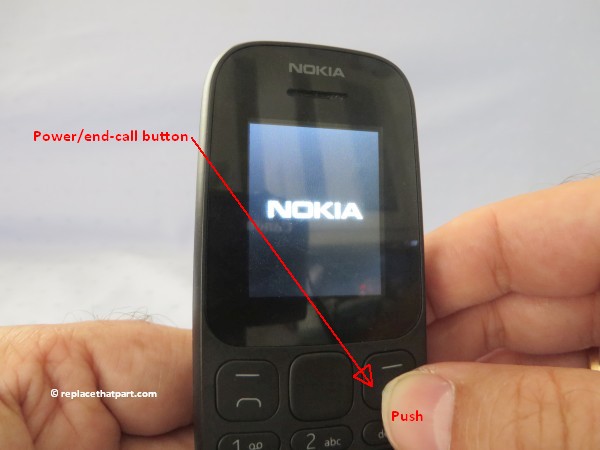
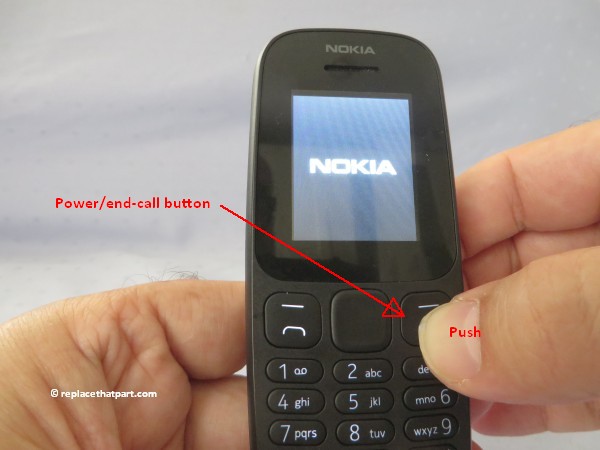
8. Press and hold the power/end-call button for 1 or 2 second. Doing so will turn your phone back on and the device will automatically search for a network.
nokia 105 ta 1037 how to replace the battery 16

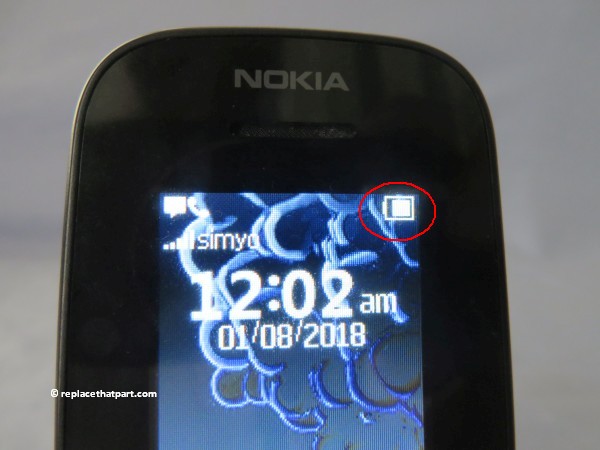
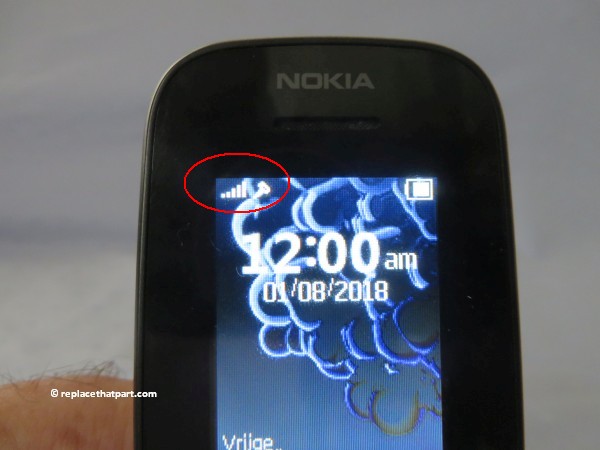
9. Check if your new battery is recognized by the device and if it’s already charged to some extent. Many battery manufacturers ship new batteries with their batteries charged around 60%. In this case, there is no real need to charge the battery before the first use. A good rule of thumb seems to be to never charge your phone up to more than 80 percent of capacity.
nokia 105 ta 1037 how to replace the battery 17

How to Insert a SIM Card into a Nokia 105 / TA-1037 Single-SIM Cell Phone – Tutorial

Which SIM Card do I need for my Nokia 105 / TA-1037 Single-SIM Cell Phone?

Note: it appears that there are two versions of the Nokia 105 / TA-1037 available: a single-SIM version and a dual-SIM one. This manual has especially been written for the single-SIM phone. However, the basics are the same, so you can use this tutorial for the dual-SIM version too.

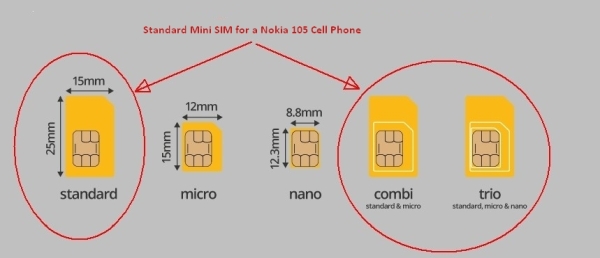
Make sure you use the correct size SIM card. Depending on the model of phone, there are three sizes of SIM card that can potentially be used in a phone: Standard Mini SIM, Micro SIM and Nano SIM. The three SIM card types work in exactly the same way from a technical perspective. They just differ in the amount of plastic housing that surrounds the metallic chip. The Combi SIM is a Micro SIM card within a Standard Mini SIM-sized unit, so if you need the smaller size of card you simply break the additional plastic away from around the Micro SIM card. This type of card allows networks to cater for more phone users with a single card. A Trio SIM is a Standard Mini SIM, a Micro and a Nano in one. Most of the pay-as-you-go SIM cards you buy from convenience stores operate under this format as they’re more useful to more users.

The Nokia 105 – TA-1037 only accepts 1 (sometimes 2) big standard Mini SIM size card. You can also use a Combi SIM or Trio SIM and NOT break away the plastic from around the SIM card. Only remove the Standard SIM from the plastic card.
nokia 105 ta 1037 single sim how to insert sim card 01

Sometimes getting a replacement SIM from your mobile network provider could be a hassle. If you already have a smaller SIM or if you find yourself switching phones around a lot, you may need to adapt — with a SIM adapter — any time you need to go bigger. They are used to transform your sim card into a bigger size which is compatible with your phone. These adapters are quite cheap to purchase, however, getting a good quality adapter would mean that it would be able to let you fit your sim tightly. Using one of those thin flimsy plastic SIM adapters (they usually have a hole in the back) or use one that uses tape to hold the SIM in is NOT recommended. Don’t place an empty SIM adapter in your phone, you must use it with the SIM card already inserted. An empty adapter might damage your phone.

Popular SIM card adapters cards include, but are not limited to:

  • Gold Samdi Brand Nano Sim Adapter and Micro Sim Adapter and Nano to Micro Adapter with a Sim Card Folder and a Needle
  • Sadapter Three Adapter Pack – Retail Packaging – Black
  • Noosy Sim Card Adapter Kits with Nano Sim Adapter and Micro Sim Adapter

Insert a SIM Card

1. Turn off the power so that you won’t lose any stored information. If the device is on, press and hold the power/end-call button for a couple of seconds, until the phone shuts down.
nokia 105 ta 1037 single sim how to insert sim card 02

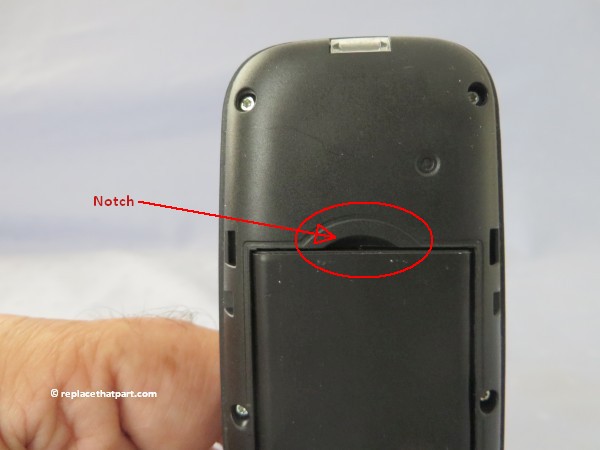
2. Remove the back cover. Hold the device in one hand and find the small notch that will help you to release the cover. It’s on the the bottom of the phone. Insert a fingernail into the notch. Lift upwards gently to pop the phone open. Some force is probably needed. Be careful not to damage your fingernails when you remove the back cover. Also, be certain not to bend or twist the back cover excessively. Doing so may damage the cover.
nokia 105 ta 1037 single sim how to insert sim card 03

nokia 105 ta 1037 single sim how to insert sim card 04

nokia 105 ta 1037 single sim how to insert sim card 05

nokia 105 ta 1037 single sim how to insert sim card 06

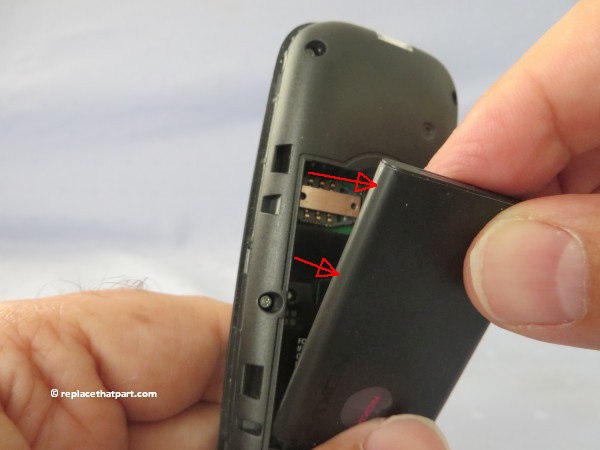
3. Remove the battery. Using your nail or finger, lift up the battery via the small notch at the top of the battery compartment and lift the battery out of the phone.
nokia 105 ta 1037 single sim how to insert sim card 07

nokia 105 ta 1037 single sim how to insert sim card 08

nokia 105 ta 1037 single sim how to insert sim card 09

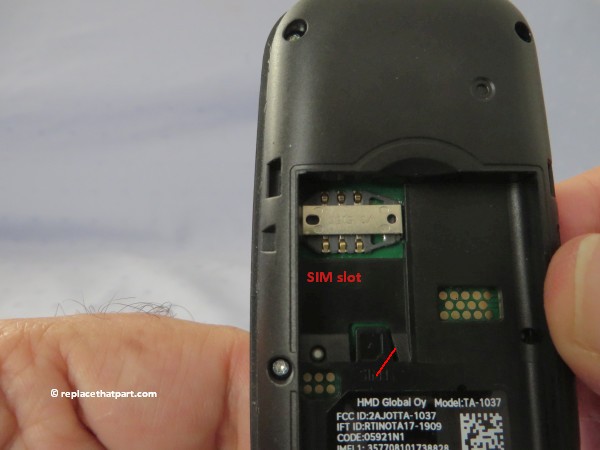
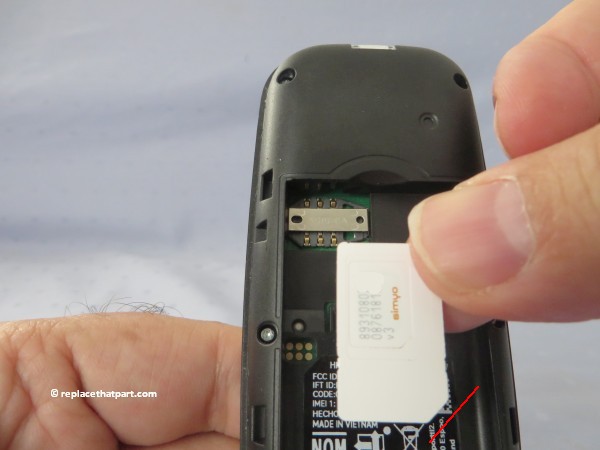
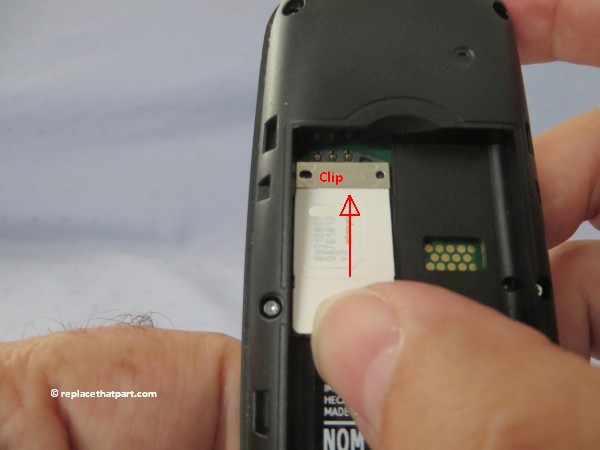
4. Place the SIM card with the gold contacts facing downwards and slide it under the metal clip and into the housing, marked with SIM 1. The SIM card’s missing corner must be on the BOTTOM RIGHT side.
nokia 105 ta 1037 single sim how to insert sim card 10

nokia 105 ta 1037 single sim how to insert sim card 11

nokia 105 ta 1037 single sim how to insert sim card 12

Remove the SIM
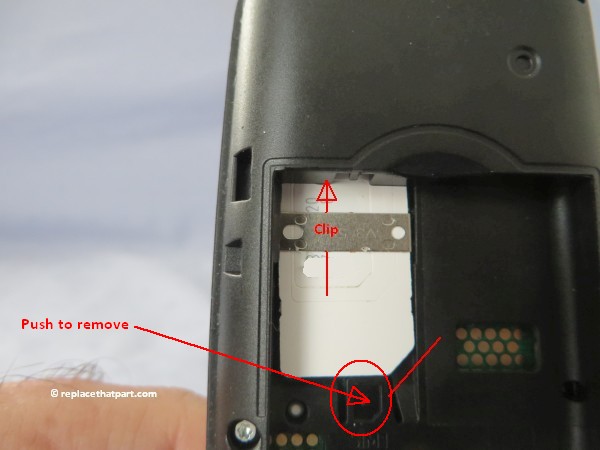
Removing the SIM is a little harder. First, you have to push in the small plastic button with the SIM drawing on it (above SIM 1). Then you can slide it out backwards.
nokia 105 ta 1037 single sim how to insert sim card 13

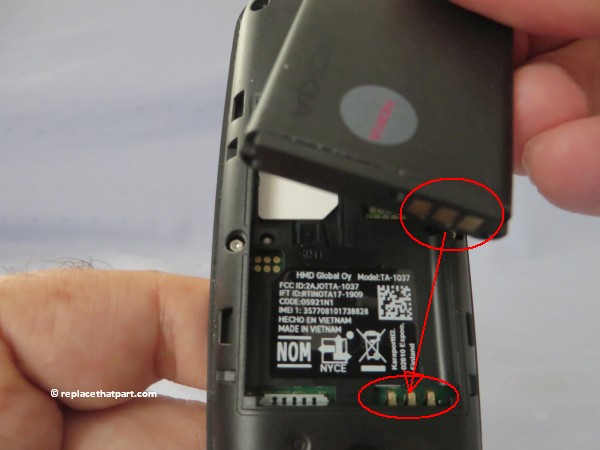
6. Reinstall the battery. Turn the battery if necessary. The Nokia logo should be on top and in the LEFT bottom corner. Align the three gold colored contacts with the three prongs on the bottom-right side of the battery slot, as shown in the pictures below. Slide the battery into the battery housing cavity and press down gently to secure it in place. It should fit easily and exactly.
nokia 105 ta 1037 single sim how to insert sim card 14

nokia 105 ta 1037 single sim how to insert sim card 15

nokia 105 ta 1037 single sim how to insert sim card 16

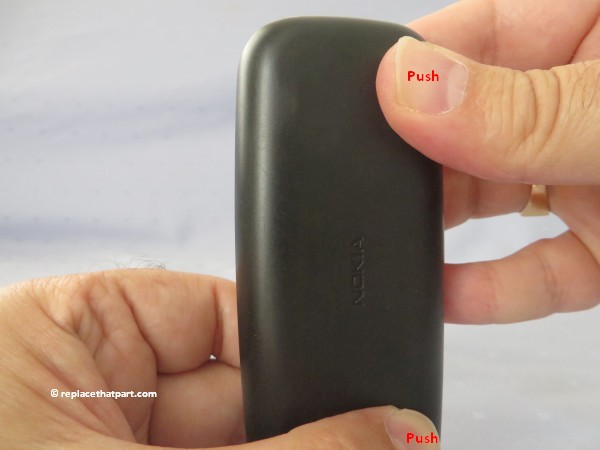
7. Replace the back cover. The 3 holes should be on top. Gently press the cover down and around the sides of the phone until it clicks into place.
nokia 105 ta 1037 single sim how to insert sim card 17

nokia 105 ta 1037 single sim how to insert sim card 18

nokia 105 ta 1037 single sim how to insert sim card 19

8. Press and hold the power/end-call button for 1 or 2 second. Doing so will turn your phone back on and the device will automatically search for a network.
nokia 105 ta 1037 single sim how to insert sim card 20

9. Check if your SIM card is recognized by the device. After ‘Searching’, the name of your network provider should be visible at the top of the display. This takes about 5 seconds.
nokia 105 ta 1037 single sim how to insert sim card 21

How to Replace the battery of an Alcatel OneTouch 10.16D Cell Phone – Tutorial

Make sure you purchase the right battery for your Smartphone. Batteries are not compatible between different brands, and often not among phones within the same brand. It’s recommended that you use a genuine Alcatel OneTouch battery.

Which battery do I need for my Alcatel OneTouch 10.16D Cell Phone?
For your Alcatel OneTouch 10.16D Cell Phone you need a a lithium-ion rechargeable battery (sometimes called a Li-ion battery or LIB): Alcatel CAB0400000C1 Battery, 3.7V 400mAh, 1.48Wh.

Replace the Battery

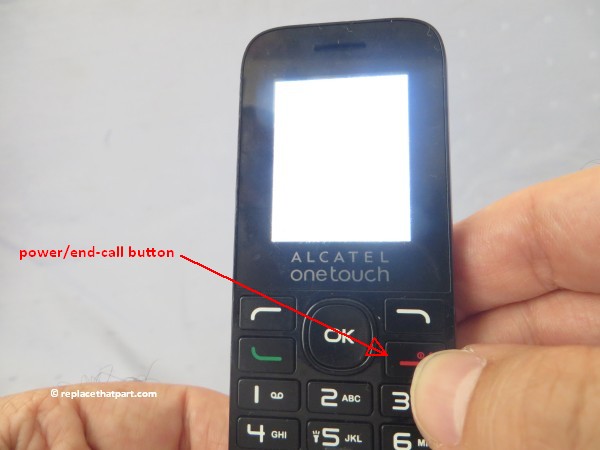
1. Turn off the power so that you won’t lose any stored information. If the device is on, press and hold the red power/end-call button for a couple of seconds, until the phone shuts down.
alcatel onetouch 10.16d cell phone replace the battery 01

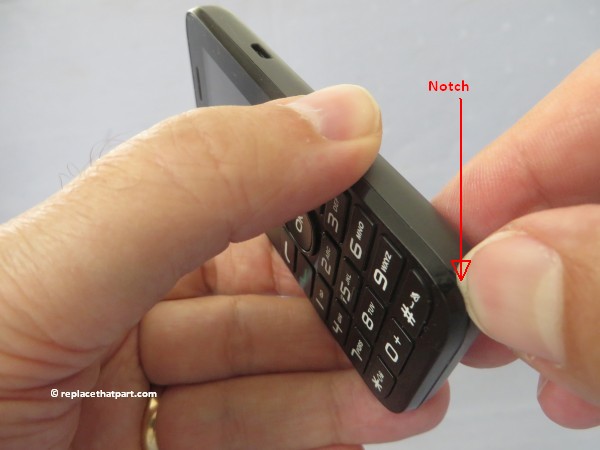
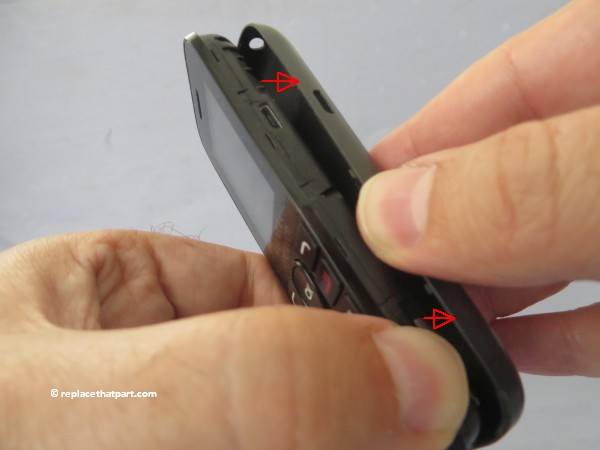
2. Remove the back cover. Hold the device in one hand and find the small notch that will help you to release the cover. It’s on the the bottom-right corner of the phone. Insert a fingernail into the notch. Lift upwards gently to pop the phone open. Working from the bottom-right corner upwards and then lifting the back cover seems to work well. Be careful not to damage your fingernails when you remove the back cover. Also, be certain not to bend or twist the back cover excessively. Doing so may damage the cover.
alcatel onetouch 10.16d cell phone replace the battery 02

alcatel onetouch 10.16d cell phone replace the battery 03

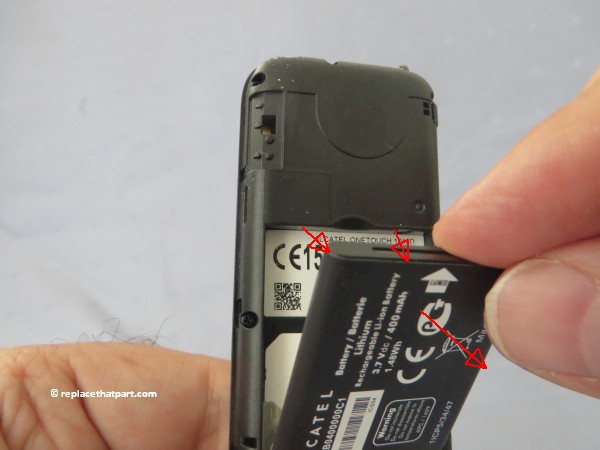
3. Remove the old battery.
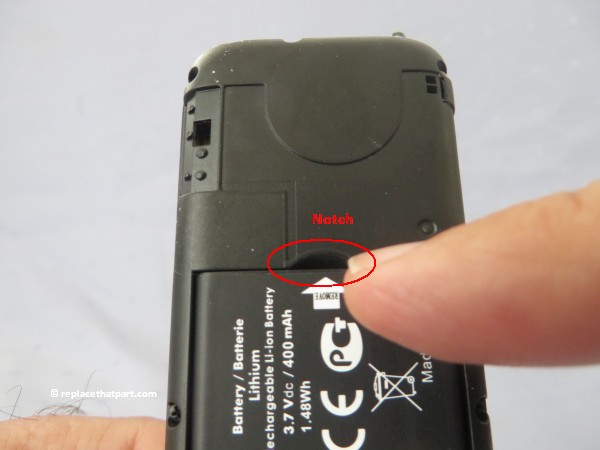
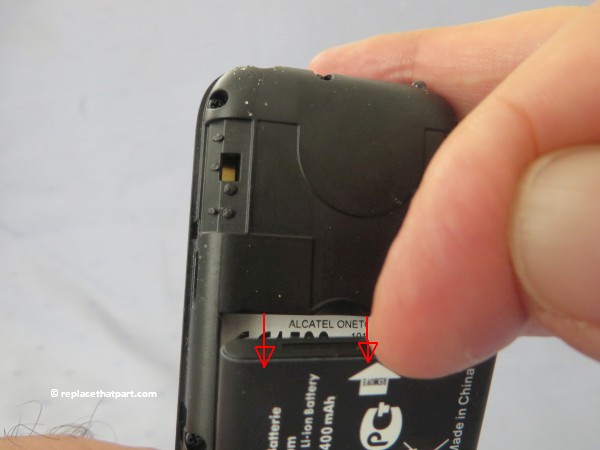
Using your nail or finger, lift up the battery via the small notch at the top of the battery compartment, and lift the battery out of the phone.
alcatel onetouch 10.16d cell phone replace the battery 04

alcatel onetouch 10.16d cell phone replace the battery 05

alcatel onetouch 10.16d cell phone replace the battery 06

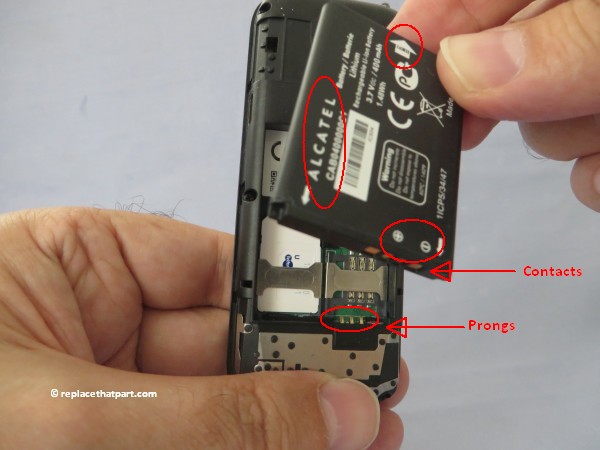
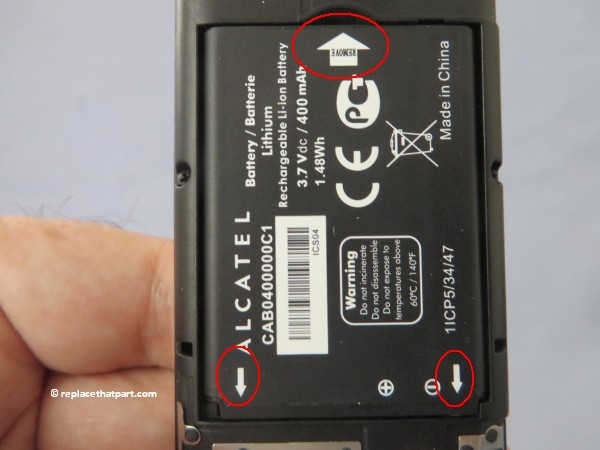
4. Install the new battery
Turn the battery if necessary. The Alcatel logo and the white arrows should be on top. Align the the plus and minus signs and three contacts with the three prongs on the bottom-right side of the battery slot. The large white arrow should be on top, as shown in the picture below. Slide the battery into the battery housing cavity and press down gently to secure it in place. It should fit easily and exactly.
alcatel onetouch 10.16d cell phone replace the battery 07

alcatel onetouch 10.16d cell phone replace the battery 08

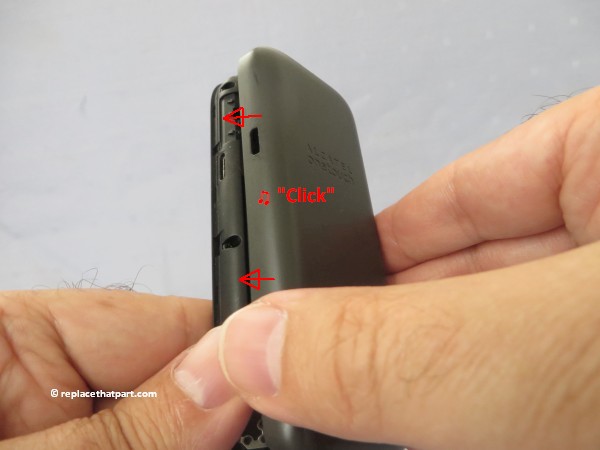
5. Replace the back cover. The Alcatel OneTouch logo on the back should be on top. Gently press the cover down and around the sides of the phone until it smoothly clicks into place.
alcatel onetouch 10.16d cell phone replace the battery 09

8. Press and hold the Power button for a couple of seconds. Doing so will turn your phone back on. When the phone is turns on, a sound is played.

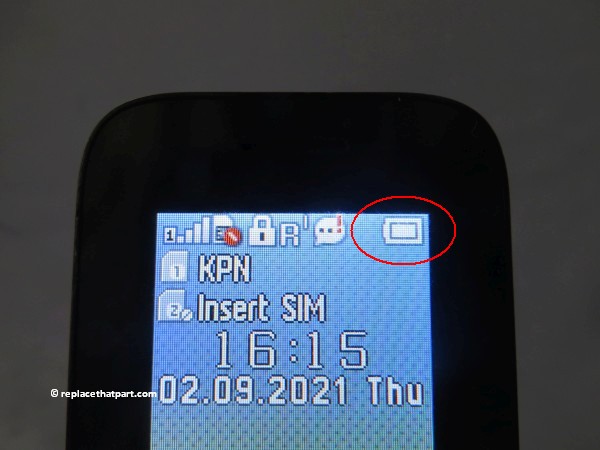
9. Check if your new battery is recognized by the device and if it’s already charged to some extent. Many battery manufacturers ship new batteries with their batteries charged around 60%. In this case, there is no real need to charge the battery before the first use. A good rule of thumb seems to be to never charge your phone up to more than 80 percent of capacity.
alcatel onetouch 10.16d cell phone replace the battery 10