How to Insert a SIM Card into an Alcatel OneTouch 10.16D Dual Sim Cell Phone – Tutorial

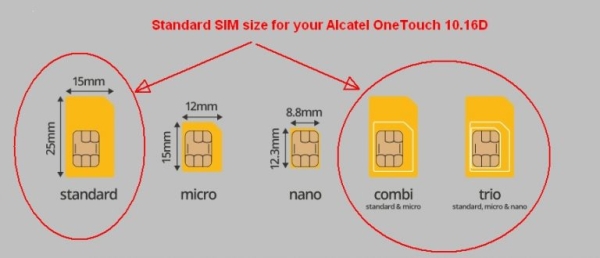
Which SIM Card do I need for my Alcatel OneTouch 10.16D Dual Cell Phone?

Make sure you use the correct size SIM card. Depending on the model of phone, there are three sizes of SIM card that can potentially be used in a phone: Standard SIM, Micro SIM and Nano SIM. The three SIM card types work in exactly the same way from a technical perspective. They just differ in the amount of plastic housing that surrounds the metallic chip. The Combi SIM is a Micro SIM card within a Standard SIM-sized unit, so if you need the smaller size of card you simply break the additional plastic away from around the Micro SIM card. This type of card allows networks to cater for more phone users with a single card. A Trio SIM is a Standard, a Micro and a Nano in one. Most of the pay-as-you-go SIM cards you buy from convenience stores operate under this format as they’re more useful to more users.

The Alcatel OneTouch 10.16D only accepts 2 big standard SIM size cards. You can also use a combi SIM or trio SIM and NOT break away the plastic from around the SIM card. Only remove the Standard SIM from the plastic card.

Sometimes getting a replacement SIM from your mobile network provider could be a hassle. If you already have a smaller SIM or if you find yourself switching phones around a lot, you may need to adapt — with a SIM adapter — any time you need to go bigger. They are used to transform your SIM card into a bigger size which is compatible with your phone. These adapters are quite cheap to purchase, however, getting a good quality adapter would mean that it would be able to let you fit your SIM tightly. Using one of those thin flimsy plastic SIM adapters (they usually have a hole in the back) or use one that uses tape to hold the SIM in is NOT recommended. Don’t place an empty SIM adapter in your phone, you must use it with the SIM card already inserted. An empty adapter might damage your phone!

Popular SIM card adapters cards include, but are not limited to:

  • Gold Samdi Brand Nano Sim Adapter and Micro Sim Adapter and Nano to Micro Adapter with a Sim Card Folder and a Needle
  • Sadapter Three Adapter Pack – Retail Packaging – Black
  • Noosy Sim Card Adapter Kits with Nano Sim Adapter and Micro Sim Adapter

Insert a SIM Card

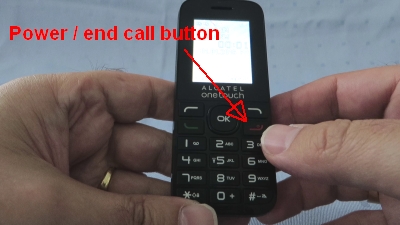
1. Turn off the power so that you won’t lose any stored information. If the device is on, press and hold the red power/end-call button for a couple of seconds, until the phone shuts down.

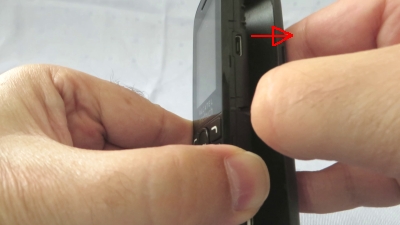
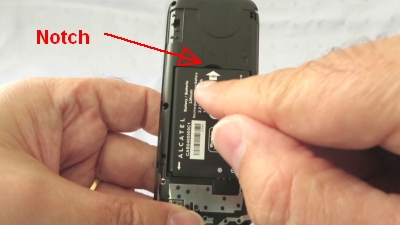
2. Remove the back cover. Hold the device in one hand and find the small notch that will help you to release the cover. It’s on the the bottom-right corner of the phone. Insert a fingernail into the notch. Lift upwards gently to pop the phone open. Working from the bottom-right corner upwards and then lifting the back cover seems to work well. Be careful not to damage your fingernails when you remove the back cover. Also, be certain not to bend or twist the back cover excessively. Doing so may damage the cover.

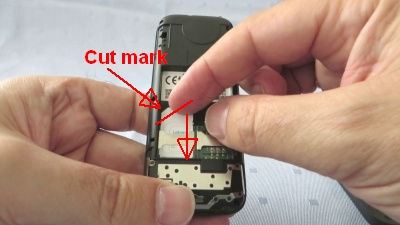
3. Remove the battery. Using your nail or finger, lift up the battery via the small notch at the top of the battery compartment and lift the battery out of the phone.

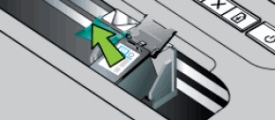
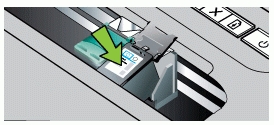
4. Place the first SIM 1 card with the gold contacts facing downwards and slide it into the left housing, marked with SIM 1 with the SIM card’s missing corner on the upper-left.

5. Place and optional second SIM 2 card with the gold contacts facing downwards and slight it into the right housing, marked with SIM 2, with the SIM card’s missing corner on the upper-left.

To remove a SIM card, press it downward a little and slight it out in an upward direction.

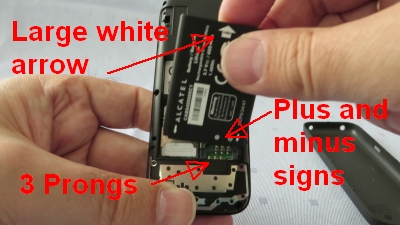
6. Reinstall the battery. Turn the battery if necessary. The Alcatel logo and the white arrows should be on top. Align the the plus and minus signs and three contacts with the three prongs on the bottom-right side of the battery slot. The large white arrow should be on top, as shown in the picture below. Slide the battery into the battery housing cavity and press down gently to secure it in place. It should fit easily and exactly.

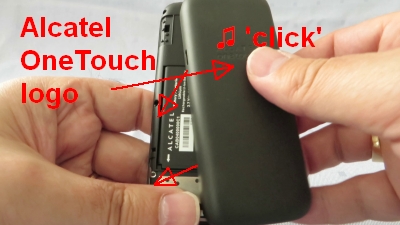
7. Replace the back cover. The Alcatel OneTouch logo on the back should be on top. Gently press the cover down and around the sides of the phone until it clicks into place.

8. Press and hold the Power button. Doing so will turn your phone back on and the device will automatically search for a network.

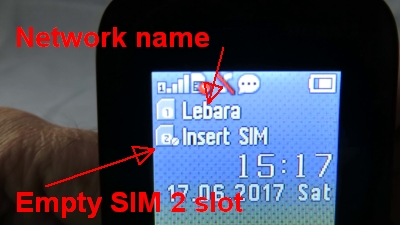
9. Check if your SIM card is recognized by the device. After ‘Searching netw…’, the name(s) of your network provider(s) should be visible at the top of the display.

How to Replace an Empty Ink Cartridge in the HP Officejet 100 (L411) Mobile Printer

Make sure you purchase the right ink cartridges for your specific printer and printer region or have your old ones refilled. Cartridges are not compatible between different brands, and often not within the same brand. HP designs its inkjet hardware to use country-specific consumables. When you unbox a new HP inkjet printer and set it up, you install a set of ink tanks that ship with the printer. As you turn on the device and get ready to use it, an initialization sequence localizes it to the country associated with the ink cartridges you installed. HP recommends that you use original HP ink cartridges. If one of the ink cartridges runs out of ink before you can replace it, you can still print with a single ink cartridge. Printing with one ink cartridge might be slower and the print quality might be affected. It is recommended to print with both ink cartridges. For borderless printing, the tri-color ink cartridge must be installed.

Which ink cartridges do I need for my HP Officejet 100 (L411) Mobile Printer?

For your US HP Officejet 100 (L411) Mobile Printer you need
HP 98 Black or HP 94 Black cartridges AND HP 95 Tri-color or HP 97 Tri-color or HP 93 Tri-color cartridges.
For your European or UK HP Officejet 100 (L411) Mobile Printer you need HP 337 Black or HP 338 Black cartridges AND HP 343 Tri-color or HP 344 Tri-color cartridges.

Try Amazon's ink selector tool to find compatible ink cartridges for your printer.

Replace the ink cartridges

1. Press the Power button to turn on the product.

2. Open the front access cover. Wait until the carriage is idle and silent before proceeding.
hp officejet 100 (l411) mobile printer_01

3. Lift the cartridge latch, and then gently remove the cartridge from the carriage.
hp officejet 100 (l411) mobile printer_02

4. Remove the new ink cartridge from its package and then pull the pink tab to remove the protective film from the cartridge.
hp officejet 100 (l411) mobile printer_03
1. Copper-colored contacts
2. Plastic tape with pink pull tab (must be removed before installing)
3. Ink nozzles under tape

! Do not touch the copper-colored electrical contacts or the ink nozzles !
do not touch contacts

5. Insert the cartridge at a slight angle into the carriage slot. Place the tri-color cartridge in the left slot, and the black or photo cartridge in the right slot.
hp officejet 100 (l411) mobile printer_04 hp officejet 100 (l411) mobile printer_05

6. Close the ink cartridge latch. If the cartridge is inserted correctly, closing the latch gently pushes the cartridge into its cradle compartment. Press the latch to make sure it is seated flat on the cartridge.
hp officejet 100 (l411) mobile printer_06

6. Close the front access cover.
hp officejet 100 (l411) mobile printer_07

7. Wait for the carriage to complete the ink cartridge initialization routine and return to the home position at the left side of the printer before using the printer.

8. Align the ink cartridges. Whenever you install a new ink cartridge, you should align the ink cartridges for the best possible print quality. If the printout is grainy, has stray dots, jagged edges, or the ink is bleeding into another color, you can realign them through Toolbox, or HP Utility (Mac OS). Load plain paper into the input tray before aligning the ink cartridges. An alignment page is printed during the alignment process.

How to Replace an Empty Ink Cartridge in the HP Officejet 150 Mobile All-in-One Printer

Make sure you purchase the right ink cartridges for your specific printer and printer region or have your old ones refilled. Cartridges are not compatible between different brands, and often not within the same brand. HP designs its inkjet hardware to use country-specific consumables. When you unbox a new HP inkjet printer and set it up, you install a set of ink tanks that ship with the printer. As you turn on the device and get ready to use it, an initialization sequence localizes it to the country associated with the ink cartridges you installed. HP recommends that you use original HP ink cartridges. If one of the ink cartridges runs out of ink before you can replace it, you can still print with a single ink cartridge. Printing with one ink cartridge might be slower and the print quality might be affected. It is recommended to print with both ink cartridges. For borderless printing, the tri-color ink cartridge must be installed.

Which ink cartridges do I need for my HP Officejet 150 Mobile All-in-One Printer?

For your US HP Officejet 150 Mobile All-in-One Printer you need HP 98 Black or HP 94 Black cartridges and HP 95 Tri-color or HP 97 Tri-color cartridges.
For your European or UK HP Officejet 150 Mobile All-in-One Printer you need HP 337 Black or HP 338 Black cartridges and HP 343 Tri-color or HP 344 Tri-color cartridges.

Try Amazon's ink selector tool to find compatible ink cartridges for your printer.

Replace the ink cartridges

1. Remove the new ink cartridge from its package and then pull the colored tab to remove the protective film from the cartridge.
HP Officejet 150_01
1. Copper-colored contacts
2. Plastic tape with pink pull tab (must be removed before installing)
3. Ink nozzles under tape

! Do not touch the copper-colored electrical contacts or the ink nozzles !
do not touch contacts

2. With the printer turned on, open the cartridge access door. Wait for the carriage to stop moving. This should take only a few seconds.
HP Officejet 150_02

3. Lift the ink cartridge latch open and gently remove the ink cartridge from its cradle compartment.
HP Officejet 150_03

4. Insert the new ink cartridge into its cradle compartment at the same angle at which you removed the old ink cartridge.
HP Officejet 150_04

5. Close the ink cartridge latch. If the cartridge is inserted correctly, closing the latch gently pushes the cartridge into its cradle compartment. Press the latch to make sure it is seated flat on the cartridge.
HP Officejet 150_05

6. Close the cartridge access door.

7. Wait for the carriage to complete the ink cartridge initialization routine before using the printer.

8. Align the ink cartridges. Whenever you install a new ink cartridge, you should align the ink cartridges for the best possible print quality. If the printout is grainy, has stray dots, jagged edges, or the ink is bleeding into another color, you can realign them through Toolbox, or HP Utility (Mac OS). Load plain paper into the input tray before aligning the ink cartridges. An alignment page is printed during the alignment process.