Honeywell Chronotherm IV – Batterijen Vervangen – Handleiding

Benodigdheden
3 Penlight AA batterijen

De thermostaat in dit artikel betreft de Honeywell Chronotherm IV, type T8602A Thermostaat. Indien u een ander type thermostaat heeft, kan de procedure op details verschillen, maar het principe is meestal hetzelfde.

Deze thermostaat werkt onafhankelijk van het elektriciteitsnet omdat hij wordt gevoed door batterijen. Tijdens een netspanningsuitval zal de thermostaat normaal blijven functioneren. De cv-installatie zal na het terugkeren van de netspanning automatisch weer in bedrijf komen.

De levensduur van de batterijen is afhankelijk van het type batterij en het gebruik en kan onder gunstige omstandigheden meer dan 2 jaar bedragen. Uw thermostaat werkt met drie standaard ‘Penlight’ alkaline batterijen (type AA). Deze zijn groter dan de kleine AAA variant. De thermostaat van de foto’s werkt overigens al jaren prima met oplaadbare
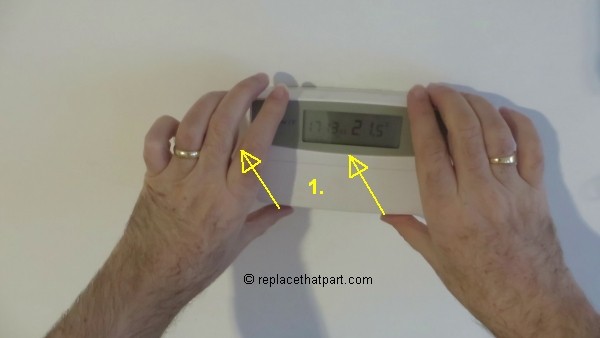
Ni-MH batterijen. De levensduur is dan vermoedelijk korter. Wanneer in het uitleesvenster VERV BAT knipperend wordt weergegeven, raken de batterijen leeg. U heeft dan nog ongeveer 2 maanden voor zij volledig zijn uitgeput. Indien de batterijen volledig zijn uitgeput, zal het uitleesvenster niets meer weergeven. De thermostaat dient dan van nieuwe batterijen te worden voorzien en in de meeste gevallen moet de tijd en dag van de week opnieuw worden ingevoerd. Als u de batterijen vervangt en het uitleesvenster nog niet is uitgevallen, heeft u 30 seconden de tijd om de batterijen te vervangen, zonder dat de tijd of dagweergave verloren gaat.

Het vervangen van de batterijen

* Handelingen gemarkeerd met een * zijn optioneel en meestal niet nodig.

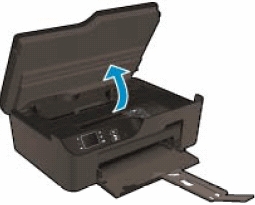
Verwijder de Honeywell Chronotherm IV van de montageplaat
1. * Eventueel: Draai de borgschroef aan de onderzijde van het huis los (alleen indien deze is aangebracht).
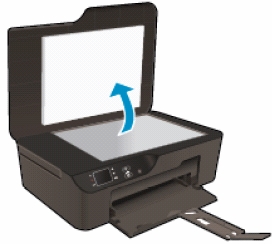
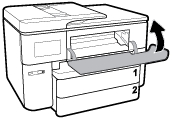
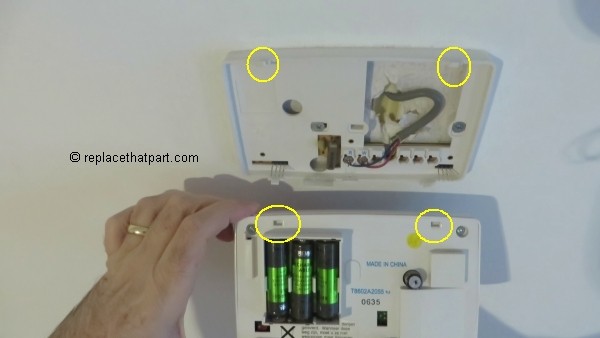
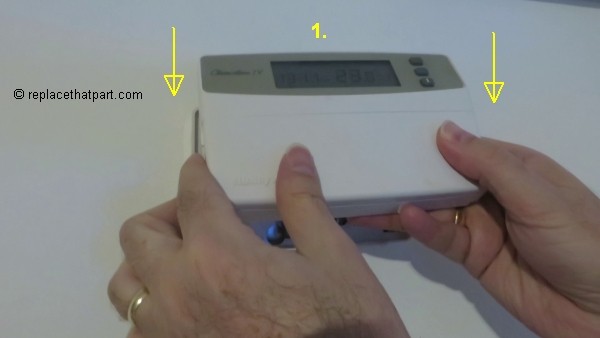
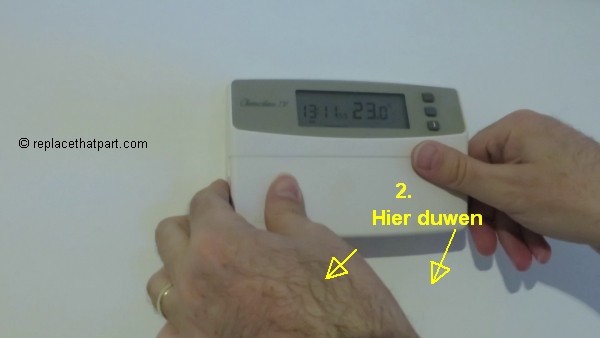
2. Pak de hele thermostaat stevig vast en kantel de onderzijde met een draaiende beweging naar boven.
honeywell chronotherm iv batterijen vervangen 02

3. Til de thermostaat vervolgens recht naar boven en los van de 2 nokken die zich aan de linkeren rechterbovenhoek van de montageplaat bevinden.

Vervang de batterijen
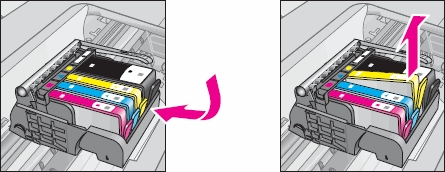
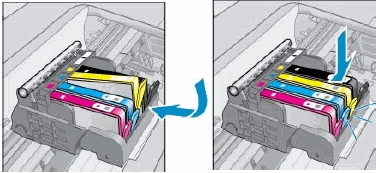
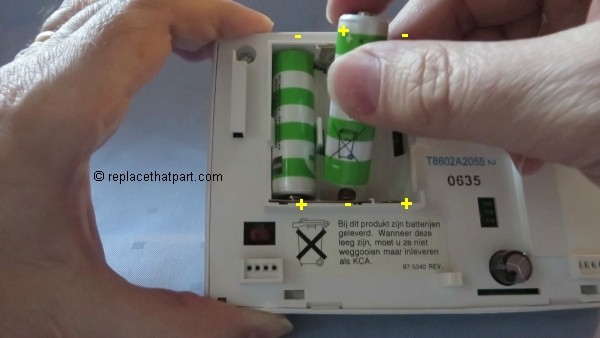
4. Verwijder de oude batterijen uit de houder.

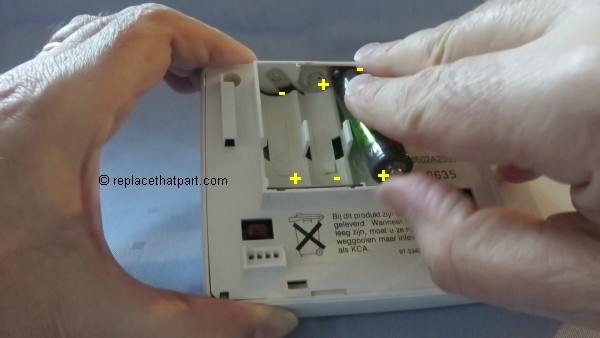
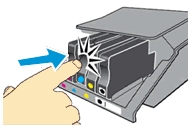
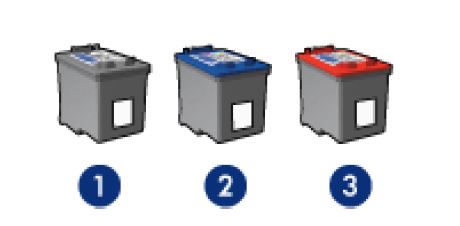
5. Plaats de nieuwe batterijen in de houder zoals aangegeven. Doe dit binnen 30 seconden; dan blijft de programmering behouden. Let op dat u de batterijen op de juiste wijze plaatst met de plus- en minkant van de batterijen conform het tekeningetje in de batterijhouder. De linker- en rechter batterij gaan met de plus naar beneden. Alleen de middelste batterij gaat met de plus naar boven in de houder.

6. *Eventueel: Stel de dag van de week en de tijd opnieuw in (alleen indien blijkt, dat dit noodzakelijk is).

Plaats de Chronotherm terug op de montageplaat
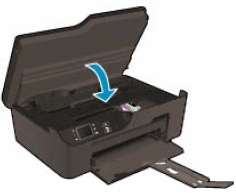
7. Haak de thermostaat met de uitsparingen op de nokken, die zich aan de linker- en rechterbovenhoek van de montageplaat bevinden.

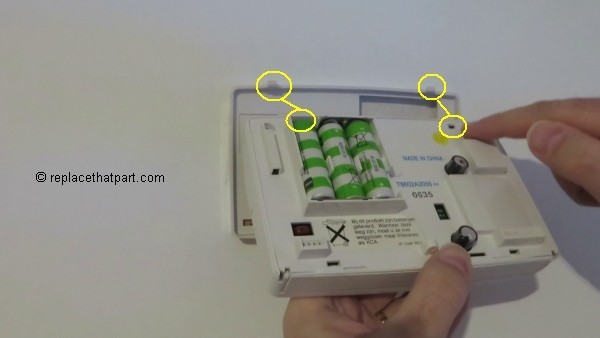
8. Kantel de thermostaat omlaag (scharnierend aan de pasnokken). Let er op dat de houder met de contactpennen van de montageplaat goed aansluiten op de contactblokjes van de thermostaat. Druk de onderkant van de Chronotherm stevig vast.

9. *Optioneel: Draai de borgschroef aan de onderzijde van de Chronotherm vast (indien gewenst).

Dat is alles! Uw Honeywell Chronotherm IV werkt weer minstens tot het volgende stookseizoen.

How to Replace an Empty Ink Cartridge in the HP Deskjet 5940 series Printer – an Illustrated Tutorial in 9 Steps

Make sure you purchase the right ink cartridges for your specific printer and printer region or have your old ones refilled. Cartridges are not compatible between different brands, and often not within the same brand. HP often designs its inkjet hardware to use country-specific consumables. When you unbox a new HP inkjet printer and set it up, you install a set of ink tanks that ship with the printer. As you turn on the device and get ready to use it, an initialization sequence localizes it to the country associated with the ink cartridges you installed.

HP recommends that you use original HP ink cartridges. XL (Extra Large) cartridges cost more but do provide better value in the long run. They will be able to print at least double the pages of a regular cartridge. However, (original) HP XL cartridges for the HP Deskjet 5940 printer are NOT available. Basically HP 96 and HP 97 are XL versions of HP 98 and 95 cartridges.

Follow these instructions to view the estimated ink levels of the print cartridges that are installed in the printer:
– Open the HP Printer Utility.
– Select Supplies Status.

Ink level warnings and indicators provide estimates for planning purposes only. When you receive a low-ink warning message, consider having a replacement ink cartridge available to avoid possible printing delays. You do not have to replace the ink cartridges until the print quality is unacceptable.

Use the ink-backup mode to operate the Deskjet 5940 with only one ink cartridge. The ink-backup mode is initiated when an ink cartridge is removed from the print cartridge cradle. Printing in ink-backup mode slows the printer and affects the quality of printouts. HP does not recommend using the photo print cartridge or the gray photo print cartridge for ink-backup mode.

Print cartridge combinations
Three print cartridges can be used with the printer. For everyday printing: Use a black cartridge along with a tri-color cartridge. For printing color photos: Use a photo cartridge along with a tri-color cartridge. Always install the tri-color print cartridge in the left side of the print cartridge cradle. Install the black OR photo print cartridge in the right side of the print cartridge cradle.

1. Black print cartridge
2. Tri-color print cartridge
3. Photo print cartridge

So, which ink cartridges do I need for my HP Deskjet 5940 Printer?

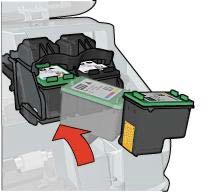
For your US HP Deskjet 5940 Printer you need HP 96 Black AND HP 97 Tri-color cartridges OR the smaller HP 98 Black AND HP 95 Tri-color cartridges. There are also 2-Packs available, like the HP 98 Black and 95 Tri-color Original Ink Cartridges, 2 Cartridges. Check the price of HP 96 and HP 97 cartridges at Amazon.com .

For printing photos use HP 99 Photo Original cartridges.

For your European or UK HP Deskjet 5940 Printer you need HP 339 Black AND HP 344 Tri-color cartridges OR the smaller HP 337 Black AND HP 343 Tri-color cartridges.
There are also 2-Packs available, like the HP 338 Black/343 Tri-color 2-pack Original Ink Cartridges.
For printing photos use HP 348 Photo cartridges.

Try Amazon's ink selector tool to find compatible ink cartridges for your printer.

Replace the ink cartridges

1. Press the power button to turn on the printer, if it is not already on.

2. Load plain unused Letter or A4 white paper in the input tray.

Remove the old cartridge
3. Open the printer cover. Wait until the print cartridge cradle is idle and silent before you continue.

4. Press down on the cartridge to release it, and then pull it toward you out its slot. Remove the cartridge from the slot on the left to replace the color cartridge. Remove the cartridge from the slot on the right to replace the black OR photo cartridge.

Insert a new cartridge
5. Remove the new cartridge from its package. Be careful to touch only the black plastic on the cartridge.

6. Remove the plastic tape using the pull tab.


Do NOT:
– Remove the copper electrical strip.
– Touch the copper-colored contacts or the ink nozzles.
– Replace the protective tape on the contacts.
do not touch contacts

7. Hold the cartridge by its sides with the nozzles toward the printer, and then slide the print cartridge at a slight upward angle into its slot. Push the cartridge forward into its slot until it snaps into place. Make sure that the cartridge is inserted in the correct slot. The tri-color cartridge goes in the slot on the left. The black cartridge OR photo goes in the slot on the right.

8. Repeat step 4 through 7 to replace the other cartridge, if necessary.
9. Close the cartridge access door. The printer automatically prints a calibration page.

Align the printer
The printer automatically aligns the print cartridges after a new print cartridge is installed. You can also align the print cartridges at other times to ensure optimal print quality.

– Open the HP Printer Utility (the HP Software).
– Select Align.
– Click the Align button, and then follow the onscreen instructions.

Perform a color calibration if the colors in photos that are printed with the photo print cartridge consistently look incorrect. Verify that a photo print cartridge is installed in the printer. Before performing a color calibration, align the print cartridges, and then reprint the photo. If the color is still incorrect, perform a color calibration from the HP Printer Utility.

How to Replace an Empty Ink Cartridge in the HP Deskjet 3521 e-All-in-One series – an Illustrated Tutorial in 10 Steps

Make sure you purchase the right ink cartridges for your specific printer and printer region or have your old ones refilled. Cartridges are not compatible between different brands, and often not within the same brand. HP often designs its inkjet hardware to use country-specific consumables. When you unbox a new HP inkjet printer and set it up, you install a set of ink tanks that ship with the printer. As you turn on the device and get ready to use it, an initialization sequence localizes it to the country associated with the ink cartridges you installed.

HP recommends that you use original HP ink cartridges. XL (Extra Large) cartridges cost more but do provide better value in the long run. They will be able to print at least double the pages of a regular cartridge. Our advice is that if you print often, go with XL. However, ink can dry up. So if you are not a frequent printer, go with the regular cartridges.

You can easily check the ink supply level to determine how soon you might need to replace a cartridge. The ink supply level shows an estimate of the amount of ink remaining in the cartridges. You can check the estimated ink levels from the printer software or from the printer control panel.

To check the ink levels from the control panel
From the Control Panel home screen, which displays Copy, Scan, and Quick Forms, select Ink Levels.
Then the printer displays the current ink levels.

To check the ink levels from the Printer Software
1. Double-click the HP Deskjet 3521 series desktop icon to open the Printer Software. You can also access the Printer Software by clicking Start > All Programs > HP > HP Deskjet 3520 series > HP Deskjet 3521 series
2. In the Printer Software, click Estimated Ink Levels.

Ink level warnings and indicators provide estimates for planning purposes only. When you receive a low-ink warning message, consider having a replacement cartridge available to avoid possible printing delays. You do not have to replace the cartridges until the print quality is unacceptable.

Which ink cartridges do I need for my HP Deskjet 3521 e-All-in-One printer?

For your US HP Deskjet 3521 e-All-in-One printer you need HP 564 Black AND HP 564 Cyan/Magenta/Yellow cartridges. There are also Combo Packs (4 cartridges in one pack) available, like the HP 564XL Black 564 Color Ink Cartridges Combo Pack. Check the price of HP 564 cartridges at Amazon.com .
For your European or UK HP Deskjet 3521 e-All-in-One printer you need HP 364 cartridges. There are also Combo Packs (4 cartridges in one pack) available, like the HP 364 Black, Cyan, Magenta, Yellow – Original Ink Cartridge Combo Content Pack – Standard Capacity.

Try Amazon's ink selector tool to find compatible ink cartridges for your printer.

Replace the ink cartridges.

1. Check that power is on. If the product is off, press the Power button to turn on the product. Wait until the product is idle and silent before continuing.

2. Before you install the ink cartridges, load unused, plain white letter or A4-sized paper in the tray, if you have not already done so.

Remove the old cartridge
3. Open the cartridge access door. Grasp the handles on either side of the cartridge access door, and then raise the door until it locks into place. The carriage moves to the access area. Wait for print carriage to move to right side of product.

4. Press the tab on the front of the cartridge inward to release it, and then pull up on the cartridge to remove it from the slot.

Insert the new cartridge
5. Pull the orange tab to remove the plastic wrap from the new cartridge.

! Do not touch the copper-colored electrical contacts and ink port !
Make sure you remove the plastic wrap from the ink cartridge before installing it in the product, or printing will fail. When you remove the plastic wrap, the paper label on the top of the cartridge tears slightly, which is necessary to vent the cartridge.

6. Remove the orange cap from the cartridge. Twist the cap counter-clockwise until it snaps off. A forceful twist may be required to remove the cap.

hp cartridge01

7. With the nozzle and the contacts facing down, push the cartridge into its slot until it clicks into place. Make sure that the color icon on the cartridge label matches the color icon on the slot.

8. Repeat step 4 to 7 for each ink cartridge you are replacing.

9. Close the cartridge access door.

Align the cartridges when prompted to do so
10. After you load new cartridges and close the cartridge access door, the printer automatically prompts you to print an alignment page.

a. On the product control panel, press OK. The product prints an alignment page.
b. Open the lid.

c. Place the alignment page on the scanner glass with the printed side down, and then position it on the front right corner of the glass.

d. Close the lid.
e. Press OK. The product scans the alignment page.
f. Follow the control panel instructions to complete the alignment.
g. Recycle or discard the alignment page.

The alignment page did not print?
If the alignment page did not print automatically, you can align the cartridges manually from the printer software and from the printer display on the product.

To align the cartridges from the Printer Software
– In the Printer Software, click Print and Scan and then click Maintain Your Printer to access the Printer Toolbox.
– The Printer Toolbox appears.
– Click Align Printheads on the Device Services tab. The product prints an alignment sheet.
– Go to step b.

How to Replace an Empty Ink Cartridge in the HP OfficeJet Pro 7720 Wide Format All-in-One series Printer – an Illustrated Tutorial in 8 Steps

Make sure you purchase the right ink cartridges for your specific printer and printer region or have your old ones refilled. Cartridges are not compatible between different brands, and often not within the same brand. HP often designs its inkjet hardware to use country-specific consumables. When you unbox a new HP inkjet printer and set it up, you install a set of ink tanks that ship with the printer. As you turn on the device and get ready to use it, an initialization sequence localizes it to the country associated with the ink cartridges you installed.

HP recommends that you use original HP ink cartridges. XL (Extra Large) cartridges cost more but do provide better value in the long run. The XL versions of the cartridges for your HP OfficeJet Pro 7720 will be able to print at least double the pages of a regular cartridge. Our advice is that if you print often, go with XL. However, ink can dry up. So if you are not a frequent printer, go with the regular cartridges. You can check the estimated ink levels from the printer software or from the printer control panel.

To check the estimated ink levels from the printer control panel
– Touch or swipe down the tab at the top of the screen to open the Dashboard, and then touch the Ink Icon (see below) to check the estimated ink levels.

The control panel displays estimated ink levels. The amount of color shown within a column represents how much ink remains in the ink cartridge of that color.

Ink level alerts and indicators provide estimates for planning purposes only. When you receive a low-ink alert, consider having a replacement cartridge available to avoid possible printing delays. You do not have to replace the cartridges until you are prompted to do so. HP recommends that you replace any missing cartridges as soon as possible to avoid print quality issues and possible extra ink usage or damage to the ink system. Never turn off the printer when ink cartridges are missing.

Which ink cartridges do I need for my HP OfficeJet Pro 7720 Wide Format All-in-One Printer?

For your US HP OfficeJet Pro 7720 Wide Format All-in-One Printer you need an
HP 952 Black Ink Cartridge AND 3 color cartridges: HP 952 Cyan, HP 952 Magenta and HP 952 Yellow.
There are also Combo Packs (4 cartridges in one pack) available, like the HP 952XL Black and 952 Tri-color (Cyan, Magenta, Yellow) Combo Pack. Check the price of HP 952 cartridges at Amazon.com .

For your European or UK HP OfficeJet Pro 7720 Wide Format All-in-One Printer you need an HP 953 Black Ink Cartridge AND and 3 color cartridges: HP 953 Cyan, HP 953 Magenta and HP 953 Yellow.

Try Amazon's ink selector tool to find compatible ink cartridges for your printer.

Replace the ink cartridges

1. Turn the printer on by pressing the power button, if it is not already turned on. Wait until the product is idle and silent before continuing.

2. Load Letter, A4, or Legal unused plain white paper into the paper tray.

Remove the empty cartridge
3. Slip your fingers behind the groove on the right-hand side of the printer, and then pull forward to open the cartridge access door. Wait until the carriage is idle and silent before you continue.

4. Find the cartridge you want to replace. Push in on the front of the cartridge to release it, and then pull it toward you to remove it from its slot.

Detailed image: Removing the empty cartridge from its slot.

Insert the new cartridge
5. Remove the new ink cartridge from its packaging. Be careful to touch only the black plastic on the cartridge. Do NOT touch the electrical contacts and ink port.

6. Hold the new cartridge so that the cartridge contacts face the printer. Using the color-coded letters for help, slide the ink cartridge into the empty slot until until it clicks into place and it is securely installed in the slot.

Detailed image: Inserting the new cartridge into its slot. Make sure that you insert the ink cartridge into the slot that has the same colored letter as the color you are installing.

7. Repeat steps 4 through 6 for each ink cartridge you are replacing. Make sure no ink cartridge is sticking out farther than the others. If an ink cartridge is sticking out, push it until it snaps into place.

8. Close the print-carriage access door and wait until the warm-up sequence finishes and your printer is quiet before you proceed.

Align the printhead only if necessary.
The printer automatically aligns the printhead during the initial setup. You might want to use this feature when the printer status page shows streaking or white lines through any of the blocks of color or if you are having print quality issues with your printouts. You can align the printhead from the printer’s control panel and from printer’s software.

From the printer control panel:
– Swipe down to open the Dashboard, and then touch the Setup icon.
– Swipe up on the display, and then touch Printer Maintenance.
– Touch Align Printhead, and then touch Continue.
An alignment page prints.

From the HP printer software:
Open the HP printer software.
– Click Print, Scan, & Fax, and then click Maintain Your Printer to access the Printer Toolbox.
– In Printer Toolbox, click Align Printheads on the Device Services tab.
The printer prints an alignment sheet.