How to Replace an Empty Ink Cartridge in the HP ENVY Inspire 7220e All-in-One Printer – an Illustrated Tutorial in 11 Steps

Make sure you purchase the right ink cartridges for your specific printer and printer region or have your old ones refilled. Cartridges are not compatible between different brands, and often not within the same brand. HP often designs its inkjet hardware to use country-specific consumables. When you unbox a new HP inkjet printer and set it up, you install a set of ink tanks that ship with the printer. As you turn on the device and get ready to use it, an initialization sequence localizes it to the country associated with the ink cartridges you installed. HP recommends that you use original HP ink cartridges.

XL (Extra Large) cartridges cost more but do provide better value in the long run. They will be able to print 3 times as many pages as a regular cartridge. Our advice is that if you print often, go with XL. However, ink can dry up. So if you are not a frequent printer, go with the regular cartridges.

You can check the estimated ink levels from the HP Smart app, from the printer software or from the printer control panel.
A. To check the estimated ink levels from the printer control panel.
– From the printer control panel, touch or swipe down the tab at the top of the screen to open the Dashboard
– Touch the Ink symbol to check the estimated ink levels.
hp envy inspire 7220e how to replace ink cartridges 01

B. To check the ink levels from the printer software (Windows)
– Open the HP printer software.
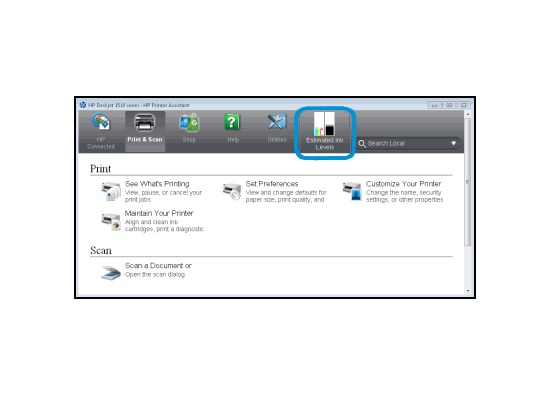
– In the printer software, click Estimated Levels at the top of the window.
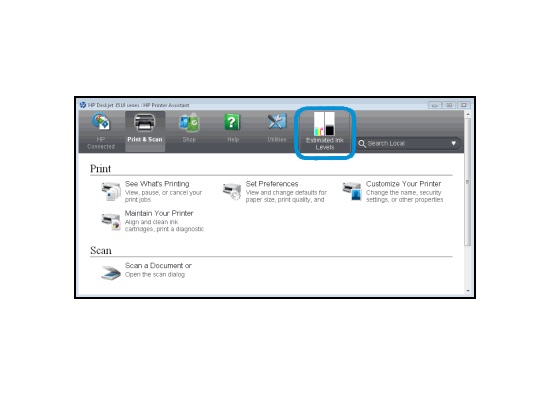
hp envy inspire 7220e how to replace ink cartridges 02

Ink level warnings and indicators provide estimates for planning purposes only. When you receive a low-ink warning message, consider having a replacement cartridge available to avoid possible printing delays. You do not have to replace the cartridges until the print quality is unacceptable.

Use the single-cartridge mode to operate the HP ENVY Inspire 7220e All-in-One printer with only one cartridge. The single-cartridge mode is initiated when an cartridge is removed from the cartridge carriage.

Which ink cartridges do I need for my HP ENVY Inspire 7220e All-in-One series Printer?

For your US HP ENVY Inspire 7220e All-in-One Printer you need HP 64 Black AND HP 64 Tri-color cartridges (OR the HP 64 XL versions). There are also combo packs available, like the HP 64 Black and Tri-Color Original Ink Cartridges, 2 Cartridges. Check the price of HP 64 cartridges at Amazon.com .
For your European or UK HP ENVY Inspire 7220e All-in-One Printer you need HP 303 Black AND HP 303 Tri-color cartridges (OR the HP 303 XL versions). There are also combo packs available, like the HP Z4B62EE 303 Photo Value Pack, Black and Tri-colour, Pack of 2.

Try Amazon's ink selector tool to find compatible ink cartridges for your printer.

Replace the ink cartridges

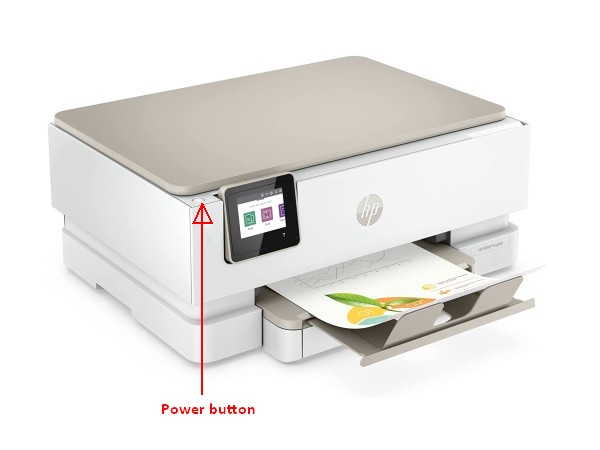
1. Press the Power button to turn on the printer, if it is not already turned on.
hp envy inspire 7220e how to replace ink cartridges 03

2. Load unused plain white Letter or A4-sized paper into the main paper tray.
hp envy inspire 7220e how to replace ink cartridges 04

Remove the empty cartridge
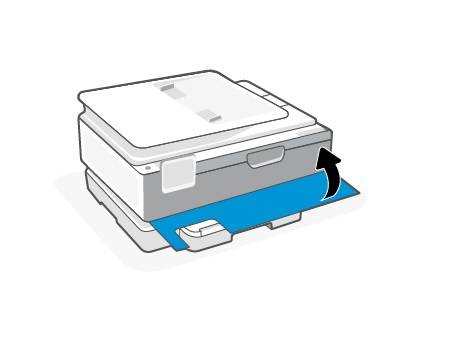
3. Open the front door as shown below.
hp envy inspire 7220e how to replace ink cartridges 05

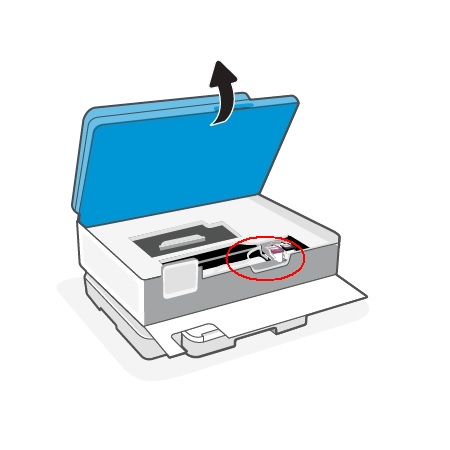
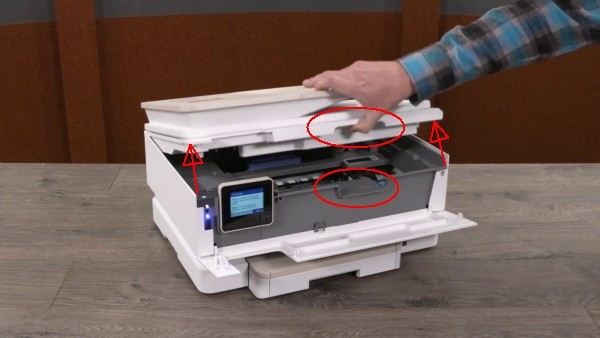
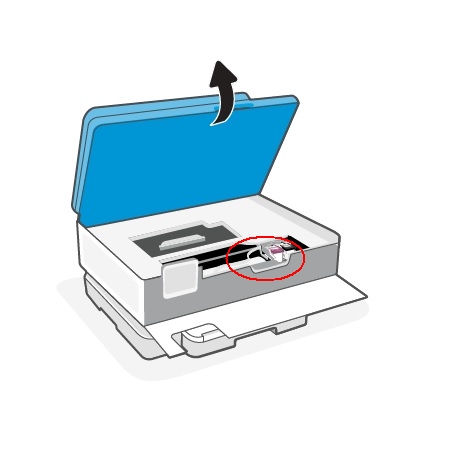
4. Open the cartridge access door by placing a thumb or two fingers under the small handle on the front of the cartridge access door and then lifting it up. Wait until the print cartridge cradle is idle and silent before you continue.
hp envy inspire 7220e how to replace ink cartridges 06

hp envy inspire 7220e how to replace ink cartridges 07

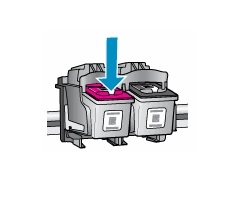
5. Lightly press down on the cartridge to release it, and then pull the cartridge toward you out of its slot. Set it aside for recycling.
– Remove the cartridge from the slot on the left to replace the tri-color cartridge.
– Remove the cartridge from the slot on the right to replace the black cartridge.
hp envy inspire 7220e how to replace ink cartridges 08

Insert the new cartridge
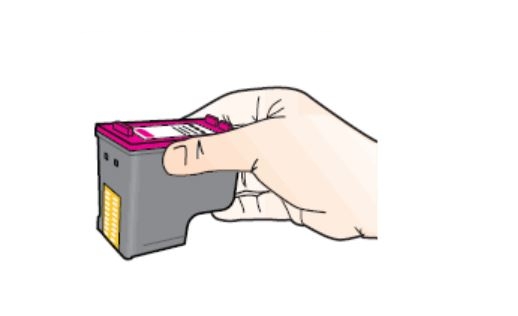
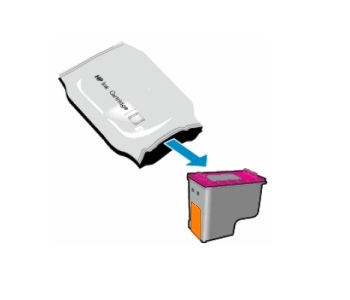
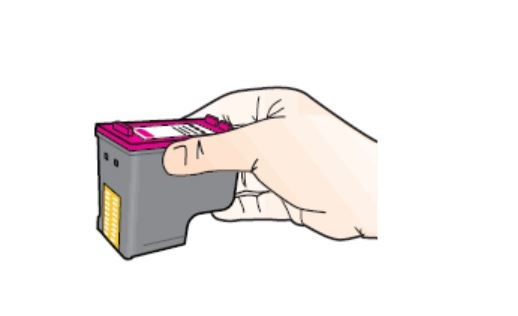
6. Remove the new cartridge from its package. Be careful to only touch the black plastic on the ink cartridge by holding the ink cartridge by its sides.
hp envy inspire 7220e how to replace ink cartridges 09

hp envy inspire 7220e how to replace ink cartridges 10

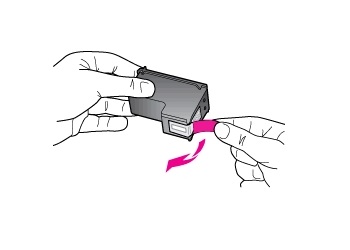
7. Pull the colored tab to remove the protective tape from the cartridge.
hp envy inspire 7220e how to replace ink cartridges 11


Do NOT:
– Remove the copper electrical strip.
– Touch the copper-colored contacts or the ink nozzles.
– Replace the protective tape on the contacts.
do not touch contacts

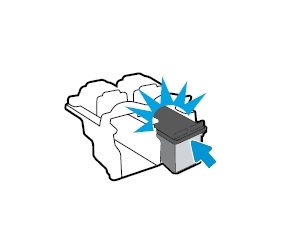
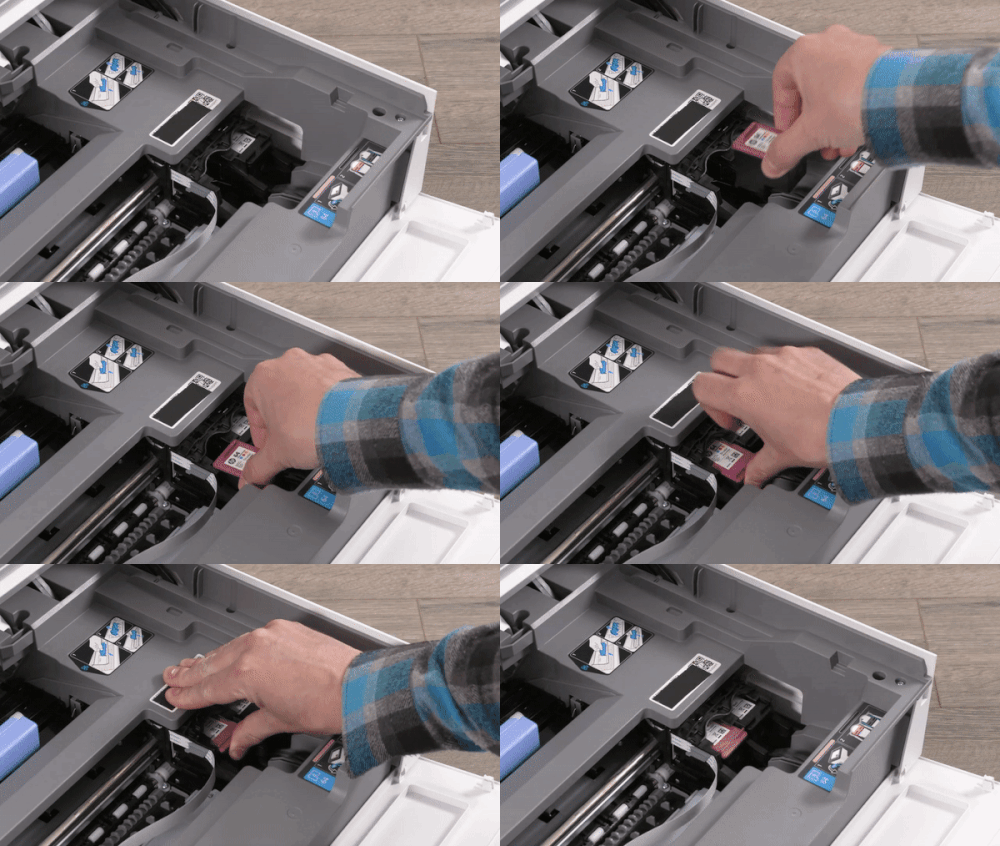
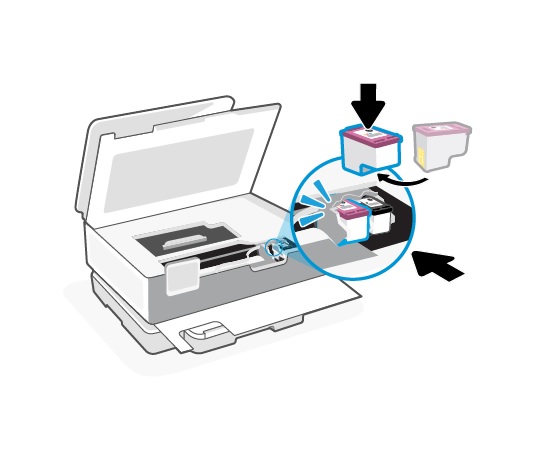
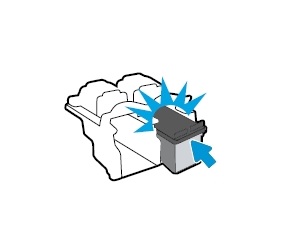
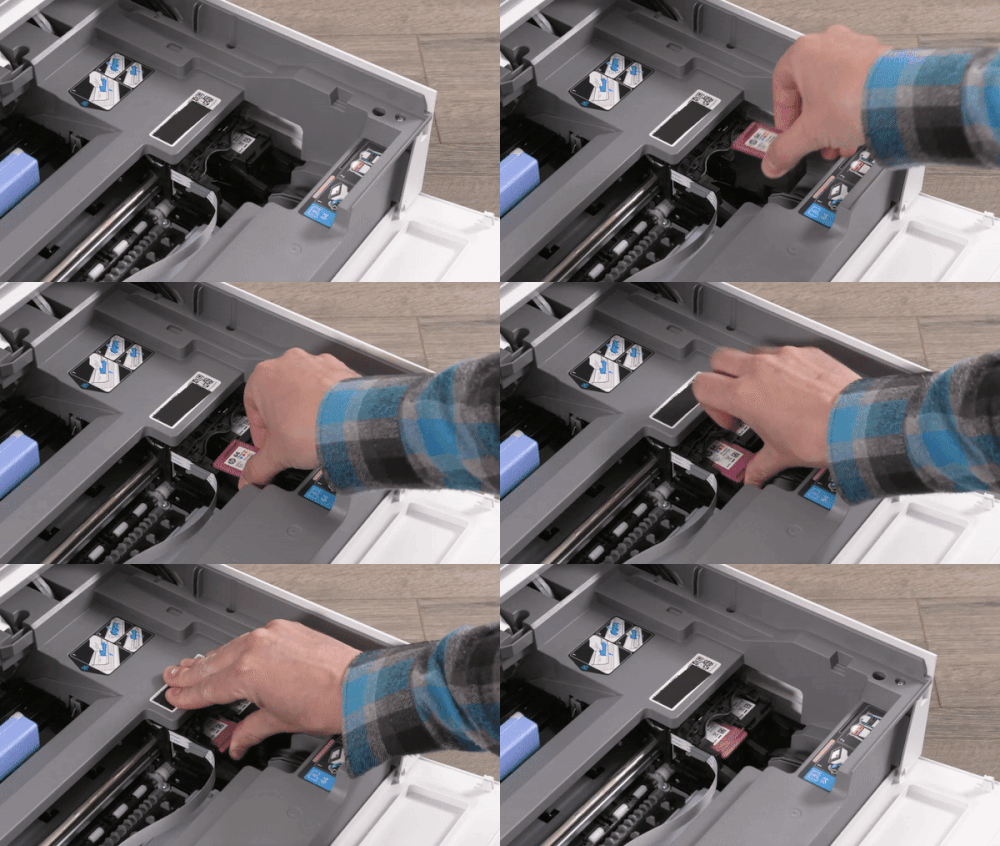
8. Hold the cartridge by its sides with the nozzles toward the printer, and then insert the cartridge into its slot at a slight upward angle. Make sure that the icon on the cartridge matches the icon on the slot.
– Insert the tri-color cartridge into the left slot.
– Insert the black cartridge into the right slot.
hp envy inspire 7220e how to replace ink cartridges 12

hp envy inspire 7220e how to replace ink cartridges 13

hp envy inspire 7220e how to replace ink cartridges 14

9. Repeat steps 5 through 8 to replace the other cartridge, if necessary.

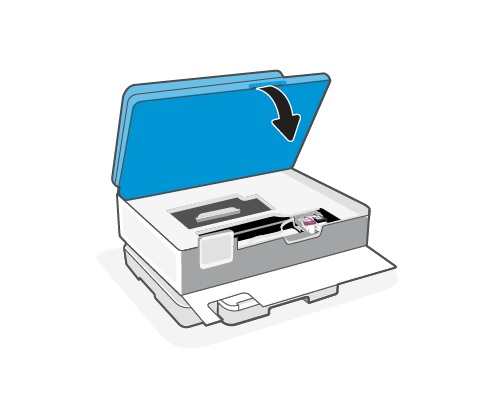
10. Close the cartridge access door. The printer starts an initialization process. It is normal for the printer to make noises during this process.
hp envy inspire 7220e how to replace ink cartridges 15

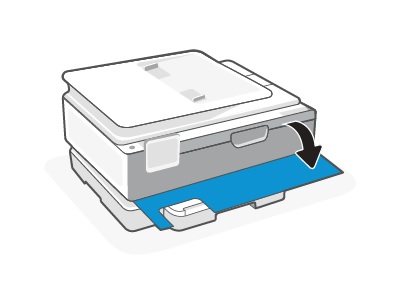
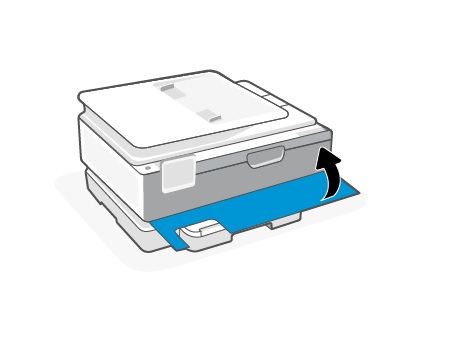
11. Close the front door.
hp envy inspire 7220e how to replace ink cartridges 16

Align the printhead only if necessary.
Clean the printhead if your printed output is streaked or has any incorrect or missing colors.

The printer automatically aligns the printhead during the initial setup. The printhead does not have to be realigned when cartridges are replaced. However, you might want to use this feature for print quality issues in printouts when the printer status page shows streaking or white lines through any of the blocks of color, or if you are having print quality issues with your printouts. Performing the cleaning and aligning procedures unnecessarily can waste ink and shorten the life of the cartridges.

From the printer control panel:
– Touch or swipe down the tab at the top of the screen to open the
Dashboard

– Touch Setup
– Touch Printer Maintenance
Select the desired option
– Follow the onscreen instructions

How to Replace an Empty Ink Cartridge in the HP ENVY Inspire 7255e All-in-One Printer – an Illustrated Tutorial in 11 Steps

Check the price of the HP ENVY Inspire 7255e at Amazon.com .


Make sure you purchase the right ink cartridges for your specific printer and printer region or have your old ones refilled. Cartridges are not compatible between different brands, and often not within the same brand. HP often designs its inkjet hardware to use country-specific consumables. When you unbox a new HP inkjet printer and set it up, you install a set of ink tanks that ship with the printer. As you turn on the device and get ready to use it, an initialization sequence localizes it to the country associated with the ink cartridges you installed. HP recommends that you use original HP ink cartridges.

XL (Extra Large) cartridges cost more but do provide better value in the long run. They will be able to print 3 times as many pages as a regular cartridge. Our advice is that if you print often, go with XL. However, ink can dry up. So if you are not a frequent printer, go with the regular cartridges.

You can check the estimated ink levels from the printer software or from the printer control panel.
A. To check the estimated ink levels from the printer control panel.
– From the printer control panel, touch or swipe down the tab at the top of the screen to open the Dashboard
– Touch the Ink symbol to check the estimated ink levels.
hp envy inspire 7255e how to replace ink cartridges 01

B. To check the ink levels from the printer software (Windows)
– Open the HP printer software.
– In the printer software, click Estimated Levels at the top of the window.
hp envy inspire 7255e how to replace ink cartridges 02

Ink level warnings and indicators provide estimates for planning purposes only. When you receive a low-ink warning message, consider having a replacement cartridge available to avoid possible printing delays. You do not have to replace the cartridges until the print quality is unacceptable.

Use the single-cartridge mode to operate the HP ENVY Inspire 7255e All-in-One printer with only one cartridge. The single-cartridge mode is initiated when an cartridge is removed from the cartridge carriage.

Which ink cartridges do I need for my HP ENVY Inspire 7255e All-in-One series Printer?

For your US HP ENVY Inspire 7255e All-in-One Printer you need HP 64 Black AND HP 64 Tri-color cartridges (OR the HP 64 XL versions). There are also combo packs available, like the HP 64 Black and Tri-Color Original Ink Cartridges, 2 Cartridges. Check the price of HP 64 cartridges at Amazon.com .
For your European or UK HP ENVY Inspire 7255e All-in-One Printer you need HP 303 Black AND HP 303 Tri-color cartridges (OR the HP 303 XL versions). There are also combo packs available, like the HP Z4B62EE 303 Photo Value Pack, Black and Tri-colour, Pack of 2.

Try Amazon's ink selector tool to find compatible ink cartridges for your printer.

Replace the ink cartridges

1. Press the Power button to turn on the printer, if it is not already turned on.
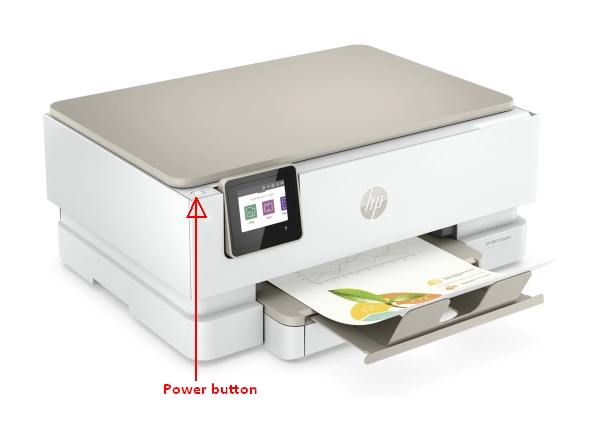
hp envy inspire 7255e how to replace ink cartridges 03

2. Load unused plain white Letter or A4-sized paper into the main paper tray.
hp envy inspire 7255e how to replace ink cartridges 04

Remove the empty cartridge
3. Open the front door as shown below.
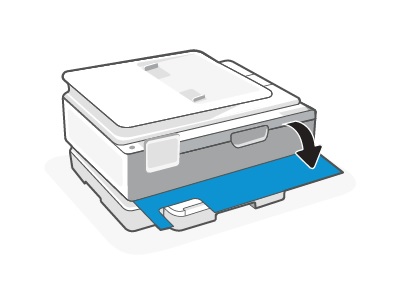
hp envy inspire 7255e how to replace ink cartridges 05

4. Open the cartridge access door by placing a thumb or two fingers under the small handle on the front of the cartridge access door and then lifting it up. Wait until the print cartridge cradle is idle and silent before you continue.
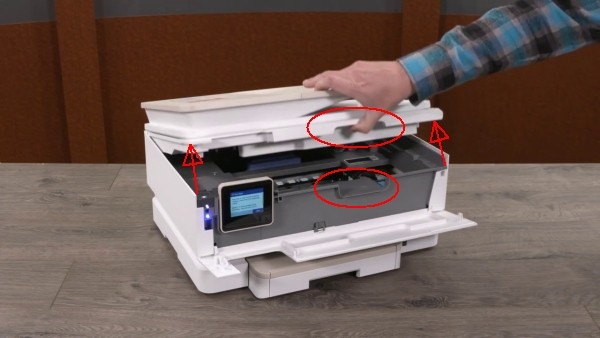
hp envy inspire 7255e how to replace ink cartridges 06

hp envy inspire 7255e how to replace ink cartridges 07

5. Lightly press down on the cartridge to release it, and then pull the cartridge toward you out of its slot. Set it aside for recycling.
– Remove the cartridge from the slot on the left to replace the tri-color cartridge.
– Remove the cartridge from the slot on the right to replace the black cartridge.
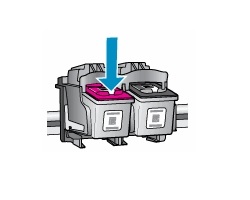
hp envy inspire 7255e how to replace ink cartridges 08

Insert the new cartridge
6. Remove the new cartridge from its package. Be careful to only touch the black plastic on the ink cartridge by holding the ink cartridge by its sides.
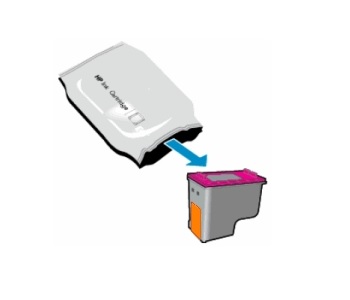
hp envy inspire 7255e how to replace ink cartridges 09

hp envy inspire 7255e how to replace ink cartridges 10

7. Pull the colored tab to remove the protective tape from the cartridge.
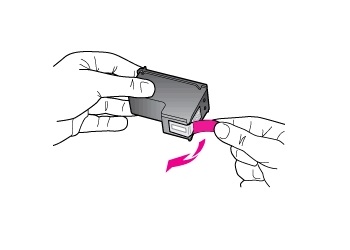
hp envy inspire 7255e how to replace ink cartridges 11


Do NOT:
– Remove the copper electrical strip.
– Touch the copper-colored contacts or the ink nozzles.
– Replace the protective tape on the contacts.
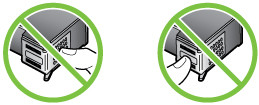
do not touch contacts

8. Hold the cartridge by its sides with the nozzles toward the printer, and then insert the cartridge into its slot at a slight upward angle. Make sure that the icon on the cartridge matches the icon on the slot.
– Insert the tri-color cartridge into the left slot.
– Insert the black cartridge into the right slot.
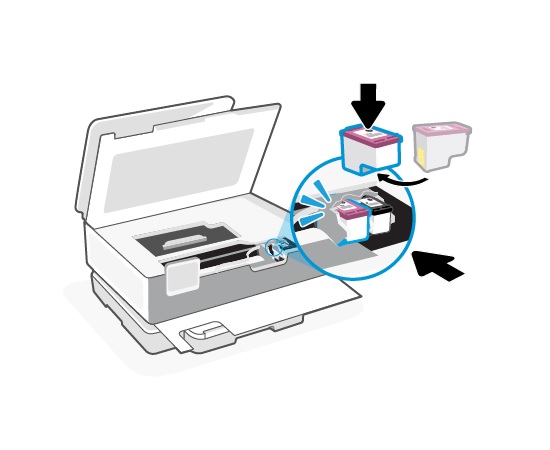
hp envy inspire 7255e how to replace ink cartridges 12

hp envy inspire 7255e how to replace ink cartridges 13

hp envy inspire 7255e how to replace ink cartridges 14

9. Repeat steps 5 through 8 to replace the other cartridge, if necessary.

10. Close the cartridge access door. The printer starts an initialization process. It is normal for the printer to make noises during this process.
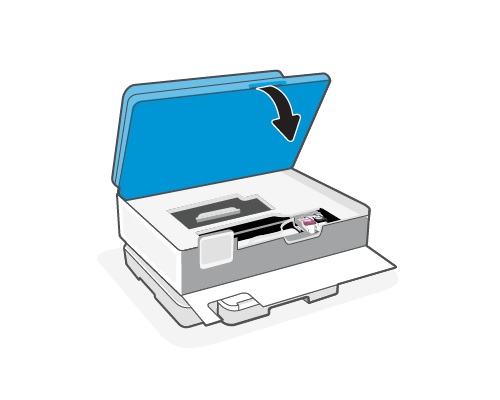
hp envy inspire 7255e how to replace ink cartridges 15

11. Close the front door.
hp envy inspire 7255e how to replace ink cartridges 16

Align the printhead only if necessary.
Clean the printhead if your printed output is streaked or has any incorrect or missing colors.

The printer automatically aligns the printhead during the initial setup. The printhead does not have to be realigned when cartridges are replaced. However, you might want to use this feature for print quality issues in printouts when the printer status page shows streaking or white lines through any of the blocks of color, or if you are having print quality issues with your printouts.
Note: Performing the cleaning and aligning procedures unnecessarily can waste ink and shorten the life of the cartridges.

Hoe vervang ik de FireX Rookmelder PADC240 zonder de montageplaat en de bedrading te vernieuwen?

Gevaren
De meeste ongelukken gebeuren in huis en ook een rookalarm vervangen is niet zonder gevaar. Zorg ervoor dat je weet wat je doet. De FireX Rookmelder PADC240 is aangesloten op 230V netspanning. Omdat rookalarmen meestal aan het plafond worden bevestigd, bestaat er ook een valrisico. Daarnaast is het zo, dat als een rookalarm niet correct wordt geplaatst, deze niet of niet optimaal werkt.

  • Lees onze disclaimer
  • Lees de officiële gebruisaanwijzing
  • Schakel een bevoegde elektricien in, als je niet zeker bent van je zaak

Wanneer moet een rookalarm vervangen worden?
De maximale levensduur van een rookmelder is 10 jaar. Na 10 jaar is een rookmelder niet meer betrouwbaar. Dit geld zowel voor rookmelders die werken op batterijen als voor rookmelders die zijn aangesloten op netstroom: elke rookmelder moet na 10 jaar worden vervangen. Een rookmelder is daarom voorzien van een sticker waarop of de productiedatum of de uiterlijke vervangingsdatum te vinden is. Ook al heb je de rookmelder getest met de testknop, je weet nooit zeker of de rookmelder het daadwerkelijk nog doet bij een echte brand als de vervangingsdatum is verlopen.

De oude FireX Rookmelder PADC240 vervangen
De FireX Rookmelder PADC240 was rond het jaar 2006 een populaire rookmelder, die ook in nieuwbouwprojecten door aannemers werd geplaatst. Vaak zijn er meerdere rookmelders door middel van bedrading aan elkaar gekoppeld, zodat meerdere ruimtes beveiligd zijn en het alarmsignaal overal te horen is. De FireX Rookmelder PADC240 is altijd aangesloten op 230V netspanning. De ingebouwde 9-Volt batterij dient slechts als back-up batterij voor het geval dat de stroom uitvalt, bijvoorbeeld door brand. De PADC240 is niet meer verkrijgbaar. Toch is het mogelijk deze brandmelder te vernieuwen, zonder de bestaande bedrading en de montageplaat van het oude apparaat te vervangen.

De FireX Rookmelder KF20 past namelijk op de bestaande montagevoet van de oude FireX Rookmelder PADC240 en ook de stekker (de connector) is hetzelfde! Naar men zegt is dit de meest verkochte rookmelder van Nederland. Deze is ook in 3-packs en 6-packs verkrijgbaar, als je er 3 of 6 aan elkaar wilt koppelen.

Benodigdheden
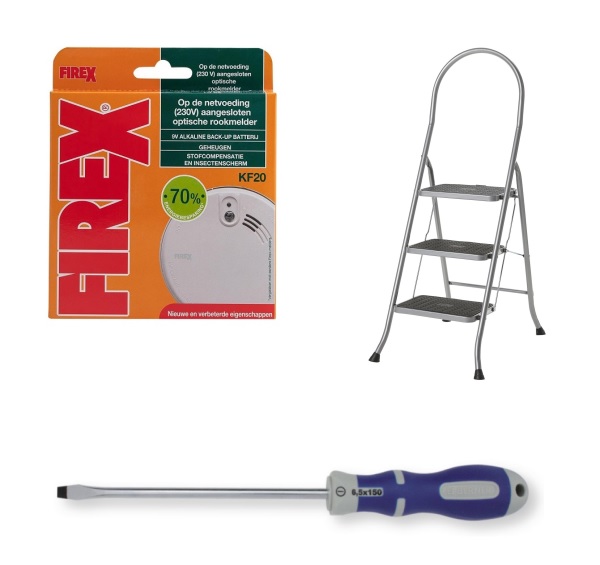
Om je oude FireX Rookmelder PADC240 te vervangen en de oude bedrading en de oude montageplaat te hergebruiken, heb je nodig:

vervangen van de firex rookalarm padc240 01

Vervangen van de FireX Rookmelder PADC240

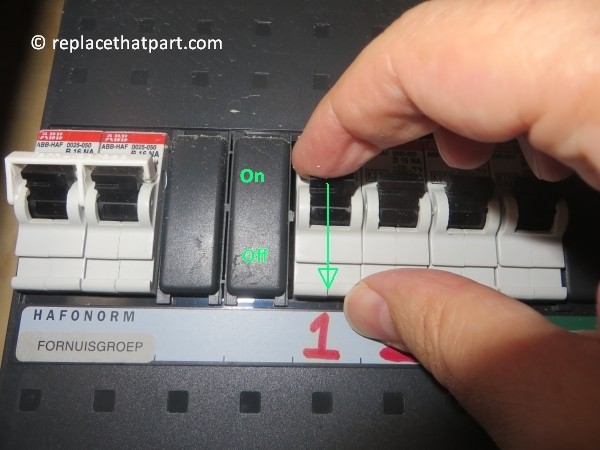
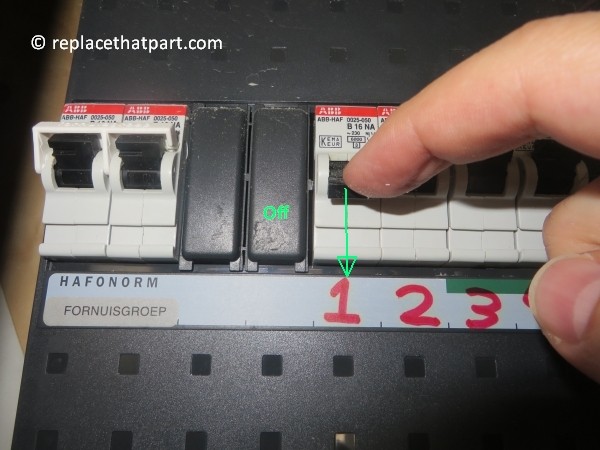
1. Sluit altijd de stroom af in de ruimte waard de rookmelder wordt vervangen. Dit doe je in de groepenkast (vroeger stoppenkast genaamd) van je woning. Het handigste is om de lichten in de ruimte waar de oude rookmelder hangt, aan te doen. Vervolgens doe je de juiste schakelaar behorend bij die ruimte naar beneden. Als het goed is gaat de verlichting in de ruimte uit. In oude huizen is de stoppenkast nog voorzien van ouderwetse (smelt)zekeringen in plaats van een schakelaar. Draai in dat geval de porseleinen draaidop los en verwijder deze tijdelijk met de zekering. Ook nu gaat de verlichting in de ruimte uit.
vervangen van de firex rookalarm padc240 02

vervangen van de firex rookalarm padc240 03

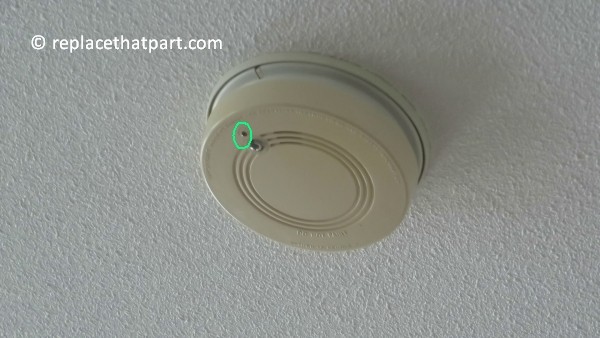
2. Controleer of het groene lampje op de oude rookmelder UIT is. In principe is de stroom in de ruimte dan correct afgesloten. Andere ruimtes van de woning en soms zelfs andere gedeeltes van de ruimte waar de rookmelder hangt, hebben meestal nog wel licht en stroom.
vervangen van de firex rookalarm padc240 04

Verwijder de oude rookmelder PADC240
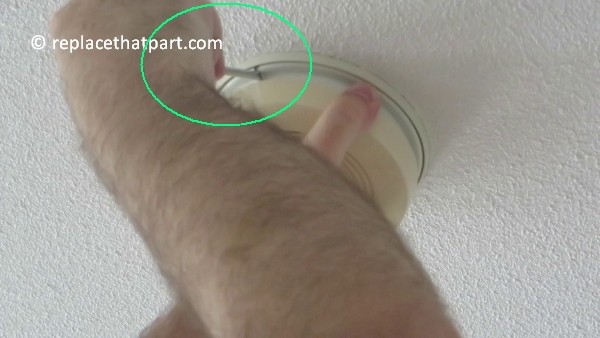
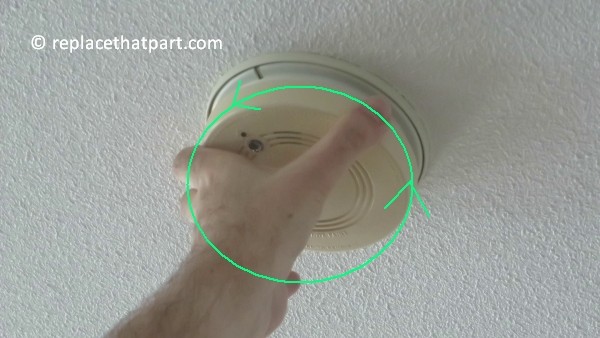
3. Lokaliseer het kleine sleufje waar je een platte schroevendraaier in kunt steken, om het rookalarm te kunnen unlocken van de montagevoet.

4. Duw de schroevendraaier in de sleuf tegen het plastic vergrendelingslipje en duw deze voorzichtig naar binnen. Vaak voel je enige beweging op het moment dat het rookalarm ontgrendeld is van de montageplaat. Deze kan nu naar links gedraaid worden.
vervangen van de firex rookalarm padc240 05

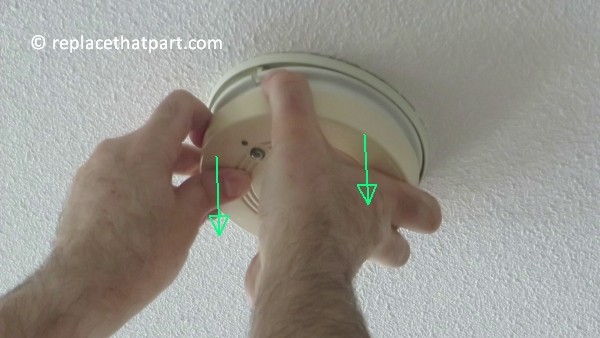
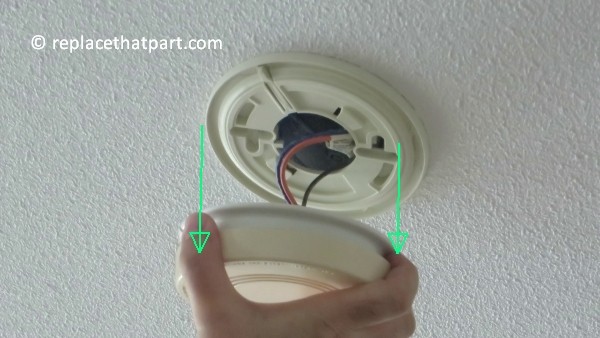
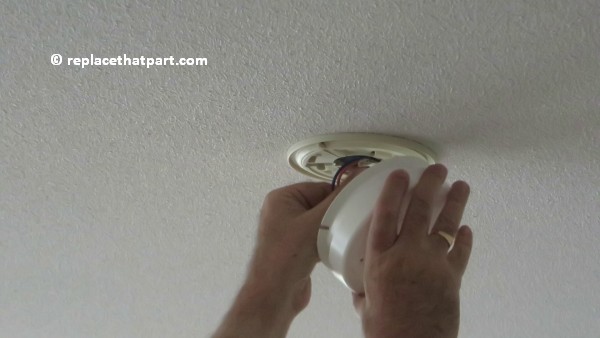
5. Neem het rookalarm (maar niet de grondplaat) stevig in je hand en draai deze ongeveer 1,5 cm naar links, tegen de klok in. Het rookalarm is nu los van de grondplaat. Trek de rookmelder nu omlaag. Soms is hier enige kracht voor nodig, omdat het alarm niet altijd heel makkelijk los komt. Doe wel voorzichtig, omdat de bedrading nog vast zit.
vervangen van de firex rookalarm padc240 06

vervangen van de firex rookalarm padc240 07

vervangen van de firex rookalarm padc240 08

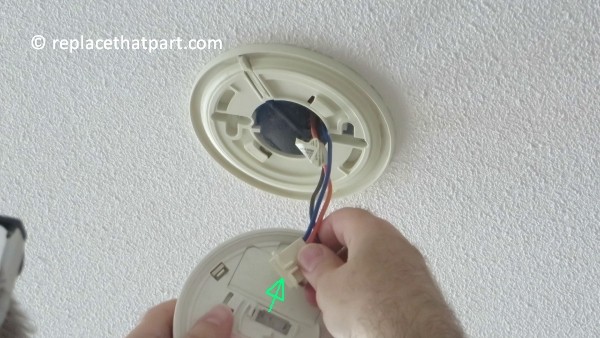
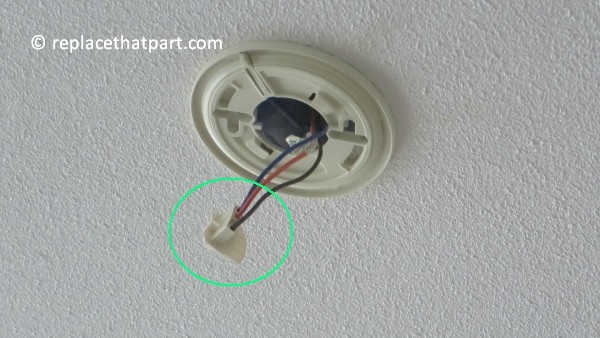
6. Trek nu de beige stekker uit de achterkant van het apparaat, zonder aan de bedrading te trekken. De beige stekker met de 3 stroomdraden kan recht naar beneden getrokken worden. Het stekkertje van de PADC240 kan behoorlijk strak vast zitten. Wij hoefden niet op plastic knopjes te duwen of aan lipjes te trekken om de stekker los te maken, maar we moesten wel kracht gebruiken. Als je niet genoeg grip op het stekkertje krijgt met je vingers, kun je eventueel voorzichtig een waterpomp tang gebruiken om de stekker los te trekken, maar doe dit op eigen risico! Bij het nieuwe model KF20, gaat het lostrekken en plaatsen van de stekker gelukkig een stuk makkelijker.
vervangen van de firex rookalarm padc240 09

vervangen van de firex rookalarm padc240 10

De oude FireX PADC240 is nu verwijderd. De grondplaat en de stroomdraden met de beige stekker zijn blijven zitten voor hergebruik.
vervangen van de firex rookalarm padc240 11

Plaats de nieuw rookmelder KF20
7. Neem de nieuwe rookmelder uit de verpakking. De beige stekker met bedrading en de grondplaat heb je niet nodig, want je hergebruikt immers die van het oude apparaat. Je kunt ze eventueel bewaren als reserveonderdeel.

8. Open het klepje van het batterijcompartiment. Het batterijencompartiment van de nieuwe FireX KF20 brandmelder is iets anders, dan die van het oude apparaat. De batterij is voor het gemak al in het toestel geplaatst, maar moet nog wel geactiveerd worden door een plastic lipje los te trekken. Trek het batterijlipje eruit. De rookmelder kan kort piepen. De rookmelder kan niet op de montageplaat gemonteerd worden als de batterij niet geplaatst is.

9. Test of de batterij werkt. Houd hiertoe de knop aan de voorkant van de rookmelder ongeveer 5 seconden lang ingedrukt. De rookmelder moet een alarm laten horen als de batterij goed is aangesloten. Let op: Bedek de geluidsopeningen met uw hand of houd het apparaat op een armlengte afstand tijdens het testen om ongemak te voorkomen.

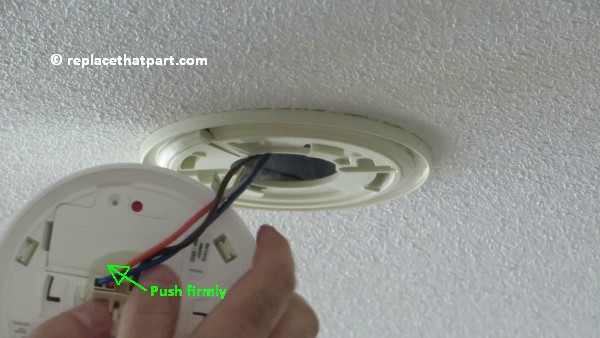
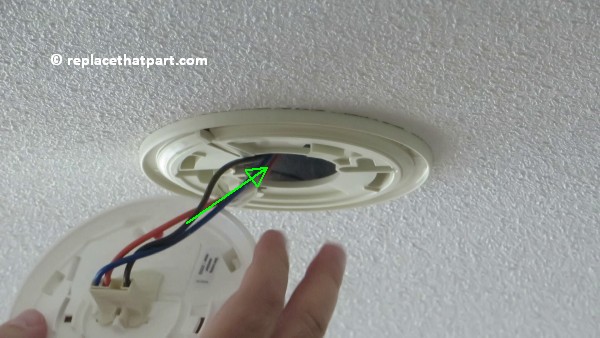
10. Het plaatsen van de nieuwe rookmelder KF20 op de montageplaat werkt hetzelfde als het losmaken van de oude rookmelder, maar dan in omgekeerde volgorde. Duw de stekker weer op de pinnen aan de onderzijde van het apparaat. Duw de stekker stevig aan, totdat hij vastklikt. De stekker past maar op één manier.
vervangen van de firex rookalarm padc240 12

vervangen van de firex rookalarm padc240 13

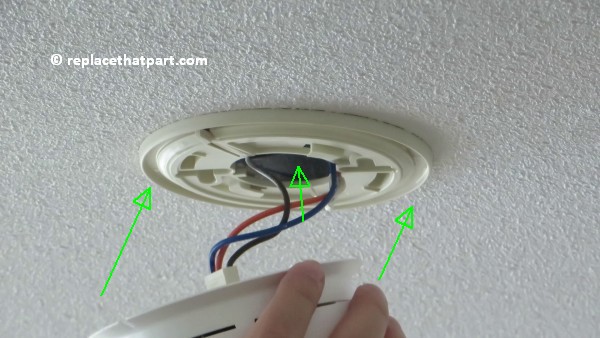
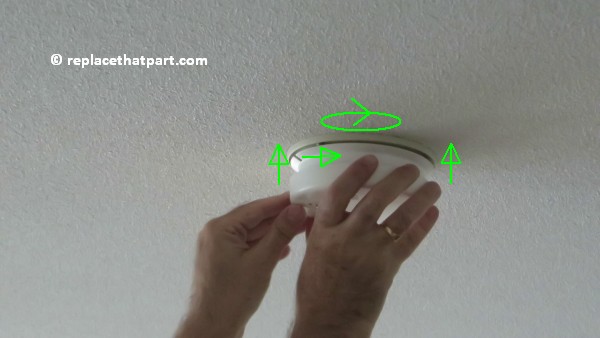
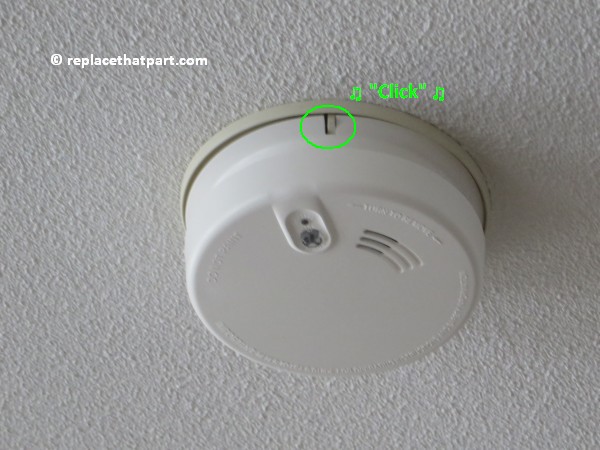
11. Beweeg de rookmelder richting de montageplaat en duw meteen de bedrading weer terug in in het plafond via het gat van de montageplaat. Plaats de rookmelder zo op de montageplaat dat het sleufje aan de zijkant van de rookmelder zich links van het lipje op de montageplaat bevindt. Draai de rookmelder naar rechts, met de klok mee om hem te vergrendelen met een klik.
vervangen van de firex rookalarm padc240 14

vervangen van de firex rookalarm padc240 15

vervangen van de firex rookalarm padc240 16

vervangen van de firex rookalarm padc240 17

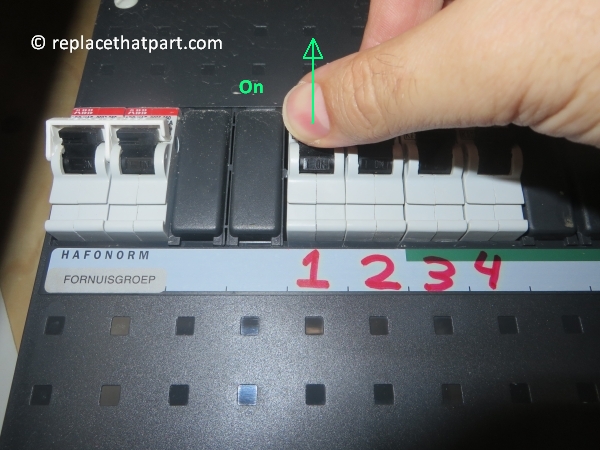
12. Schakel de elektriciteit weer in bij de groepenkast door de juiste schakelaar, die naar beneden staat weer naar boven te klikken, of de porseleinen draaidop met de zekering weer vast te draaien.
vervangen van de firex rookalarm padc240 18

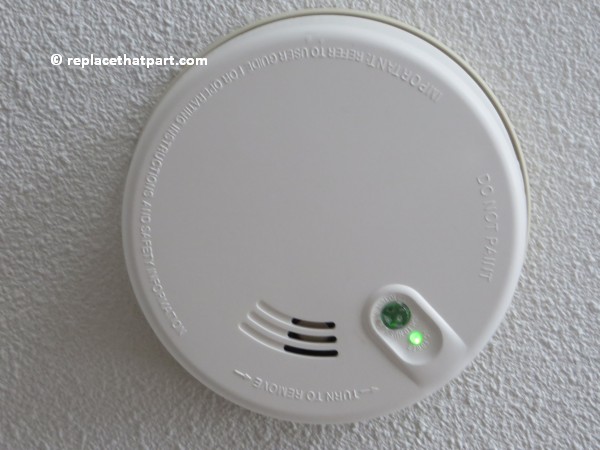
13. Er staat nu weer stroom op de rookmelder en het groene lampje op de rookmelder zou nu moeten branden. Controleer dit! Als het groene lampje brandt, is het zeker, dat de rookmelder correct op het stroomnet is aangesloten.
vervangen van de firex rookalarm padc240 19

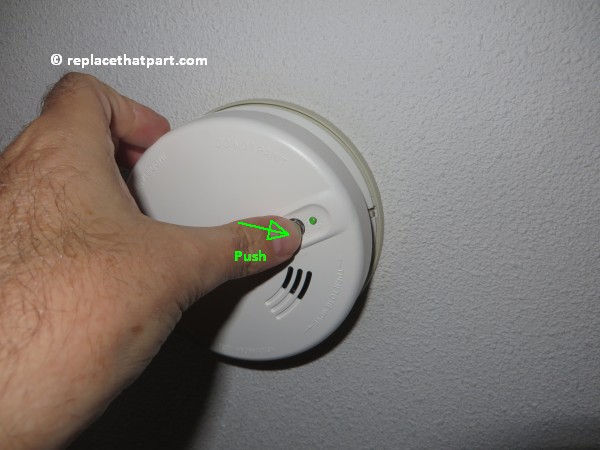
14. Test of de rookmelder werkt. Druk hiertoe de testknop stevig in gedurende ongeveer 5 seconden. De rookmelder zal een luide pieptoon maken die ongeveer 3 keer wordt herhaald. Nadat u de testknop hebt losgelaten, kan het alarm tot 10 seconden lang blijven klinken. Bij het indrukken van de testknop worden alle functies getest. Gebruik daarom geen andere testmethoden om de rookmelder te testen. Test de rookmelder dus NIET met brandende kaarsen, aanstekers, sigarettenrook etc.
vervangen van de firex rookalarm padc240 20

Speel het testgeluid van de FireX Rookmelder KF20 af:

Dat is alles! Als het groene lampje brand en het testgeluid werkt, is de nieuwe FireX Rookmelder KF20 correct geplaatst en zal je weer 10 jaar waarschuwen voor brand of rook.

How to Replace an Empty Ink Cartridge in the Canon PIXMA TS6420a All-in-One Wireless Inkjet Printer – an Illustrated Tutorial in 11 Steps

Make sure you purchase the right ink cartridges for your specific printer and printer region or have your old ones refilled. Cartridges are not compatible between different brands, and often not within the same brand. Canon recommends that you use original Canon ink cartridges. If the cartridges are labeled as Canon FINE Cartridges, the cartridges have a mechanical printhead built into the cartridge, instead of being installed into the printer.

Check the estimated ink levels
You can check the estimated ink levels from the display on the printer operation panel and from the Canon printer software. The ink level detector is mounted on the printer to detect the remaining ink level. The printer considers as ink is full when a new cartridge is installed, and then starts to detect a remaining ink level. If you install a used cartridge, the indicated ink level of it may not be correct. In such case, refer to the ink level information only as a guide.

To check the estimated ink levels from the printer LCD display:
– Check that printer is turned on.
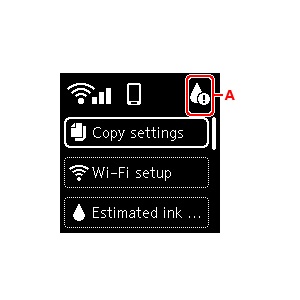
– Press the OK button. A symbol appears in the upper right corner (A), if there is any information about the remaining ink level.
canon pixma ts6420a replace the ink cartridges 01

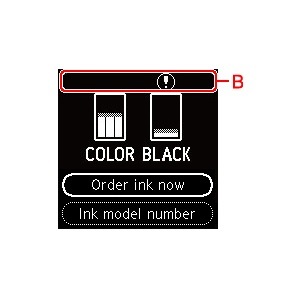
– Select Estimated ink levels. A symbol is displayed on top of the cartridge (B) where there is a notification. The ink is running low. Prepare a new ink cartridge. The resulting print quality may not be satisfactory, if printing is continued under this condition. The image below shows estimated ink levels. Select Order ink now and press the QR button to display the QR code and access the ink purchasing site. You can check the model number of the cartridge by selecting Ink model number.
canon pixma ts6420a replace the ink cartridges 02

To check the ink levels from the printer software (Windows):

Open the printer driver setup window:
– Select the print command or printer icon from your application software. The Print command can generally be found in the File menu.
Select your printer model, and click Preferences or Properties. The printer driver’s setup screen appears.

You can also display the printer driver’s setup screen by clicking the printer icon:
– Select Control Panel -> Hardware and Sound -> Devices and Printers.
Right-click the icon of your model. When the menu appears, select Printing preferences.

Canon IJ Status Monitor
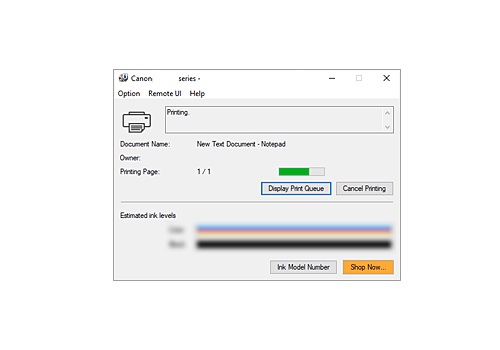
The Canon IJ Status Monitor displays the printer status and the printing progress. You can also use it to check the remaining ink level and the cartridge types for your model. The information displayed on the Canon IJ Status Monitor may differ depending on the country or region where you are using your printer. The Canon IJ Status Monitor launches automatically when print data is sent to the printer. When launched, the Canon IJ Status Monitor appears as a button on the task bar. Click the button of the status monitor displayed on the task bar. The Canon IJ Status Monitor appears. To open the Canon IJ Status Monitor when the printer is not printing, open the printer driver setup window and click View Printer Status on the Maintenance tab.
canon pixma ts6420a replace the ink cartridges 03

canon pixma ts6420a replace the ink cartridges 04

Canon sells most of their cartridges in a standard yield size and a high yield or XL. For some printer models, extra-high yield, or XXL cartridges are available. All cartridge sizes are the exact same size and install in your printer the same way, the only difference is the amount of ink that is inside the cartridge. XL (Extra Large) cartridges cost more but do provide better value in the long run. They will be able to print at least 2 times as many pages as a regular cartridge. Our advice is that if you print often, go with XL. However, ink can dry up. So if you are not a frequent printer, go with the regular cartridges. A new Canon printer includes a complete set of starter ink cartridges. Starter cartridges are filled with less ink than a standard yield cartridge so you shouldn’t expect to get very many prints out of them before they need to be replaced.

Ink level warnings and indicators provide estimates for planning purposes only. When you receive a low-ink warning message, consider having a replacement cartridge available to avoid possible printing delays. You do not have to replace the cartridges until the print quality is unacceptable.

Single cartridge
If an ink cartridge runs out of ink, you can print with either the color or black ink cartridge. However the print quality may be reduced compared to when printing with both cartridges. We recommend to use a new ink cartridge in order to obtain optimum qualities. Even when printing with one cartridge only, print with leaving the empty ink cartridge installed. If either the color ink cartridge or black ink cartridge isn’t installed, an error occurs and the printer can’t print.

Which ink cartridges do I need for my Canon PIXMA TS6420a Wireless All-in-One Printer?

For your US Canon PIXMA TS6420a Wireless All-in-One Printer you need a Canon PG-260 black cartridge AND a Canon CL-261 color cartridge OR the XL versions: Canon PG-260 XL black cartridge AND a Canon CL-261 XL color cartridge. There are also two-in-one valuepacks available like the PG-260/PG-261 Value Pack (also available in XL).

Try Amazon's ink selector tool to find compatible ink cartridges for your printer.

Replace the ink cartridges

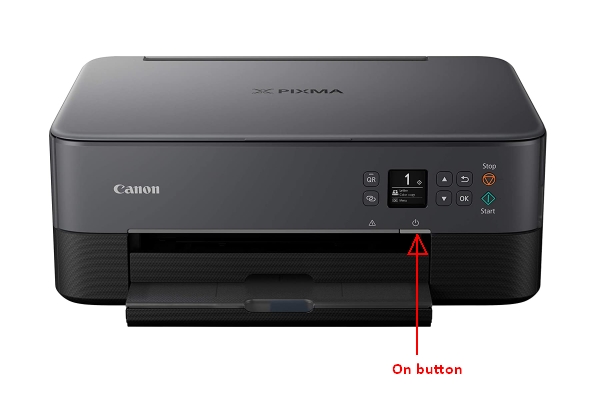
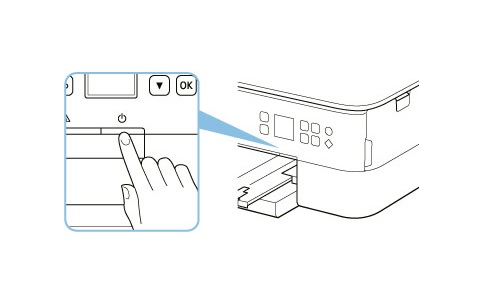
1. Press the ON button to turn on the printer, if it is not already turned on.
canon pixma ts6420a replace the ink cartridges 05

canon pixma ts6420a replace the ink cartridges 06

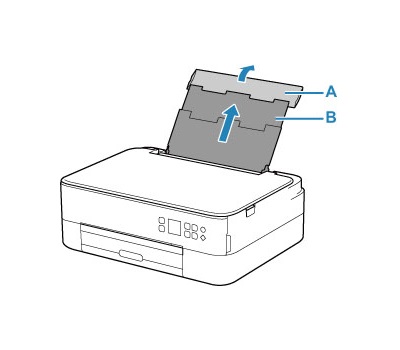
2. Load paper
Open the rear tray cover (A) gently. Pull straight up and fold back paper support (B).
canon pixma ts6420a replace the ink cartridges 07

3.
– Open the feed slot cover (C) and slide the right paper guide (D) to open both paper guides.
– Load paper stack in portrait orientation with print side facing up.
– Slide the right paper guide (D) to align with both sides of paper stack. Do not slide the paper guides too hard against the paper. The paper may not be fed properly.
– Close the feed slot cover (C) gently.
– After closing the feed slot cover, the paper setting confirmation screen for the rear tray appears on the LCD. If page size and media type on LCD match size and type of paper loaded in rear tray, select OK. If not, select Change to change the settings in accordance with the size and type of the loaded paper.
canon pixma ts6420a replace the ink cartridges 08

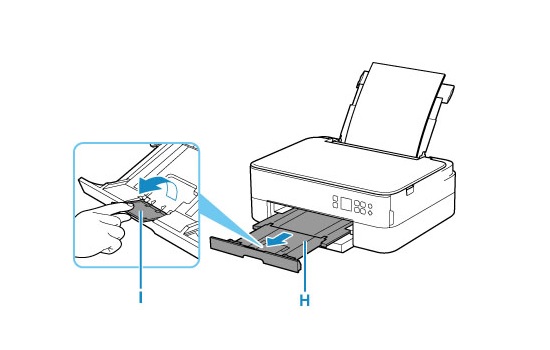
4. Pull out the paper output tray (H) and open the paper output support (I).
canon pixma ts6420a replace the ink cartridges 09

5. Replace the cartridges.
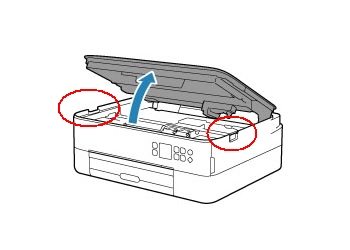
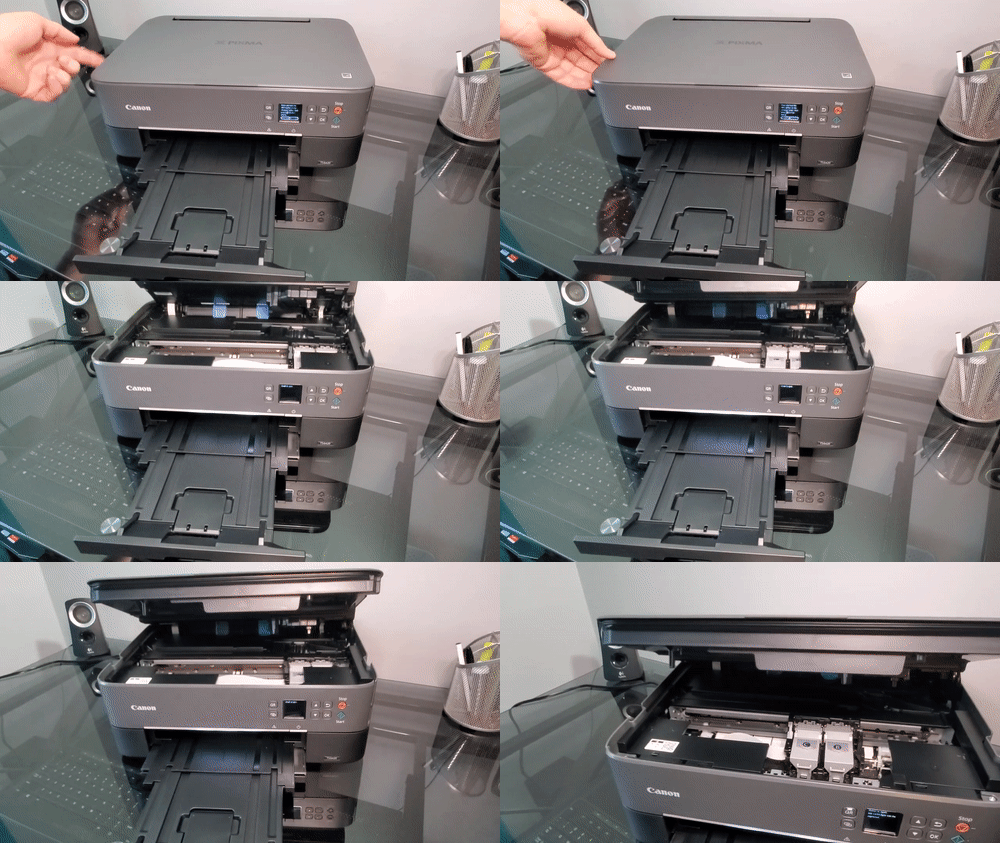
Open the scanning unit / cover, using one or both of the tabs at sides of the cover. The cartridge holder moves to the replacement position. Wait until the printer is idle and silent before continuing.
canon pixma ts6420a replace the ink cartridges 10

canon pixma ts6420a replace the ink cartridges 11

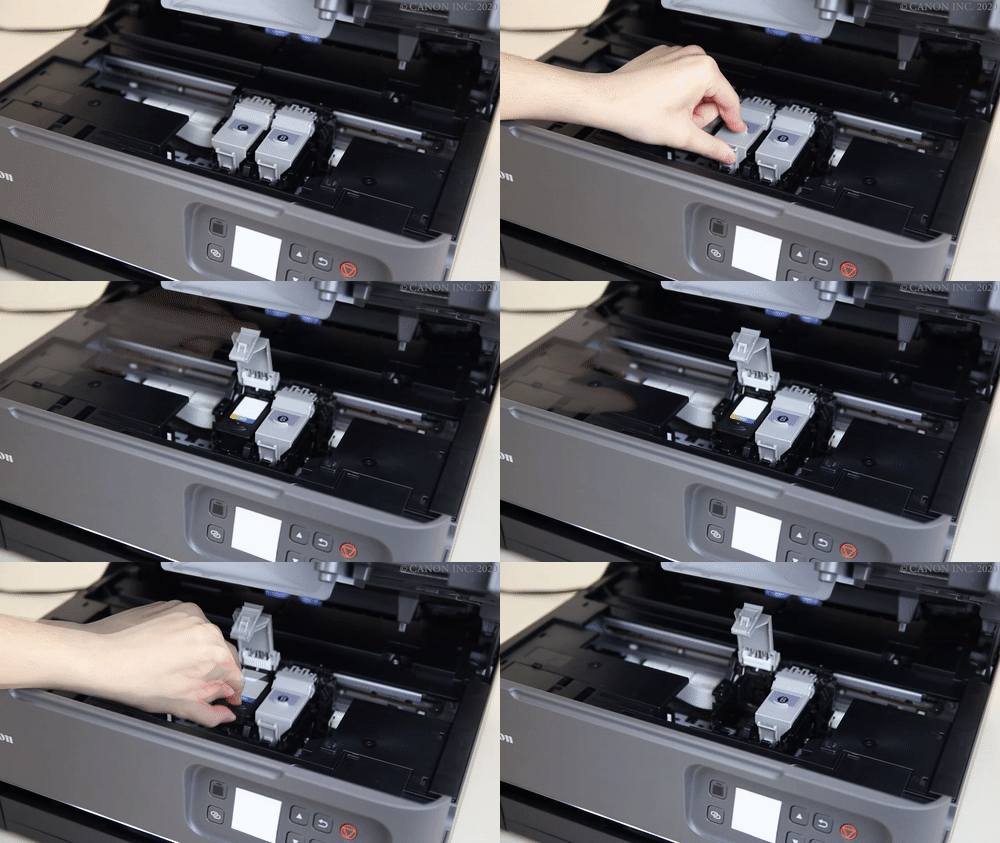
6. Remove the empty cartridge.
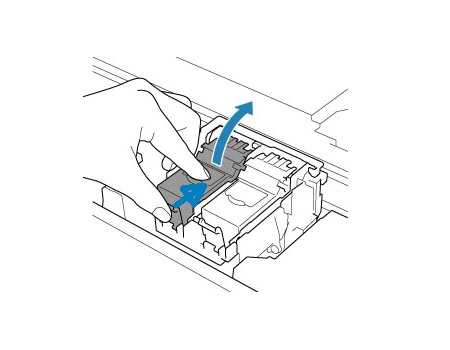
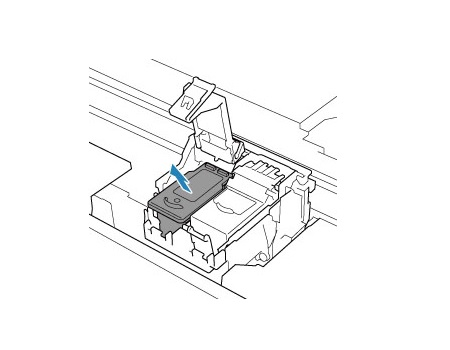
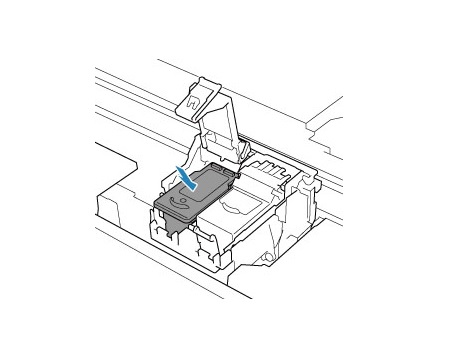
Open the ink cartridge locking cover by pushing the front tab in, while lifting the cover up.
– Lift out the empty cartridge.
canon pixma ts6420a replace the ink cartridges 12

canon pixma ts6420a replace the ink cartridges 13

canon pixma ts6420a replace the ink cartridges 14

7. Prepare a new cartridge.
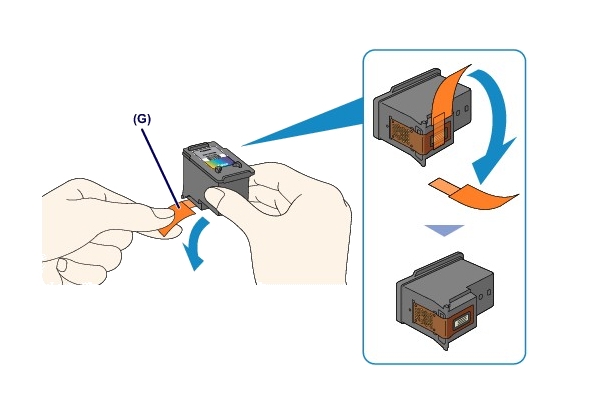
– Remove the new cartridge from its packaging. Be careful to only touch the black plastic on the ink cartridge by holding the ink cartridge by its sides.
Remove the protective tape (G) gently.


Do NOT:
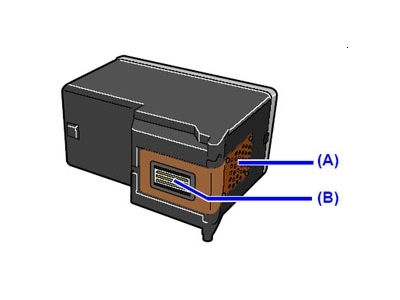
– Remove the copper electrical strip
– Touch the copper-colored contacts or the ink nozzles.
– Replace the protective tape on the contacts.
canon pixma ts6420a replace the ink cartridges 15

canon pixma ts6420a replace the ink cartridges 16

8. Install the new cartridge.
Insert the new cartridge into the cartridge holder.
The tri-color cartridge goes in the slot on the left.
The black cartridge goes in the slot on the right.
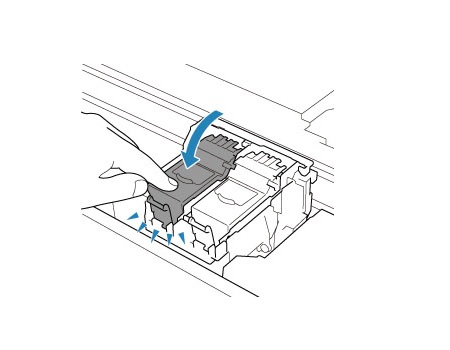
– Close the ink cartridge locking cover to secure the ink cartridge. Push the ink cartridge locking cover fully until it clicks. The cartridge will be locked.
canon pixma ts6420a replace the ink cartridges 17

canon pixma ts6420a replace the ink cartridges 18

9. Repeat step 5 through 8 to replace the other cartridge, if necessary.
The tri-color cartridge goes in the slot on the left.
The black cartridge goes in the slot on the right.

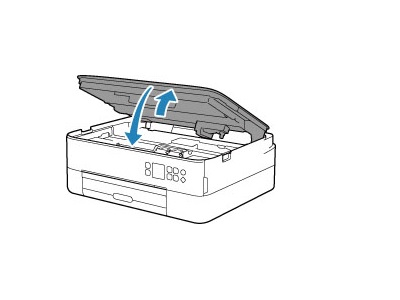
10. Close the scanning unit / cover. Be sure to lift the cover first a little to unlock the hinge, then take it down gently.
canon pixma ts6420a replace the ink cartridges 19

Align the cartridges if necessary.
If printed ruled lines are misaligned or print results are otherwise unsatisfactory, align the print head.

11.
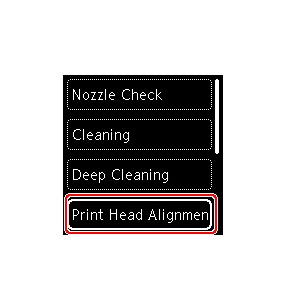
– Press the Maintenance on the LCD.
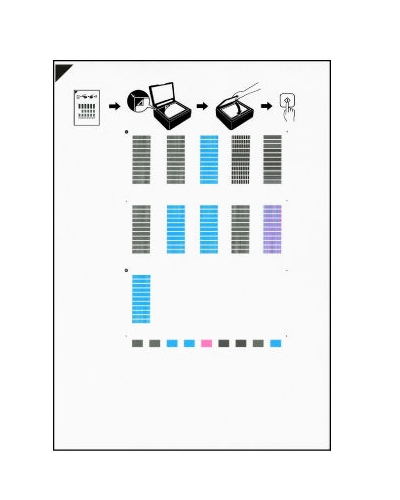
– Select Print Head Alignment – Auto. The confirmation screen will appear. Then, select Yes and Press the OK button. The print head alignment sheet is printed, and the print head is aligned automatically. This may take a few minutes. When the completion message appears, select OK.
– Discard or recycle the alignment page.
canon pixma ts6420a replace the ink cartridges 20

canon pixma ts6420a replace the ink cartridges 21