Adding RAM is often the most cost-effective upgrade you can make to speed up a computer. When a computer runs short of RAM, it’s forced to swap the overflow data on and off of the hard drive, which can significantly slow performance. Fortunately, upgrading netbook memory is often one of the easiest computer upgrades. Do you want to get a little more power out of your Samsung NB30 Pine Trail powered Netbook? Upgrade that 1GB memory module with a 2GB SODIMM. It will speed up opening new applications, running multiple applications at once, and switching between software applications (multi-tasking). Here’s a complete and easy guide on how to upgrade your Samsung NB30’s memory.
Purchase the right memory.
Intel Atom N450 (Pineview) based machines can’t access more than 2GB of RAM in total. A 1GB memory module is installed in the memory slot at the bottom of your computer. There is, however, only one memory slot on the motherboard, so this means that you’ll have to remove the current RAM module in order to insert a new one. For your Samsung NB30 you need a standard 200 pin DDR2 SODIMM laptop memory module (not desktop memory). Select a 2GB DDR2 SODIMM memory module of 667MHz or 800MHz. These may be referenced as PC2-5400 or PC2-6400. Recommended brands include, but are not limited to, Crucial, Corsair, Kingston, Patriot, Hynix and Viking.
(#ad or paid links)


- Crucial 2GB Single DDR2 667MHz (PC2-5300) CL5 SODIMM 200-Pin Notebook Memory Module CT25664AC667
This is by far the most popular Netbook memory replacement at the moment.
- Crucial 2GB Single DDR2 800MHz (PC2-6400) CL6 SODIMM 200-Pin Notebook Memory Module CT25664AC800
- Corsair VS2GSDS667D2 2GB (1x2GB) DDR2 667 MHz (PC2 5300) Laptop Memory
A 1GB memory module is installed in the memory slot at the bottom of your computer. There is, however, only one memory slot on the motherboard so this means that you’ll have to remove the current RAM module in order to insert a new one. The procedure to replace the memory is described below.
1. Shut down the computer completely.
2. Power off your Samsung NB30 Netbook if it’s on. Also, unplug the AC power adapter.
3. Prepare your netbook by placing it upside-down on a flat surface with some form of soft padding. Static electricity can damage your module and other computer parts. Make sure that you are working in a static-safe environment. Remove any plastic bags or papers from your work space.
4. Remove the battery. This will prevent you from accidentally shorting anything on the system board during this process. Pull the two battery latches outwards, then remove the battery.

5. Discharge residual power by pressing the power button.
6. Be sure to ground yourself. Touch something metal, like a tap, for a couple of seconds and you should be fine.
7. The memory stick is secured in a dedicated compartment at the bottom side of your netbook.
a. Remove the screw that secures the compartment cover using an Electronics Repair Screwdriver Set


(#ad or paid links)
.

b. Remove the compartment cover.
8. Press outwards on the latches on both edges of the socket at the same time. Remove the SODIMM; it should pop right out. Be sure to save the old SODIMM for future use.

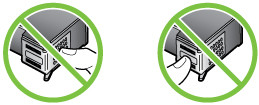
9. Most memory will be sold in a piece of hard, clear plastic. Gently remove the new module from the packaging by pressing on it from the plastic side. Avoid bending the module or applying too much force to the packaging. When you remove the SODIMM memory module from its packaging hold it by the edges, try not to touch the gold colored contacts as this can damage the memory.
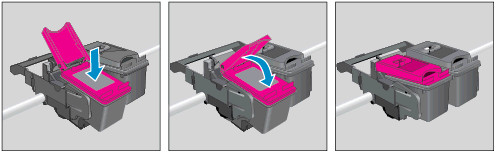
10. Turn the module so the teeth are facing the SODIMM slot. It’s impossible to put the memory module in backwards thanks to the notches which “key” it with the slot. Insert the notched end of the SODIMM into the socket. This is important; you want to stick in the new memory module at a 30 degree angle. Press the SODIMM firmly, and pivot it until it snaps into place.

11. Push the memory module down so that it’s completely fixed and the metal retaining clips clasp into the grooves on either side of the module. If the memory does not fit easily, take it out and try again. If necessary, push the SODIMM module down, while puling the memory module latches outward. The module should usually be seated so that you don’t see any of the gold contacts.

12. Before you close your case, replace the battery. Just slide the battery into the system. The battery latches move inwards and fix the battery automatically.

Test it.
13. Turn your computer back on. The BIOS automatically detects the amount of memory in the system and configures CMOS accordingly during the Power-On Self-Test (POST) process. There is no hardware or software (including BIOS) setup required after the memory is installed. You should see the new amount of memory displayed on your start-up screens or in the properties for “My Computer”. Right click on the “My Computer” icon and select “properties”. The screen which appears should show approximately 2GB of RAM. The memory capacity reported in Windows is less than the actual capacity of memory. This is because BIOS or the onboard graphics uses a portion of memory or claims it for further use.
If you don’t see approximately 2GB in “My Computer”, reboot and press F2 repeatedly until you get to the BIOS screen. It will then see the 2 Gig.
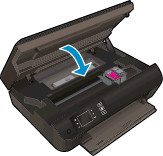
14. If everything works correctly, you are done and you can reinstall the memory compartment cover. If you have any problems, go to step 15 for troubleshooting tips.
15. Troubleshooting. If you have trouble with your new RAM, check these things first. Check the power cords. Is everything plugged in properly? Check the module. Try removing the module and replacing it to make sure it is seated properly in the slot. If you’re still having difficulties with your RAM, check the Crucial FAQ section. You may find an easy solution for your problem.
16. Close the memory compartment cover and fasten te screw.
Enjoy!
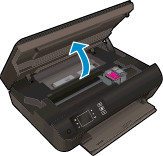
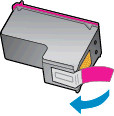
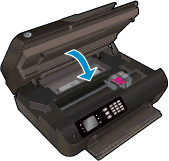
 For your US HP ENVY 4500 e-All-in-One Series Printer you need HP 61 OR HP 61XL cartridges. Check the price of HP 61 cartridges at Amazon.com .

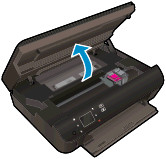
 For your European or UK HP ENVY 4500 e-All-in-One Series Printer you need HP 301 or HP 301XL cartridges.