How to Upgrade RAM Memory of the Lenovo IdeaPad S10-3 Netbook – a Complete Guide

A computer memory upgrade is often the best way of increasing overall computer performance, and upgrading netbook memory is often one of the easiest computer upgrades. Do you want to get a little more power out of your Lenovo IdeaPad S10-3 Pine Trail Netbook? Upgrade that 1GB memory module with a 2GB SODIMM. It will speed up opening new applications, running multiple applications at once, and switching between software applications (multi-tasking). Here’s a complete and easy guide on how to upgrade your Lenovo IdeaPad S10-3’s memory.

Purchase the right memory.

Intel Atom N450 (Pineview) based machines can’t access more than 2GB of RAM in total. A 1GB memory module is installed in the memory slot at the bottom of your computer. There is, however, only one memory slot on the motherboard, so this means that you’ll have to remove the current RAM module in order to insert a new one (*). For your Lenovo IdeaPad S10-3 you need a standard 200 pin DDR2 SODIMM laptop memory module (not desktop memory). Select a 2GB DDR2 SODIMM memory module of 667MHz or 800MHz. These may be referenced as PC2-5400 or PC2-6400. Recommended brands include, but are not limited to, Crucial, Corsair, Kingston, Patriot, and Viking.

(*) Note: according to the S10-3’s manual you have to replace the current 1GB SODIMM. Older 1GB S10 models sometimes had 1GB of RAM soldered onto the motherboard and the memory slot at the bottom of the machine was actually empty. We assume Lenovo doesn’t use that system for the S10-3, but have no confirmation of this yet. Check if the slot is empty. If it’s empty, you can just put a 1 GB DDR2-667 SODIMM module into the empty free slot.

(#ad or paid links)

  • Crucial 2GB Single DDR2 667MHz (PC2-5300) CL5 SODIMM 200-Pin Notebook Memory Module CT25664AC667
    This is by far the most popular Netbook memory replacement at the moment.
  • Crucial 2GB Single DDR2 800MHz (PC2-6400) CL6 SODIMM 200-Pin Notebook Memory Module CT25664AC800
  • Corsair VS2GSDS667D2 2GB (1x2GB) DDR2 667 MHz (PC2 5300) Laptop Memory
  • A 1GB memory module is installed in the memory slot at the bottom of your computer. There is, however, only one memory slot on the motherboard so this means that you’ll have to remove the current RAM module in order to insert a new one. The procedure to replace the memory is described below.

    1. Shut down the computer completely.

    2. Power off your Lenovo IdeaPad S10-3 if it’s on. Also, unplug the AC power adapter.

    3. Prepare your IdeaPad S10-3 by placing it upside-down on a flat surface with some form of soft padding. Static electricity can damage your module and other computer parts. Make sure that you are working in a static-safe environment. Remove any plastic bags or papers from your work space.

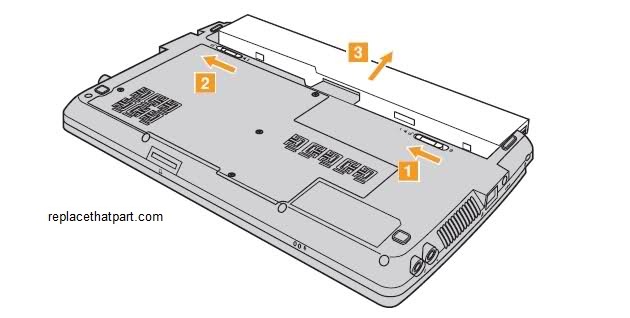
    4. Remove the battery. This will prevent you from accidentally shorting anything on the system board during this process. Unlock the manual battery latch [1]. Hold the spring-loaded battery latch in the unlocked position [2], remove the battery pack in the direction shown by the arrow [3].


    5. Discharge residual power by pressing the power button.

    6. Be sure to ground yourself. Touch something metal (like a tap) for a couple of seconds and you should be fine.

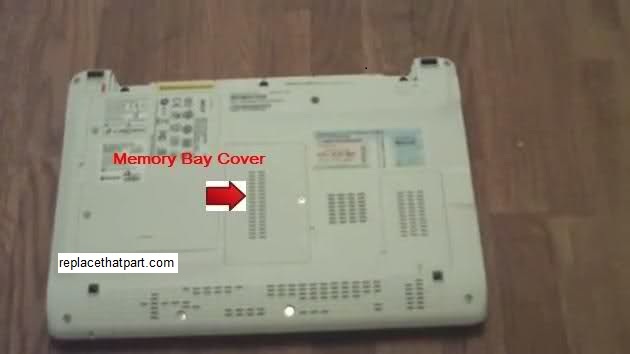
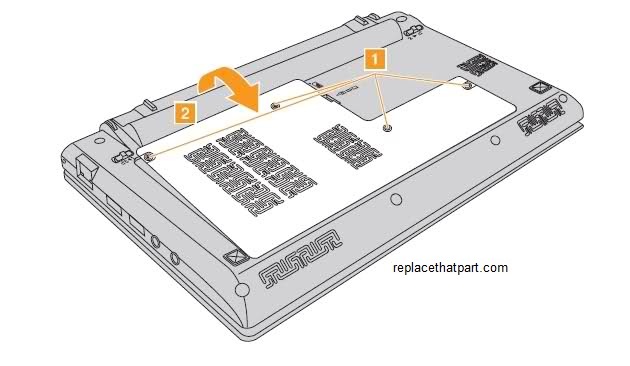
    7. Remove the Hard disk/Memory/Mini PCI Express Card slot compartment cover.
    a.     Remove the screws that secure the compartment cover [1].
    b.     Remove the compartment cover [2].

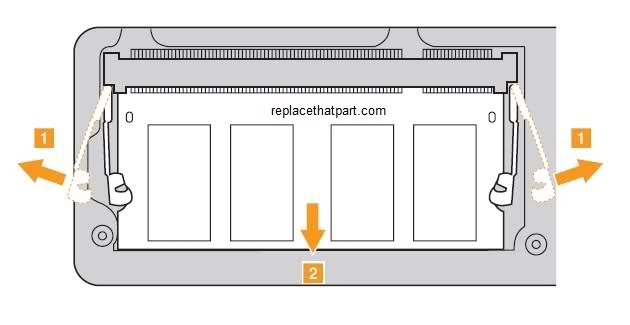
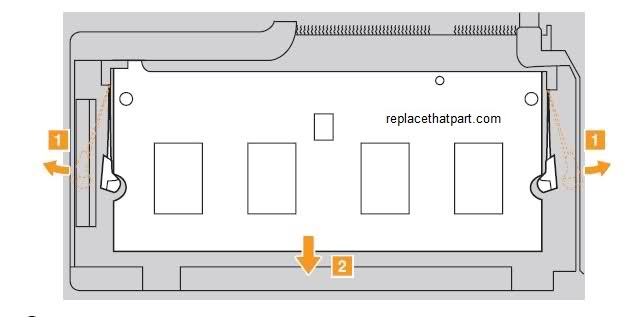
    8. Press outwards on the latches on both edges of the socket at the same time, remove the SO-DIMM. Be sure to save the old SO-DIMM for future use.

    9. Most memory will be sold in a piece of hard, clear plastic. Gently remove the new module from the packaging by pressing on it from the plastic side. Avoid bending the module or applying too much force to the packaging. When you remove the SODIMM memory module from its packaging hold it by the edges, try not to touch the gold colored contacts as this can damage the memory.

    10. Turn the module so the teeth are facing the SODIMM slot and the sticker is face down. It’s impossible to put the memory module in backwards thanks to the notches which “key” it with the slot. Insert the notched end of the SODIMM into the socket. This is important; you want to stick in the new memory module at a 45 degree angle. Press the SODIMM firmly, and pivot it until it snaps into place and the metal retaining clips clasp into the grooves on either side of the module.

    11. Make sure that it is firmly fixed in the slot and does not move easily. If the memory does not fit easily, take it out and try again. The module should be seated so that you don’t see any of the gold contacts.

    12. Test it. Before you close your case, replace the battery. When the battery pack is inserted, it will automatically lock. Turn your computer back on. The BIOS automatically detects the amount of memory in the system and configures CMOS accordingly during the Power-On Self-Test (POST) process. There is no hardware or software (including BIOS) setup required after the memory is installed. You should see the new amount of memory displayed on your start-up screens or in the properties for “My Computer”. You can also Hold F2 during startup. The BIOS Setup Utility screen will open and the System Memory item shows the total amount of memory installed in your netbook.

    13. If everything works correctly, you are done and you can reinstall the memory compartment cover. If you have any problems, go to step 14 for troubleshooting tips.

    14. Troubleshooting. If you have trouble with your new RAM, check these things first. Check the power cords. Is everything plugged in properly? Check the module. Try removing the module and replacing it to make sure it is seated properly in the slot. If you’re still having difficulties with your RAM, check the Crucial FAQ section. You may find an easy solution for your problem.

    Enjoy!

How to Upgrade the RAM Memory of the Lenovo IdeaPad S10-3t Tablet Netbook

A memory upgrade is often the best and easiest way of increasing the performance of a Netbook and the cost to upgrade the RAM actually amounts to a relatively trivial amount of cash. The Lenovo IdeaPad S10-3t Touch Screen Tablet Netbook has 1 RAM slot and supports up to 2GB of RAM. The netbook ships with either 1GB or 2GB pre-installed. The 1GB Models can be upgraded to 2GB; the 2GB models however can NOT be upgraded, due to hardware limitations. Upgrading a Lenovo IdeaPad S10-3t Netbook is very easy, even when you’ve never done something like this before. It will only take a couple of minutes. Upping the RAM will speed up opening new applications, running multiple applications at once, and switching between software applications (multi-tasking). Here’s a complete guide on how to upgrade your Lenovo IdeaPad S10-3t’s memory.

Purchase the right memory.

Intel Atom N450 or N470 based machines can’t access more than 2GB of RAM in total. If there’s a 1GB  memory stick in the memory slot at the bottom of your computer, you’ll have to remove the current RAM module in order to insert a new one (*). For your 1GB Lenovo IdeaPad S10-3t you need a standard 200 pin DDR2 SODIMM laptop memory module (not desktop memory). Select a 2GB DDR2 SODIMM memory module of 667MHz or 800MHz. These may be referenced as PC2-5400 or PC2-6400. Recommended brands include, but are not limited to, Crucial, Corsair, Kingston, Patriot, and Viking.

(*) Note: according to the S10-3t’s manual you have to replace the current 1GB SODIMM. Older 1GB S10 models sometimes had 1GB of RAM soldered onto the motherboard and the memory slot at the bottom of the machine was actually empty. We assume Lenovo doesn’t use that system for the S10-3t, but have no confirmation of this yet. Check if the slot is empty. If it’s empty, you can just put a 1 GB DDR2-667 SODIMM module into the empty free slot.

(#ad or paid links)

  • Crucial 2GB Single DDR2 667MHz (PC2-5300) CL5 SODIMM 200-Pin Notebook Memory Module CT25664AC667
    This is by far the most popular Netbook memory replacement at the moment.
  • Crucial 2GB Single DDR2 800MHz (PC2-6400) CL6 SODIMM 200-Pin Notebook Memory Module CT25664AC800
  • Corsair VS2GSDS667D2 2GB (1x2GB) DDR2 667 MHz (PC2 5300) Laptop Memory
  • A 1GB memory module is installed in the memory slot at the bottom of your computer. There is, however, only one memory slot on the motherboard so this means that you’ll have to remove the current RAM module in order to insert a new one. The procedure to replace the memory is described below.

    1. Shut down the computer completely.

    2. Power off your Lenovo IdeaPad S10-3t if it’s on. Also, unplug the AC power adapter.

    3. Prepare your IdeaPad S10-3t by placing it upside-down on a flat surface with some form of soft padding. Static electricity can damage your module and other computer parts. Make sure that you are working in a static-safe environment. Remove any plastic bags or papers from your work space.

    4. Remove the battery. This will prevent you from accidentally shorting anything on the system board during this process. Unlock the manual battery latch [1]. Hold the spring-loaded battery latch in the unlocked position [2], remove the battery pack in the direction shown by the arrow [3].

    5. Discharge residual power by pressing the power button.

    6. Be sure to ground yourself. Touch something metal (like a tap) for a couple of seconds and you should be fine.

    7. Remove the Hard disk/Memory/Mini PCI Express Card slot compartment cover.
    a.     Loosen the screws that secure the compartment cover [1].
    b.     Remove the compartment cover [2].

    8. Press outwards on the latches on both edges of the socket at the same time, remove the SODIMM. Be sure to save the old SODIMM for future use.

    9. Most memory will be sold in a piece of hard, clear plastic. Gently remove the new module from the packaging by pressing on it from the plastic side. Avoid bending the module or applying too much force to the packaging. When you remove the SODIMM memory module from its packaging hold it by the edges, try not to touch the gold colored contacts as this can damage the memory.

    10. Turn the module so the teeth are facing the SODIMM slot and the sticker is face down. It’s impossible to put the memory module in backwards thanks to the notches which “key” it with the slot. Insert the notched end of the SODIMM into the socket. This is important; you want to stick in the new memory module at a 45 degree angle. Press the SODIMM firmly, and pivot it until
    it snaps into place and the metal retaining clips clasp into the grooves on either side of the module.

    11. Make sure that it is firmly fixed in the slot and does not move easily. If the memory does not fit easily, take it out and try again. The module should be seated so that you don’t see any of the gold contacts.

    12. Test it. Before you close your case, replace the battery. When the battery pack is inserted, it will automatically lock. Turn your computer back on. The BIOS automatically detects the amount of memory in the system and configures CMOS accordingly during the Power-On Self-Test (POST) process. There is no hardware or software (including BIOS) setup required after the memory is installed. You should see the new amount of memory displayed on your start-up screens or in the properties for “My Computer”. You can also Hold F2 during startup. The BIOS Setup Utility screen will open and the System Memory item shows the total amount of memory installed in your netbook.

    13. If everything works correctly, you are done and you can reinstall the HDD/Memory/Mini PCI compartment cover. If you have any problems, go to step 14 for troubleshooting tips.

    14. Troubleshooting. If you have trouble with your new RAM, check these things first. Check the power cords. Is everything plugged in properly? Check the module. Try removing the module and replacing it to make sure it is seated properly in the slot. If you’re still having difficulties with your RAM, check the Crucial FAQ section. You may find an easy solution for your problem.

    Enjoy!
How to Upgrade your Acer Aspire One AOD250 Netbook’s RAM Memory

A memory upgrade is often the best way of increasing overall computer performance. The official manual of the 10-inch Acer Aspire One AOD250 does not say anything on upgrading your netbook, and the Acer support site isn’t much of a help either. However, upgrading a 10-inch Acer Aspire One AOD250 Netbook is very easy, even when you’ve never done something like this before. Do you want to get a little more power out of your Aspire One Netbook? Upgrade that 1GB memory module with a 2GB SODIMM. It will speed up opening new applications, running multiple applications at once, and switching between software applications (multi-tasking). Here’s a complete and easy guide on how to upgrade your Acer Aspire One AOD250’s memory.

Purchase the right memory. For your Acer Aspire One AOD250 Netbook with an Intel Atom Processor N270 or N280 you need a standard 200 pin DDR2 SODIMM laptop memory module (not desktop memory). Select a 2GB DDR2 SODIMM memory module of 667MHz. This may be referenced as PC2-5300. The PC2-5300 667MHz SODIMM is the most popular netbook memory upgrade and a faster module is backwards compatible, so a 667MHz SODIMM will definitely work, even when the original SODIMM is a 533MHz module. Recommended brands include, but are not limited to, Crucial, Corsair, Kingston, Patriot, and Viking.

(#ad or paid links)

A 1GB memory module is installed in the memory slot at the bottom of your computer. There is, however, only one memory slot on the motherboard so this means that you’ll have to remove the current RAM module in order to insert a new one. The procedure to replace the memory is described below.

1. Shut down your Netbook completely.

2. Disconnect all external devices connected to your Aspire One AOD250.

3. Power off your AOD250 if it’s on. Also, unplug the AC power adapter.

4. Prepare your Netbook by placing it upside-down on a flat surface with some form of soft padding. Static electricity can damage your module and other computer parts. Make sure that you are working in a static-safe environment. Remove any plastic bags or papers from your work space.

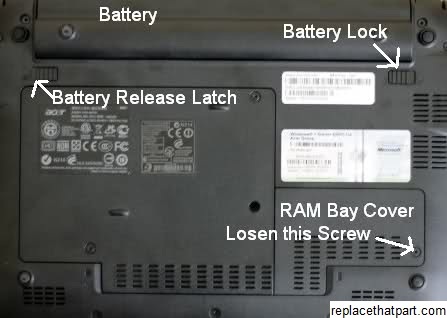
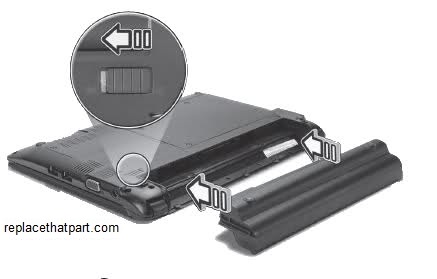
5. Remove the battery. This will prevent you from accidentally shorting anything on the system board during this process. To remove a battery pack:
1 Slide the battery release latch to release the battery.
2 Pull the battery from the battery bay.

6. Discharge residual power by pressing the power button.

7. If your device has WWAN capability, remove the 3G SIM card (only for certain models).

8. Be sure to ground yourself. Touch something grounded metal (like a tap) for a couple of seconds and you should be fine.

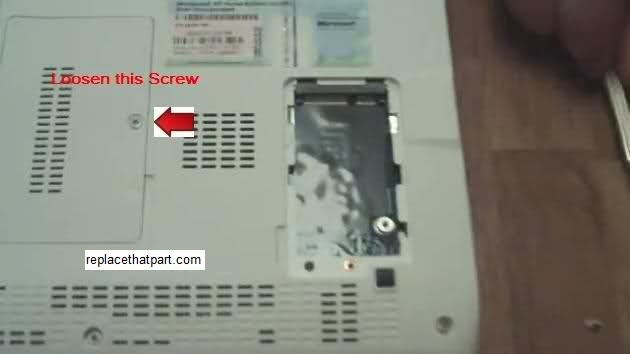
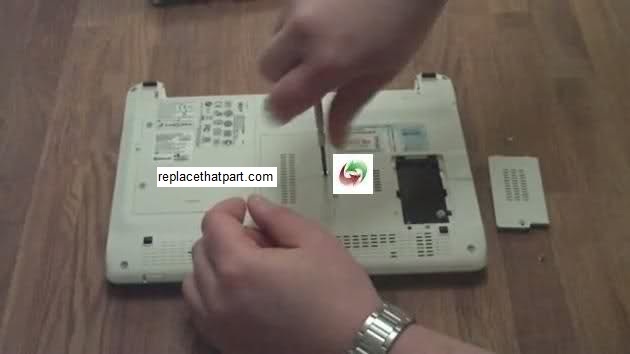
9. Loosen the captive screw that secures the memory module compartment cover to the computer.

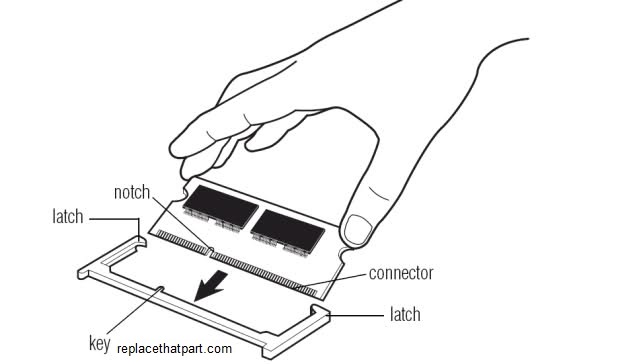
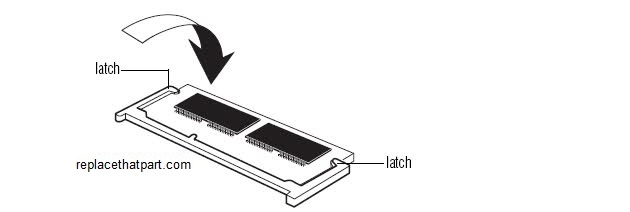
10. Spread the retaining tabs on each side of the memory module slot to release the memory module. (The edge of the module opposite the slot rises away from the device). Remove the memory module by pulling the module away from the slot at an angle.

11. Most memory will be sold in a piece of hard, clear plastic. Gently remove the new module from the packaging by pressing on it from the plastic side. Avoid bending the module or applying too much force to the packaging. When you remove the SODIMM memory module from its packaging hold it by the edges, try not to touch the gold colored contacts as this can damage the memory.

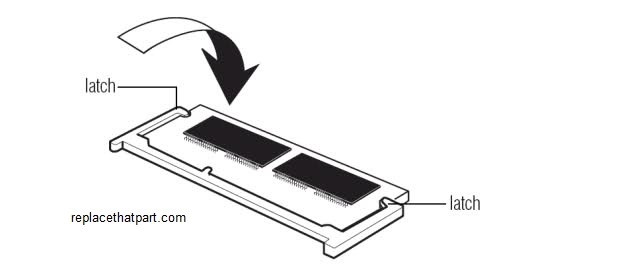
12. Insert a new memory module into the memory slot at an angle of approximately 30 degrees aligning it to the angle of the memory slot. Memory modules are designed with a notch to prevent incorrect insertion into the memory module slot.

13. Push the memory module down so that it’s completely fixed. If the memory does not fit easily, push the memory module down while puling the memory module latches outward. The module should be seated so that you don’t see any of the gold contacts.

14. Test it. Before you close your case, insert the SIM and replace the battery. To install the battery again, slide the battery into the system. Turn your computer back on. The BIOS automatically detects the amount of memory in the system and configures CMOS accordingly during the Power-On Self-Test (POST) process. There is no hardware or software (including BIOS) setup required after the memory is installed. You should see the new amount of memory displayed on your start-up screens or in the properties for “My Computer”. You can also hold <F2> during the POST; while the notebook PC logo is being displayed. The BIOS Setup Utility screen will open and the System Memory item shows the total amount of memory installed in your netbook. If everything works correctly, you are done and you can close your case. If you have any problems, go to step 13 for troubleshooting tips.

15. Troubleshooting. If you have trouble with your new RAM, check these things first. Check the power cords. Is everything plugged in properly? Check the module. Did both side clips snap to hold the module firmly in place? Try removing the module and replacing it to make sure it is seated properly in the slot. If you’re still having difficulties with your RAM, check the Crucial FAQ section. You may find an easy solution for your problem.

16. Close the memory compartment cover and fasten the screw.

17. Insert your 3G SIM card if you have one.

How to Upgrade the RAM Memory of the Acer Aspire One 532h Netbook- a Complete Guide

A computer memory upgrade is often the best way of increasing overall computer performance, and upgrading netbook memory is often one of the easiest computer upgrades. Do you want to get a little more power out of your Acer Aspire One 532h Pine Trail Netbook? Upgrade that 1GB memory module with a 2GB SODIMM. It will speed up opening new applications, running multiple applications at once, and switching between software applications (multi-tasking). Here’s a complete and easy guide on how to upgrade your Acer Aspire One 532h’s memory.

Purchase the right memory.

Intel Atom N450 (Pineview) based machines can’t access more than 2GB of RAM in total. A 1GB memory module is installed in the memory slot at the bottom of your computer. There is, however, only one memory slot on the motherboard, so this means that you’ll have to remove the current RAM module in order to insert a new one. For your Acer Aspire One 532h Netbook you need a standard 200 pin DDR2 SODIMM laptop memory module (not desktop memory). Select a 2GB DDR2 SODIMM memory module of 667MHz or 800MHz. These may be referenced as PC2-5400 or PC2-6400. The 800MHz stick will work, but it won’t make a difference in speed as it’s just throttled down to the motherboard bus speed of 667MHz. The original memory module is a 667MHz one. Recommended brands include, but are not limited to, Crucial, Corsair, Kingston, Patriot, Hynix and Viking.

(#ad or paid links)

  • Crucial 2GB Single DDR2 667MHz (PC2-5300) CL5 SODIMM 200-Pin Notebook Memory Module CT25664AC667
    This is by far the most popular Netbook memory replacement at the moment.
  • Crucial 2GB Single DDR2 800MHz (PC2-6400) CL6 SODIMM 200-Pin Notebook Memory Module CT25664AC800
  • Corsair VS2GSDS667D2 2GB (1x2GB) DDR2 667 MHz (PC2 5300) Laptop Memory
  • A 1GB memory module is installed in the memory slot at the bottom of your computer. There is, however, only one memory slot on the motherboard so this means that you’ll have to remove the current RAM module in order to insert a new one. The procedure to replace the memory is described below.

    1. Shut down the computer completely.

    2. Power off your Aspire One if it’s on. Also, unplug the AC power adapter.

    3. Prepare your Aspire One by placing it upside-down on a flat surface with some form of soft padding. Static electricity can damage your module and other computer parts. Make sure that you are working in a static-safe environment. Remove any plastic bags or papers from your work space.

    4. Remove the battery. This will prevent you from accidentally shorting anything on the system board during this process. The spring battery lock keeps the battery pack secure. When removing the battery pack, this spring lock must be retained in the unlocked position.

    5. Discharge residual power by pressing the power button.

    6. Be sure to ground yourself. Touch a piece of grounded metal, like a tap or a large piece of metal for a couple of seconds and you should be fine.

    7. The memory stick is secured in a dedicated compartment at the bottom side of your netbook.

    a. Remove the screw that secures the compartment cover using an Electronics Repair Screwdriver Set


    (#ad or paid links)
    ..
    b. Remove the compartment cover.

    8. Press outwards on the latches on both edges of the socket at the same time, remove the SODIMM; it should pop right out. Be sure to save the old SODIMM for future use.

    9. Most memory will be sold in a piece of hard, clear plastic. Gently remove the new module from the packaging by pressing on it from the plastic side. Avoid bending the module or applying too much force to the packaging. When you remove the SODIMM memory module from its packaging hold it by the edges, try not to touch the gold colored contacts as this can damage the memory.

    10. Turn the module so the teeth are facing the SODIMM slot and the sticker is face down. It’s impossible to put the memory module in backwards thanks to the notches which “key” it with the slot. Insert the notched end of the SODIMM into the socket. This is important; you want to stick in the new memory module at a 45 degree angle. Press the SODIMM firmly, and pivot it until it snaps into place and the metal retaining clips clasp into the grooves on either side of the module.

    11. Make sure that it is firmly fixed in the slot and does not move easily. If the memory does not fit easily, take it out and try again. The module should be seated so that you don’t see any of the gold contacts.

    12. Before you close your case, replace the battery. The manual battery lock is used to keep the battery pack secured. Move the manual lock to the unlocked position to insert or remove the battery pack. Move the manual lock to the locked position after inserting the battery.

    Test it.
    13. Turn your computer back on. The BIOS automatically detects the amount of memory in the system and configures CMOS accordingly during the Power-On Self-Test (POST) process. There is no hardware or software (including BIOS) setup required after the memory is installed. You should see the new amount of memory displayed on your start-up screens or in the properties for “My Computer”. You can also Hold F2 during startup. The BIOS Setup Utility screen will open and the System Memory item shows the total amount of memory installed in your netbook. If everything works correctly, you are done and you can close your case. If you have any problems, go to step 13 for troubleshooting tips.

    14. If everything works correctly, you are done and you can reinstall the memory compartment cover. If you have any problems, go to step 15 for troubleshooting tips.

    15. Troubleshooting. If you have trouble with your new RAM, check these things first. Check the power cords. Is everything plugged in properly? Check the module. Try removing the module and replacing it to make sure it is seated properly in the slot. If you’re still having difficulties with your RAM, check the Crucial FAQ section. You may find an easy solution for your problem.

    Enjoy!