Loekie Foxy Lady LED Achterlicht / Reflector – Batterijen Vervangen – Handleiding

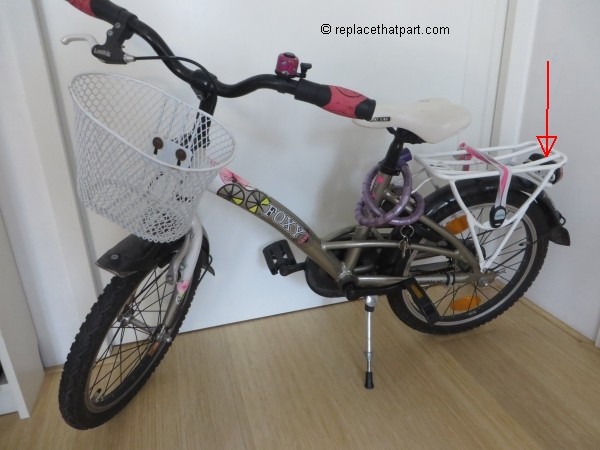
Goed werkende verlichting op fietsen is van levensbelang. Het is dan ook erg belangrijk om de batterijen snel te vervangen als ze leeg of zwak zijn. Dit is een handleiding voor het Loekie Foxy Lady LED Achterlicht. Deze handleiding is echter meestal ook voor andere Loeki fietsen te gebruiken, omdat de achterlamp hetzelfde is. Het vervangen van de batterijen is niet moeilijk; er is alleen een schroevendraaiertje voor nodig. Het is niet nodig om de hele LED Reflector te vervangen of te verwijderen. Het is ook niet nodig om de fiets op te takelen of op zijn kop te zetten.

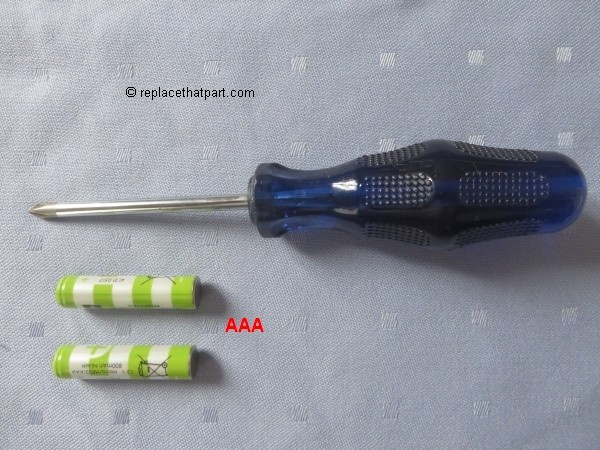
Het Loekie Foxy Lady LED Achterlicht werkt met twee standaard alkaline batterijen, type AAA. Deze zijn kleiner dan de grotere AA “Penlight” variant. U kunt ook oplaadbare Ni-MH batterijen gebruiken. De levensduur van de batterijen is dan vermoedelijk korter.

Benodigdheden
– 1 kleine kruiskopschroevendraaier
– 2 standaard AAA batterijen

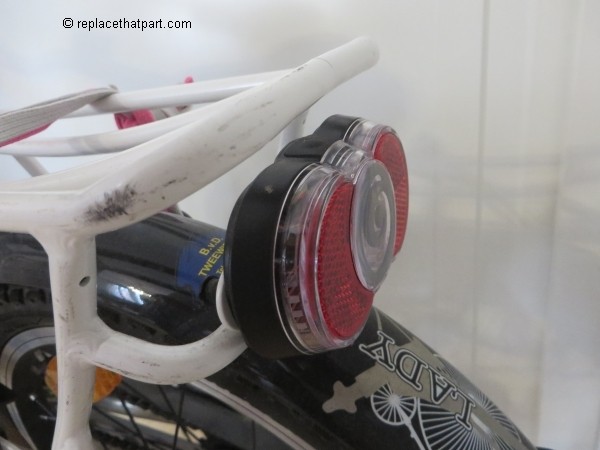
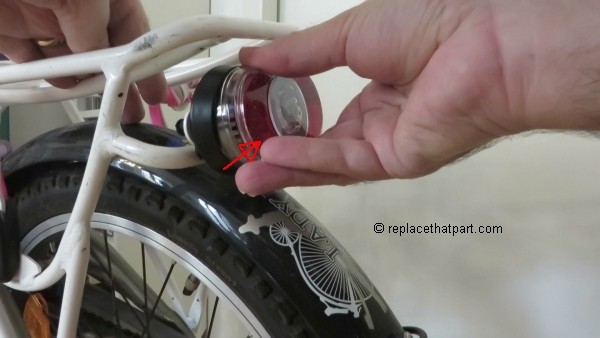
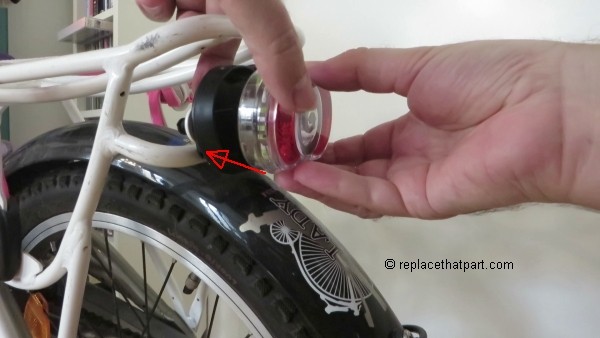
1. Lokaliseer het schroefje. Het achterlicht met de batterijen kan alleen zonder schade van de montageplaat gehaald worden door eerst één klein kruiskopschroefje te verwijderen! Het schroefje bevindt zich onderaan de rode voorzijde van het achterlicht.

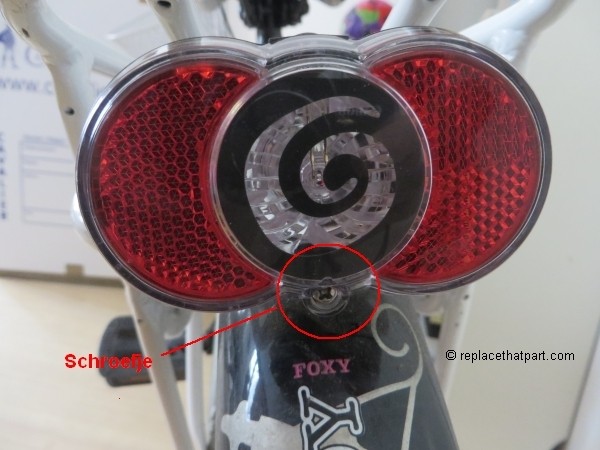
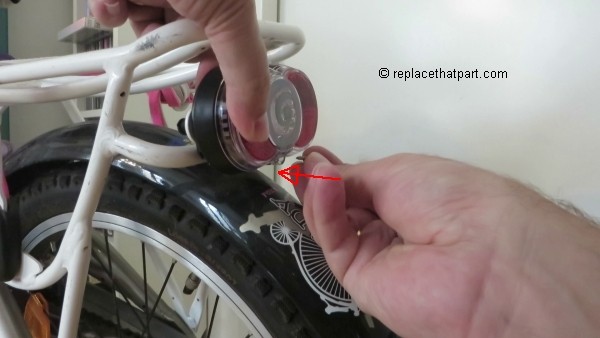
2. Gebruik de kruiskopschroevendraaier om het schroefje, die het achterlicht met de batterijen op zijn plaats houdt te verwijderen. Draai naar links, tegen de klok in. Er is maar één schroefje om te verwijderen. Leg de schroef apart en zorg dat u hem weer terug kunt vinden.

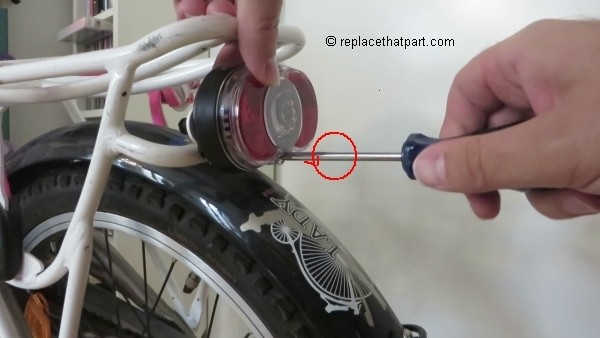
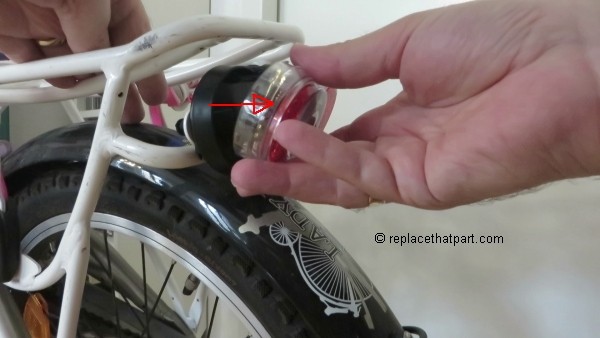
3. Trek nu het achterlicht met de batterijen van de zwarte montageplaat. Dit gaat het beste door aan de onderzijde te beginnen en de reflector een beetje naar boven te kantelen. Daarna trekt u de hele lamp van de montageplaat.

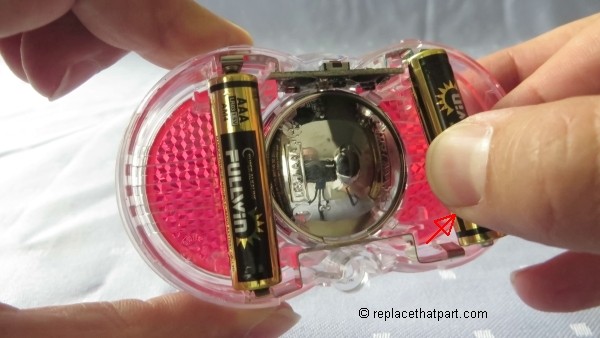
4. Verwijder de lege of zwakke AAA batterijen. U kunt de batterijen makkelijk tussen duim- en wijsvinger pakken en de batterijen eruit trekken. Vervang altijd beide batterijen, ook als er één nog werkt.

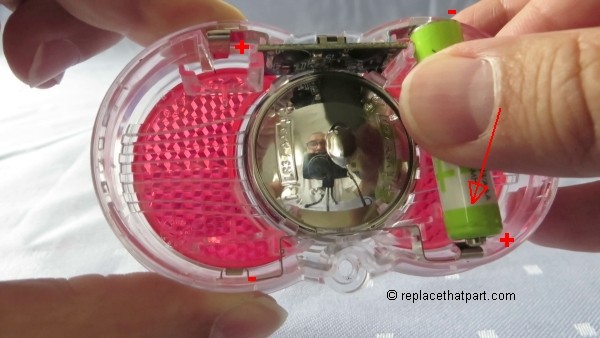
5. Plaats nu 2 nieuwe of opgeladen AAA batterijen in de batterijhouder. Let op dat u de batterijen op de juiste wijze plaatst met de plus- en minkant van de batterijen conform het tekeningetje op de chroomkleurige circel in het midden van de batterijhouder.

6. Plaats het achterlicht met de batterijen weer terug op de zwarte montageplaat. Dit gaat het beste door aan de onderzijde te beginnen. Daarna duwt u de hele lamp op de montageplaat. Dit moet heel makkelijk gaan. Er is geen kracht voor nodig.

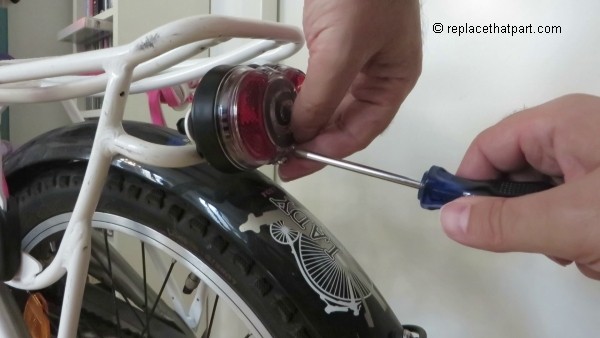
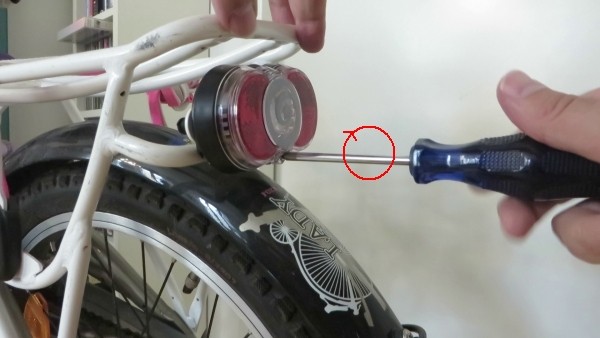
7. Draai het enkele schroefje weer vast. Draai hiervoor naar rechts, met de klok mee. Alles moet precies passen.

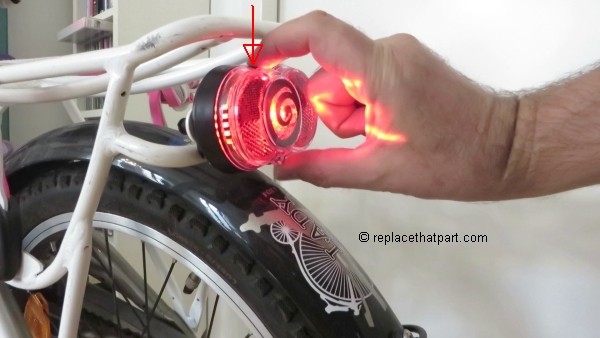
8. Schakel het achterlicht in. De rubberen ronde aan- uitschakelaar bevindt zich aan bovenzijde van de achterlamp. Als u de knop indrukt, gaat de lamp aan. Test of de verlichting naar behoren werkt, ook als er aan de fiets geschud wordt en u het achterwiel laat stuiteren.

Dat is alles! De fiets van uw kind is weer klaar voor veilig gebruik.

How to Replace an Empty Ink Cartridge in the HP OfficeJet 4655 All-in-One series Printer – an Illustrated Tutorial in 9 Steps

Make sure you purchase the right ink cartridges for your specific printer and printer region or have your old ones refilled. Cartridges are not compatible between different brands, and often not within the same brand. HP often designs its inkjet hardware to use country-specific consumables. When you unbox a new HP inkjet printer and set it up, you install a set of ink tanks that ship with the printer. As you turn on the device and get ready to use it, an initialization sequence localizes it to the country associated with the ink cartridges you installed. HP recommends that you use original HP ink cartridges. XL (Extra Large) cartridges cost more but do provide better value in the long run. They will be able to print at least double the pages of a regular cartridge. Our advice is that if you print often, go with XL. However, ink can dry up. So if you are not a frequent printer, go with the regular cartridges. You’ll usually install both the black and tri-color cartridges in the HP Officejet, but you can also leave one ink cartridge carriage empty (single-cartridge mode). During single-cartridge mode, the printer can copy documents, copy photos, and print jobs from the computer.

Which ink cartridges do I need for my HP OfficeJet 4655 All-in-One Printer?

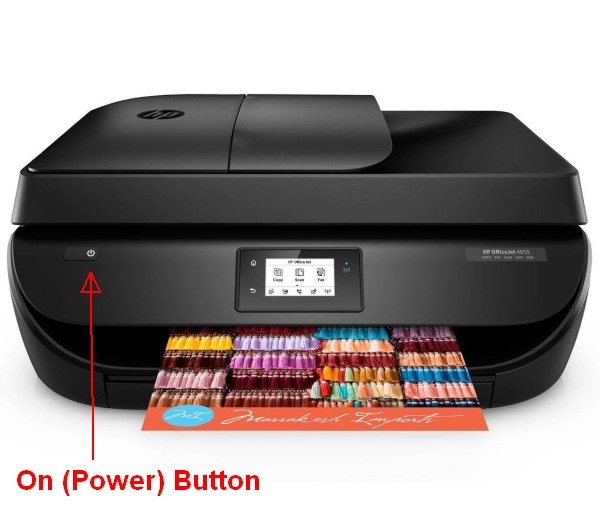
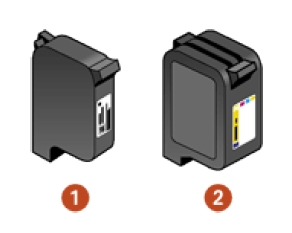
For your US HP OfficeJet 4655 All-in-One Printer you need HP 63 OR HP 63XL cartridges. There are also Combo Packs (2 cartridges in one pack) available, like the HP 63 Black and Tri-color Original Ink Cartridges, 2 Cartridges. Check the price of HP 63 cartridges at Amazon.com .

For your European or UK HP OfficeJet 4655 All-in-One Printer you need HP 302 OR HP 302XL cartridges. There are also Combo Packs (2 cartridges in one pack) available, like the HP 302 2-pack Black/Tri-color Original Ink Cartridges.

Try Amazon's ink selector tool to find compatible ink cartridges for your printer.

Replace the ink cartridges

1. Press the power button to turn on the printer, if it is not already on. It may take a few seconds for the printer to turn on after pressing the button.

2. Load unused plain white Letter or A4-sized paper into the input tray.

Remove the old cartridge
3. Open the ink cartridge access door. The carriage moves to the center of the printer. Wait until the carriage is idle and silent before you proceed.

4. To release the ink cartridge, lift the lid on the ink cartridge slot, then gently push the lid back until it stops. Pull up on the ink cartridge to remove it from the slot. Remove the cartridge from the slot on the left to replace the tri-color cartridge. Remove the cartridge from the slot on the right to replace the black cartridge.

Insert the new cartridge
5. Remove the new cartridge from its package. Be careful to touch only the black plastic on the cartridge.

6. Carefully remove the plastic tape using the pull tab.


Do NOT:
– Remove the copper electrical strip.
– Touch the copper-colored contacts or the ink nozzles.
– Replace the protective tape on the contacts.
do not touch contacts

7. Hold the ink cartridge by its sides with the nozzles toward the printer, then slide the ink cartridge forward into the slot. Close the lid on the ink cartridge slot until it clicks to secure the ink cartridge into place. The tri-color cartridge goes in the slot on the left, and the black cartridge goes in the slot on the right.

8. Repeat step 4 to 7 to replace the other cartridge, if necessary.

9. Close the ink cartridge access door.

Align the cartridges.
After you install new ink cartridges, the printer automatically prints an alignment page. Wait for the alignment page to fully eject from the printer and lift the scanner lid. If you remove and reinstall the same ink cartridge, the HP All-in-One will not prompt you to align the ink cartridges. The HP All-in-One remembers the alignment values for that ink cartridge, so you do not need to realign the ink cartridges.

– Place the alignment page with the print side down on the right-front corner of the scanner glass. See the engraved guide next to the scanner glass for help loading the alignment page.

Follow the instructions on the printer display to align the cartridges.
– Recycle or discard the cartridge alignment sheet.

How to Replace an Empty Ink Cartridge in the HP Deskjet 3820 Printer Series – an Illustrated Tutorial in 11 Steps

Make sure you purchase the right ink cartridges for your specific printer and printer region or have your old ones refilled. Cartridges are not compatible between different brands, and often not within the same brand. HP often designs its inkjet hardware to use country-specific consumables. When you unbox a new HP inkjet printer and set it up, you install a set of ink tanks that ship with the printer. As you turn on the device and get ready to use it, an initialization sequence localizes it to the country associated with the ink cartridges you installed. HP recommends that you use original HP ink cartridges.

The Cartridge Status light flashes when one or both of the cartridges are low on ink, improperly installed, or malfunctioning. The Cartridge Status light also flashes if you are using the wrong cartridge type. When a print cartridge is empty, leave the empty print cartridge in the print cartridge cradle until it is replaced. The printer requires both print cartridges to operate. Ink level warnings and indicators provide estimates for planning purposes only. When you receive a low-ink warning message, consider having a replacement ink cartridge available to avoid possible printing delays. You do not have to replace the ink cartridges until the print quality is unacceptable.

Which ink cartridges do I need for my HP Deskjet 3820 Printer?

Two print cartridges can be used with your printer:
l. black print cartridge
2. tri-color print cartridge

For your US, European and UK HP Deskjet 3820 Printer you need HP 15 Black AND HP 78 Tri-color OR the XL version: HP 78XL Tri-color cartridges.

Try Amazon's ink selector tool to find compatible ink cartridges for your printer.

Replace the ink cartridges

1. Press the power button to turn on the printer, if it is not already on. It may take a few seconds for the printer to turn on after pressing the button.

2. Load plain unused Letter or A4 white paper in the in the IN tray. To do this, you have to open the space-saving 100-sheet fold-up tray to load paper or other media to be printed.

Remove the old cartridge
3. Open the printer top cover. The print cartridge cradle moves to the center of the printer. Wait until the print cartridge is idle and silent before you continue.

4. Raise the cradle latch of the print cartridge you want to install or replace.

5. Lift the print cartridge out of the print cartridge cradle and discard it. Remove the cartridge from the slot on the left to replace the tri-color cartridge. Remove the cartridge from the slot on the right to replace the black cartridge.

Insert the new cartridge
6. Remove the new cartridge from its package. Be careful to touch only the black plastic on the cartridge.

7. Carefully remove the plastic tape using the pull tab.


Do NOT:
– Remove the copper electrical strip.
– Touch the copper-colored contacts or the ink nozzles.
– Replace the protective tape on the contacts.

8. Hold the print cartridge so that the copper the copper strip is on the bottom . Carefully slide the print cartridge into the cradle, then firmly push the cartridge in until it stops.

9. Lower and secure the cradle latch.

10. Repeat step 4 to 9 to replace the other cartridge, if necessary.

11. Close the top cover.

Calibrate cartridges
After installing a print cartridge, calibrate the print cartridges to ensure great print quality. Calibrating the print cartridges takes about two minutes and requires you to examine two test pages.

To calibrate print cartridges:
– Go to printer maintenance.
– Click the calibrate printer button.
– Click calibrate, then follow the onscreen instructions.