How to Replace an Empty Ink Cartridge in the Canon PIXMA TS9521C Crafter’s All-in-One Printer – an Illustrated Tutorial in 13 Steps

Check the price of the Canon PIXMA TS9521C Crafter's All-in-One Printer at Amazon.com .


Make sure you purchase the right ink cartridges for your specific printer and printer region or have your old ones refilled. Cartridges are not compatible between different brands, and often not within the same brand. Canon recommends that you use original Canon ink cartridges. If the cartridges are labeled as Canon FINE Cartridges, the cartridges have a mechanical printhead built into the cartridge, instead of being installed into the printer.

Check the estimated ink levels
You can check the estimated ink levels from the Canon printer software and from the touch screen on the printer. The ink level detector is mounted on the printer to detect the remaining ink level. The printer considers as ink is full when a new cartridge is installed, and then starts to detect a remaining ink level. If you install a used cartridge, the indicated ink level of it may not be correct. In such case, refer to the ink level information only as a guide. Installing a used cartridge is not recommended.

To check the ink levels from the printer software (Windows):

Open the printer driver setup window:
– Select the print command from your application software. The Print command can generally be found in the File menu.
Select your printer model, and click Preferences or Properties. The printer driver’s setup screen appears.

You can also display the printer driver’s setup screen by clicking the printer icon:
– Select Control Panel -> Hardware and Sound -> Devices and Printers.
Right-click the icon of your model. When the menu appears, select Printing preferences.

Canon IJ Status Monitor
The Canon IJ Status Monitor displays the printer status and the printing progress. You can also use it to check the remaining ink level and the cartridge types for your model. The Canon IJ Status Monitor launches automatically when print data is sent to the printer. When launched, the Canon IJ Status Monitor appears as a button on the task bar. Click the button of the status monitor displayed on the task bar. The Canon IJ Status Monitor appears. To open the Canon IJ Status Monitor when the printer is not printing, open the printer driver setup window and click View Printer Status on the Maintenance tab.
canon pixma ts9521c replace the ink cartridges 02

To check the ink status from the touch screen
– Display the HOME screen. If the HOME screen is not displayed, tap the HOME button to display it.
– Select the INFORMATION / hint button on the HOME screen. The hint menu screen will appear.
– Select Estimated ink levels. A symbol appears in the area A if there is any information about the remaining ink level.

canon pixma ts9521c replace the ink cartridges 03
canon pixma ts9521c replace the ink cartridges 04

canon pixma ts9521c replace the ink cartridges 05

Canon sells most of their cartridges in a standard yield size and a high yield or XL. Some cartridges are also available in extra-high yield, or XXL. All cartridge sizes are the exact same size and install in your printer the same way, the only difference is the amount of ink that is inside the cartridge. XL and XXL cartridges cost more but do provide better value in the long run. Our advice is that if you print often, go with XL or XXL. However, ink can dry up. So if you are not a frequent printer, go with the regular cartridges. A new Canon printer includes a complete set of starter ink cartridges. Starter cartridges are filled with less ink than a standard yield cartridge so you shouldn’t expect to get very many prints out of them before they need to be replaced.

Ink level warnings and indicators provide estimates for planning purposes only. When you receive a low-ink warning message, consider having a replacement cartridge available to avoid possible printing delays. You do not have to replace the cartridges until the print quality is unacceptable.

Two different black ink tanks
There are two kinds of black ink in the printer: dye ink (BK) and pigment ink (PGBK).
The dye ink is used mainly for printing photos, illustration, and the pigment ink is used for text-based documents. Each has different purposes so that even if one runs out, another will NOT be used instead. If either of them runs out, the ink tank replacement is required. These two inks are automatically used depending on the type of printing paper or the settings of the printer driver. You cannot change the usage of these inks yourself.

Which ink cartridges do I need for my Canon PIXMA TS9521C Printer?

For your US Canon PIXMA TS9521C Printer you need a Canon PGI-280 black (pigment) cartridge AND 4 Canon CLI-281 color (dye) cartridge OR the XL or XXL versions. The 4 Canon CLI-281 color cartridges are also available in multiple value packs.

Try Amazon's ink selector tool to find compatible ink cartridges for your printer.

Replace the ink cartridges

1. Press the ON button to turn on the printer, if it is not already turned on.
canon pixma ts9521c replace the ink cartridges 06

canon pixma ts9521c replace the ink cartridges 07

2. Load paper
Open the rear tray cover (A) gently. Pull straight up and fold back paper support (B).
3.
– Open the feed slot cover (C) and slide the right paper guide (D) to open both paper guides.
– Load paper stack in portrait orientation with print side facing up.
canon pixma ts9521c replace the ink cartridges 08

– Slide the right paper guide (D) to align with both sides of paper stack. Do not slide the paper guides too hard against the paper. The paper may not be fed properly.
– Close the feed slot cover (C) gently.
– After closing the feed slot cover, the paper setting confirmation screen for the rear tray appears on the LCD. If page size and media type on LCD match size and type of paper loaded in rear tray, select OK. If not, select Change to change the settings in accordance with the size and type of the loaded paper.
4. Open operation panel (H). Be sure to open the operation panel before printing. If the operation panel is closed, the printer does not print.
5. Pull out the paper output tray (I) and open the paper output support (J).
canon pixma ts9521c replace the ink cartridges 09

6. Open the scanning unit / top cover. The print head holder moves to the replacement position. Don’t touch it and wait until the printer is idle and silent before continuing.
canon pixma ts9521c replace the ink cartridges 10

7. Remove the empty cartridge.
Push the tab (A) inward a bit and pull the cartridge toward you out of its slot.
– Set the empty cartridge aside for recycling.
canon pixma ts9521c replace the ink cartridges 11

8. Prepare a new cartridge.
– Remove the new cartridge from its packaging.
Remove the orange tape (G) completely.
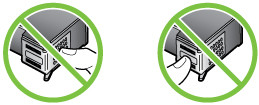
– Remove the protective film (C) completely. Be careful to only touch the black plastic on the ink cartridge by holding the ink cartridge gently by its sides.
canon pixma ts9521c replace the ink cartridges 12


9. Install the new cartridge.
– Hold the ink tank with the orange protective cap (E) pointing up while being careful not to block the Y-shape air hole (D).
– Lift up the tab on the orange protective cap (E) to remove it off gently.
canon pixma ts9521c replace the ink cartridges 13

10. Insert the front end of the ink tank into the print head at a slant. Make sure that the position of the ink tank matches the label.
canon pixma ts9521c replace the ink cartridges 14

11. Press on the top of the ink tank until the ink tank snaps firmly into place.
canon pixma ts9521c replace the ink cartridges 15

12. Repeat step 6 through 11 to replace an other cartridge, if necessary. Do not remove two or more ink tanks at the same time. Be sure to replace ink tanks one by one when replacing two or more ink tanks. You cannot print unless all the ink tanks are installed. Be sure to install all the ink tanks.

13. Close the scanning unit / top cover. To close the scanning unit / cover, hold it up once, then take it down gently.

If the error message appears on the touch screen after the top cover is closed, take appropriate action. When you start printing after replacing the ink tank, the printer starts cleaning the print head automatically. Do not perform any other operations until the printer completes the cleaning of the print head.
canon pixma ts9521c replace the ink cartridges 16

Align the print head only if necessary.
If the print head is out of alignment, as indicated by misaligned printed ruled lines or similar symptoms, align the print head.
– Load at least two sheets of A4 or Letter-sized plain paper in the cassette (front tray).
– Select the Setup button on the HOME screen.
– Select Maintenance.
– Select Auto head alignment and confirm with Yes. The print head alignment sheet is printed, and the print head is aligned automatically. This might take 3 to 4 minutes.
canon pixma ts9521c replace the ink cartridges 17

How to Replace an Empty Ink Cartridge in the HP Deskjet 2723e All-in-One Printer – an Illustrated Tutorial in 10 Steps

Check the price of the HP Deskjet 3772e at Amazon.com .


Make sure you purchase the right ink cartridges for your specific printer and printer region or have your old ones refilled. Cartridges are not compatible between different brands, and often not within the same brand. HP often designs its inkjet hardware to use country-specific consumables. When you unbox a new HP inkjet printer and set it up, you install a set of ink tanks that ship with the printer. As you turn on the device and get ready to use it, an initialization sequence localizes it to the country associated with the ink cartridges you installed. HP recommends that you use original HP ink cartridges.

XL (Extra Large) cartridges cost more but do provide better value in the long run. They will be able to print almost 2 times as many pages as a regular cartridge. Our advice is that if you print often, go with XL. However, ink can dry up. So if you are not a frequent printer, go with the regular cartridges.

You can check the estimated ink levels from the printer software, printer control panel or HP Smart.

To check the ink levels from the printer control panel
The ink level icons on the printer display show an estimate of ink remaining in the cartridges. The left ink icon shows the estimated ink level of the tri-color cartridge, and the right icon shows the estimated ink level of the black cartridge.
hp deskjet 2723e replace the ink cartridges 01

To check the ink levels from the HP printer software (Windows)
Open the HP printer software.
– In the printer software, click the Estimated Levels tab.

To check the ink levels from the HP Smart app
Open HP Smart app. Check the estimated ink levels at the right side of the printer image.

Ink level warnings and indicators provide estimates for planning purposes only. When you receive a low-ink warning message, consider having a replacement cartridge available to avoid possible printing delays. You do not have to replace the cartridges until the print quality is unacceptable.

Use the single-cartridge mode to operate the HP All-in-One with only one print cartridge. The single-cartridge mode is initiated when a print cartridge is removed from the print cartridge carriage.

Which ink cartridges do I need for my HP Deskjet 2723e All-in-One Printer?

For your US HP DeskJet 2723e All-in-One Printer you need HP 67 Black AND HP 67 Tri-color cartridges OR the XL versions: HP 67XL Black AND HP 67XL Tri-color cartridges. Check the price of HP 67 cartridges at Amazon.com .

For your European or UK HP DeskJet 2723e All-in-One Printer you need HP 305 Black AND HP 305 Tri-color cartridges OR the XL versions: HP 305XL Black AND HP 305XL Tri-color cartridges.

Try Amazon's ink selector tool to find compatible ink cartridges for your printer.

Replace the ink cartridges

1. Press the Power button to turn on the printer, if it is not already turned on. Wait until the printer is idle and silent before continuing.
hp deskjet 2723e replace the ink cartridges 02

hp deskjet 2723e replace the ink cartridges 03

2. Load unused plain white Letter or A4-sized paper into the input tray.
hp deskjet 2723e replace the ink cartridges 04

Remove cartridge
3. Reach inside the printer, grasp the handle, and then lower the ink cartridge access door. The carriage moves to the center of the printer. Wait until the printer is idle and silent before continuing.
hp deskjet 2723e replace the ink cartridges 05

4. Lightly press down on the cartridge to release it, and then pull the cartridge out of its slot.
hp deskjet 2723e replace the ink cartridges 06

Insert the new cartridge
5. Remove the new cartridge from its packaging. Be careful to only touch the black plastic on the ink cartridge by holding the ink cartridge by its sides.
hp deskjet 2723e replace the ink cartridges 07

hp deskjet 2723e replace the ink cartridges 08

6. Pull the coloured tab to remove the plastic tape.
hp deskjet 2723e replace the ink cartridges 09


Do NOT:
– Remove the copper electrical strip.
– Touch the copper-colored contacts or the ink nozzles.
– Replace the protective tape on the contacts.
do not touch contacts

7. Hold the cartridge by its sides with the nozzles toward the printer, and then insert the cartridge into its slot at a slight upward angle. Make sure that the icon on the cartridge matches the icon on the slot. The tri-color cartridge goes in the slot on the left, and the black cartridge goes in the slot on the right.
hp deskjet 2723e replace the ink cartridges 10

8. Push the cartridge forward until it snaps into place.
hp deskjet 2723e replace the ink cartridges 11

9. Repeat step 4 through 8 to replace the other cartridge, if necessary.
10. Close the cartridge access door.
hp deskjet 2723e replace the ink cartridges 12

Align the cartridges

To achieve the best print quality, it is always useful to align the ink cartridges. If an Alignment Page prints, follow the instructions on the page to align the cartridges and complete the installation.

You can always print the alignment page from the HP Smart app or from the printer software.

A. To print the alignment page from the printer software:

Open the printer software.
– In the printer software, click Print & Scan.
– Click Maintain Your Printer to access the printer toolbox.
– Click Align Cartridges on the Device Services tab.

The printer prints an alignment page.
hp deskjet 2723e replace the ink cartridges 13

– Follow the onscreen instructions to align the cartridges.
– Recycle or discard the cartridge alignment sheet later.

How to Replace an Empty Ink Cartridge in the HP ENVY Inspire 7955e All-in-One Printer – an Illustrated Tutorial in 11 Steps

Check the price of the HP ENVY Inspire 7955e at Amazon.com .


Make sure you purchase the right ink cartridges for your specific printer and printer region or have your old ones refilled. Cartridges are not compatible between different brands, and often not within the same brand. HP often designs its inkjet hardware to use country-specific consumables. When you unbox a new HP inkjet printer and set it up, you install a set of ink tanks that ship with the printer. As you turn on the device and get ready to use it, an initialization sequence localizes it to the country associated with the ink cartridges you installed. HP recommends that you use original HP ink cartridges.

XL (Extra Large) cartridges cost more but do provide better value in the long run. They will be able to print 3 times as many pages as a regular cartridge. Our advice is that if you print often, go with XL. However, ink can dry up. So if you are not a frequent printer, go with the regular cartridges.

You can check the estimated ink levels from the printer control panel, from the printer software or from the HP Smart app.
A. To check the estimated ink levels from the printer control panel:
– From the printer control panel, touch or swipe down the tab at the top of the screen to open the Dashboard
– Touch the Ink symbol to check the estimated ink levels.
hp envy inspire 7955e how to replace the ink cartridges 01

B. To check the ink levels from the printer software (Windows):
– Open the HP printer software.
– In the printer software, click Estimated Levels at the top of the window.
hp envy inspire 7955e how to replace the ink cartridges 02

C. To check the ink levels from the HP Smart app:
Just view the estimated ink levels from the home screen.
hp envy inspire 7955e how to replace the ink cartridges 03

Ink level warnings and indicators provide estimates for planning purposes only. When you receive a low-ink warning message, consider having a replacement cartridge available to avoid possible printing delays. You do not have to replace the cartridges until the print quality is unacceptable.

Use the single-cartridge mode to operate the HP ENVY Inspire 7955e All-in-One printer with only one cartridge. The single-cartridge mode is initiated when an cartridge is removed from the cartridge carriage.

Which ink cartridges do I need for my HP ENVY Inspire 7955e All-in-One series Printer?

For your US HP ENVY Inspire 7955e All-in-One Printer you need HP 64 Black AND HP 64 Tri-color cartridges (OR the HP 64 XL versions). There are also combo packs available, like the HP 64 Black and Tri-Color Original Ink Cartridges, 2 Cartridges. Check the price of HP 64 cartridges at Amazon.com .
For your European or UK HP ENVY Inspire 7955e All-in-One Printer you need HP 303 Black AND HP 303 Tri-color cartridges (OR the HP 303 XL versions). There are also combo packs available, like the HP Z4B62EE 303 Photo Value Pack, Black and Tri-colour, Pack of 2.

Try Amazon's ink selector tool to find compatible ink cartridges for your printer.

Replace the ink cartridges

1. Press the Power button to turn on the printer, if it is not already turned on.
hp envy inspire 7955e how to replace the ink cartridges 04

2. Load unused plain white Letter or A4-sized paper into the main paper tray.
hp envy inspire 7955e how to replace the ink cartridges 05

Remove the empty cartridge
3. Open the front door as shown below.
hp envy inspire 7955e how to replace the ink cartridges 06

4. Open the cartridge access door by placing a thumb or two fingers under the small handle on the front of the cartridge access door and then lifting it up. Wait until the print cartridge cradle is idle and silent before you continue.
hp envy inspire 7955e how to replace the ink cartridges 07

hp envy inspire 7955e how to replace the ink cartridges 08

5. Lightly press down on the cartridge to release it, and then pull the cartridge toward you out of its slot. Set it aside for recycling.
– Remove the cartridge from the slot on the left to replace the tri-color cartridge.
– Remove the cartridge from the slot on the right to replace the black cartridge.
hp envy inspire 7955e how to replace the ink cartridges 09

Insert the new cartridge
6. Remove the new cartridge from its package. Be careful to only touch the black plastic on the ink cartridge by holding the ink cartridge by its sides.
hp envy inspire 7955e how to replace the ink cartridges 10

hp envy inspire 7955e how to replace the ink cartridges 11

7. Pull the colored tab to remove the protective tape from the cartridge.
hp envy inspire 7955e how to replace the ink cartridges 12


Do NOT:
– Remove the copper electrical strip.
– Touch the copper-colored contacts or the ink nozzles.
– Replace the protective tape on the contacts.
do not touch contacts

8. Hold the cartridge by its sides with the nozzles toward the printer, and then insert the cartridge into its slot at a slight upward angle. Make sure that the icon on the cartridge matches the icon on the slot.
– Insert the tri-color cartridge into the left slot.
– Insert the black cartridge into the right slot.
hp envy inspire 7955e how to replace the ink cartridges 13

hp envy inspire 7955e how to replace the ink cartridges 14

hp envy inspire 7955e how to replace the ink cartridges 15

9. Repeat steps 5 through 8 to replace the other cartridge, if necessary.

10. Close the cartridge access door. The printer starts an initialization process. It is normal for the printer to make noises during this process.
hp envy inspire 7955e how to replace the ink cartridges 16

11. Close the front door.
hp envy inspire 7955e how to replace the ink cartridges 17

Align the printhead only if necessary.
Clean the printhead if your printed output is streaked or has any incorrect or missing colors.

The printer automatically aligns the printhead during the initial setup. The printhead does not have to be realigned when cartridges are replaced. However, you might want to use this feature for print quality issues in printouts when the printer status page shows streaking or white lines through any of the blocks of color, or if you are having print quality issues with your printouts. Performing the cleaning and aligning procedures unnecessarily can waste ink and shorten the life of the cartridges.

From the printer control panel:
– Touch or swipe down the tab at the top of the screen to open the
Dashboard

– Touch Setup
– Touch Printer Maintenance
Select the desired option
– Follow the onscreen instructions

How to Replace an Empty Ink Cartridge in the HP Deskjet F2110 All-in-One Printer – an Illustrated Tutorial in 10 Steps

Make sure you purchase the right ink cartridges for your specific printer and printer region or have your old ones refilled. Cartridges are not compatible between different brands, and often not within the same brand. HP often designs its inkjet hardware to use country-specific consumables. When you unbox a new HP inkjet printer and set it up, you install a set of ink tanks that ship with the printer. As you turn on the device and get ready to use it, an initialization sequence localizes it to the country associated with the ink cartridges you installed. HP recommends that you use original HP ink cartridges. XL (Extra Large) cartridges cost more but do provide better value in the long run. They will be able to print at least double the pages of a regular cartridge. Our advice is that if you print often, go with XL. However, ink can dry up. So if you are not a frequent printer, go with the regular cartridges.

You can check the ink levels by using the HP Photosmart Software:
– In the HP Solution Center, click Settings, point to Print Settings, and then click Printer Toolbox.
You can also open the Printer Toolbox from the Print Properties dialog box, click the Services tab, and then click Service this device.
– Click the Estimated Ink Level tab.
The estimated ink levels for the print cartridges appear.

The Check Print Cartridge light on the Control panel indicates the need to reinsert the print cartridge, replace the print cartridge because something is wrong, or close the print cartridge door.
hp deskjet f2110 how to replace the ink cartridges 01

Ink level warnings and indicators provide estimates for planning purposes only. When you receive a low-ink warning message, consider having a replacement cartridge available to avoid possible printing delays. You do not have to replace the cartridges until the print quality is unacceptable.

You’ll usually install both the black and tri-color cartridges in the Deskjet, but you can use the ink-backup mode to operate the HP Deskjet with only one print cartridge. The ink-backup mode is initiated when a print cartridge is removed from the print cartridge carriage. This printing mode lets you print with a single print cartridge, but it slows the product and affects the quality of printouts. During ink-backup mode, the product can only print jobs from the computer. You cannot initiate a print job from the control panel (such as copying or scanning an original).

Which ink cartridges do I need for my HP Deskjet F2110 All-in-One Printer?

For your US, European and UK HP Deskjet F2110 All-in-One Printer you need HP 21 Black AND HP 22 Tri-color cartridges OR HP 21XL Black AND HP 22XL Tri-color cartridges. There are also 2-Packs available, like the HP 21 Black and 22 Tri-color Original Ink Cartridges, 2 pack. Check the price of HP 21 and HP 22 cartridges at Amazon.com .

Quality color photos: For more vibrant colors when printing color photographs or other special documents, remove the black print cartridge and install an HP 58 Photo Ink Cartridge.

Try Amazon's ink selector tool to find compatible ink cartridges for your printer.

Replace the ink cartridges

1. Turn the printer on by pressing the On/Off button (power button), if it is not already turned on. It can take a few seconds for the printer to turn on after you press the Power button. Wait until the product is idle and silent before continuing.
hp deskjet f2110 how to replace the ink cartridges 02

hp deskjet f2110 how to replace the ink cartridges 03

2. Load unused, plain white letter or A4-sized paper in the paper tray, if you have not already done so.
hp deskjet f2110 how to replace the ink cartridges 04

Remove the empty cartridge
3. Open the print cartridge door. The carriage moves to the center of the printer. If the carriage does not move to the center, turn off the printer, and then turn it on again. Wait until the carriage is idle and silent before proceeding.
hp deskjet f2110 how to replace the ink cartridges 05

4. Press down on the empty cartridge to release it, and then pull it toward you out its slot. Remove the cartridge from the slot on the left (1) to replace the tri-color cartridge. Remove the cartridge from the slot on the right (2) to replace the black cartridge OR photo print cartridges.

If the black print cartridge is being removed in order to install the photo print cartridge, store the black print cartridge in the print cartridge protector or an airtight plastic container.
hp deskjet f2110 how to replace the ink cartridges 06

Insert the new cartridge
5. Remove the new cartridge from its packaging. Be careful to only touch the black plastic on the ink cartridge by holding the ink cartridge by its sides.
hp deskjet f2110 how to replace the ink cartridges 07

hp deskjet f2110 how to replace the ink cartridges 08

6. Gently remove the plastic tape on the cartridge by pulling the colored pull tab.
hp deskjet f2110 how to replace the ink cartridges 09


Do NOT:
– Remove the copper electrical strip.
– Touch the copper-colored contacts or the ink nozzles.
– Replace the protective tape on the contacts.
do not touch contacts

7. Hold the new cartridge by its sides, so that the copper strip is on the bottom and facing toward the printer. The HP label is on top.
hp deskjet f2110 how to replace the ink cartridges 10

8. Slide the print cartridge firmly into the cradle at a slight upward angle until you feel resistance. The push on the upper part of the print cartridge forward until it snaps into place. If you are installing the tri-color print cartridge, slide it into the left slot. If you are installing the black OR photo print cartridge, slide it into the right slot.
hp deskjet f2110 how to replace the ink cartridges 11

hp deskjet f2110 how to replace the ink cartridges 12

hp deskjet f2110 how to replace the ink cartridges 13

9. Repeat step 4 trough 8 to replace the other cartridge, if needed.

10. Close the print cartridge door. The product prints an alignment page.
hp deskjet f2110 how to replace the ink cartridges 15

Align the new cartridge
Print cartridge alignment ensures better print quality.
– After the print cartridge alignment sheet prints, load it on the left front corner of the glass with the top of the page to the left.
hp deskjet f2110 how to replace the ink cartridges 16

Press the Scan button. The HP All-in-One aligns the print cartridges. Recycle or discard the print cartridge alignment sheet.
hp deskjet f2110 how to replace the ink cartridges 17