How to Replace an Empty Ink Cartridge in the HP OfficeJet Pro 8035 series – an Illustrated Tutorial in 11 Steps

Make sure you purchase the right ink cartridges for your specific printer and printer region or have your old ones refilled. Cartridges are not compatible between different brands, and often not within the same brand. HP often designs its inkjet hardware to use country-specific consumables. When you unbox a new HP inkjet printer and set it up, you install a set of ink tanks that ship with the printer. As you turn on the device and get ready to use it, an initialization sequence localizes it to the country associated with the ink cartridges you installed.

HP recommends that you use original HP ink cartridges. XL (Extra Large) cartridges cost more but do provide better value in the long run. They will be able to print at least double the pages of a regular cartridge. Our advice is that if you print often, go with XL. However, ink can dry up. So if you are not a frequent printer, go with the regular cartridges.

You can check the estimated ink levels from the printer control panel or from the printer software. Ink level warnings and indicators provide estimates for planning purposes only. When you receive a low-ink warning message, consider having a replacement cartridge available to avoid possible printing delays. You do not have to replace the cartridges until prompted to do so.

To check the estimated ink levels from the printer control panel:
– touch or swipe down the tab at the top of the screen to open the Dashboard, and then touch the Ink Icon (see below) to check the estimated ink levels.
hp officejet pro 8035 how to replace ink cartridges 01

Which ink cartridges do I need for my HP OfficeJet Pro 8035 printer?

For your US HP OfficeJet Pro 8035 printer you need 1 HP 910 Black OR the XL-version HP 910XL Black AND 3 color cartridges: HP 910 Cyan/Magenta/Yellow OR the XL-version HP 910XL Cyan/Magenta/Yellow. There are also Combo Packs (4 cartridges in one pack) available, like the HP 910 | 4 Ink Cartridges | Black, Cyan, Magenta, Yellow | 3YL61AN, 3YL58AN, 3YL59AN, 3YL60AN. Check the price of HP 910 cartridges at Amazon.com .

For your European or UK HP OfficeJet Pro 8035 printer you need 1 HP 912 Black OR the XL-version HP 912XL Black cartridge AND 3 color cartridges: HP 912 Cyan + HP 912 Magenta + HP 912 Yellow cartridges. OR the XL-version of the color cartridges: HP 912XL Cyan + HP 912XL Magenta + HP 912XL Yellow. There are also Combo Packs (4 cartridges in one pack) available, like the HP 3YP34AE 912XL High Yield Original Ink Cartridge, Black/Cyan/Magenta/Yellow, Pack of 4.

Try Amazon's ink selector tool to find compatible ink cartridges for your printer.

Replace the ink cartridges.

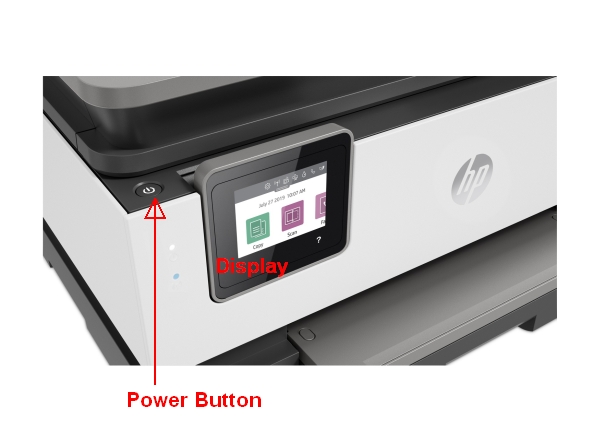
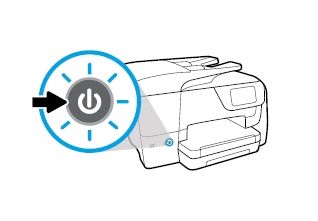
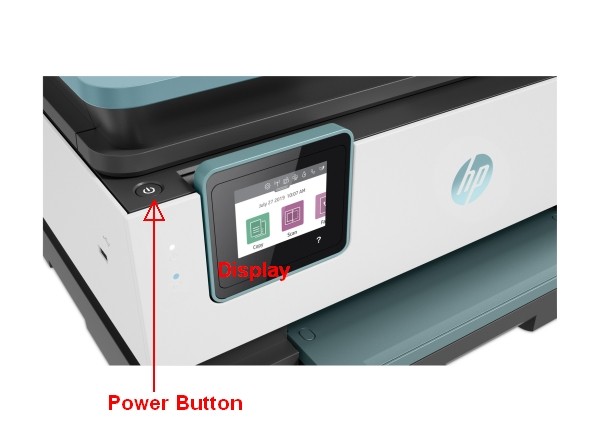
1. Look at the Power button located on the printer. If it is not lit, the printer is turned off. Press the Power button to turn on the printer. Wait until the product is idle and silent before continuing.
hp officejet pro 8035 how to replace ink cartridges 02

Remove the old cartridge
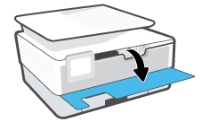
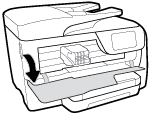
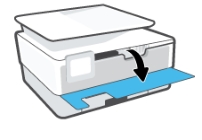
2. Open the front door.
hp officejet pro 8035 how to replace ink cartridges 03

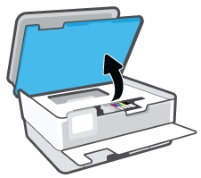
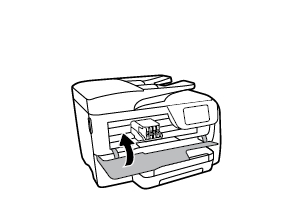
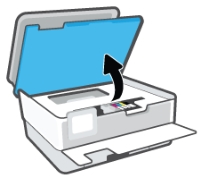
3. Open the cartridge access door. Wait until the carriage is idle and silent before you proceed.
hp officejet pro 8035 how to replace ink cartridges 04

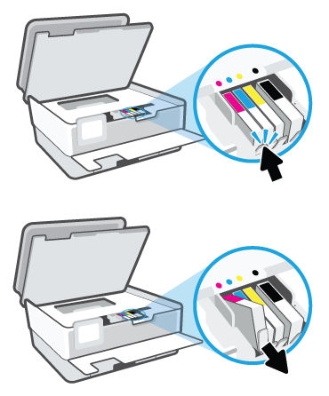
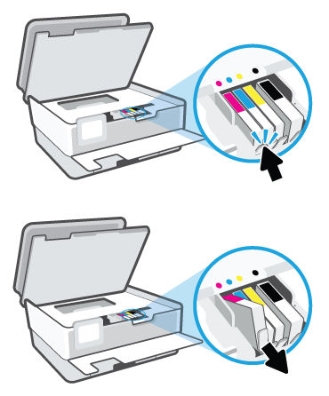
4. Press the tab on the front of the cartridge inward to release it, and then pull up on the cartridge to remove it from the slot.
hp officejet pro 8035 how to replace ink cartridges 05

Insert the new cartridge
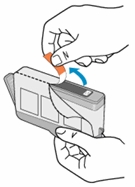
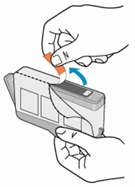
5. Remove the new ink cartridge from its packaging by pulling the orange pull-tab straight back to remove the plastic wrap from the ink cartridge. Make sure you remove the orange pull-tab completely. When you remove the plastic wrap, the paper label on the top of the cartridge tears slightly, which is necessary to vent the cartridge. Do not touch the copper-colored electrical contacts and ink port.
hp officejet pro 8035 how to replace ink cartridges 06

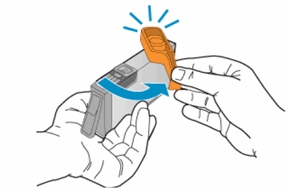
6. Remove the orange cap from the cartridge. Hold the ink cartridge by its sides, and then twist the cap counter-clockwise until it snaps off. A forceful twist may be required to remove the cap.
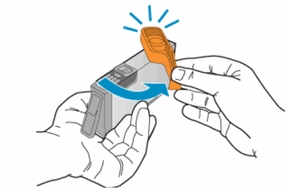
hp officejet pro 8035 how to replace ink cartridges 07

hp cartridge01

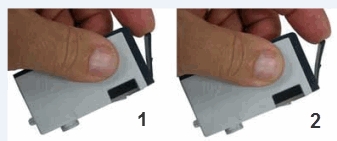
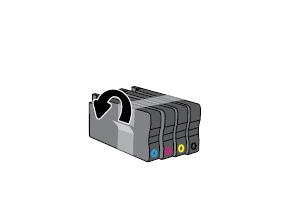
7. Gently bend the tab away from the ink cartridge. Be careful not to bend the tab out more than 1.27 cm (0.5 in). Moving the tab too far might damage the ink cartridge or cause the tab to break.
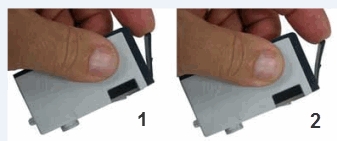
hp officejet pro 8035 how to replace ink cartridges 08

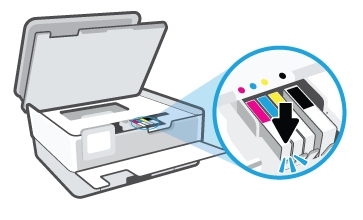
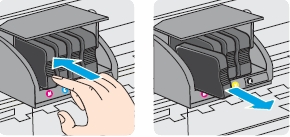
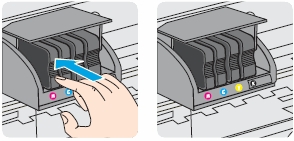
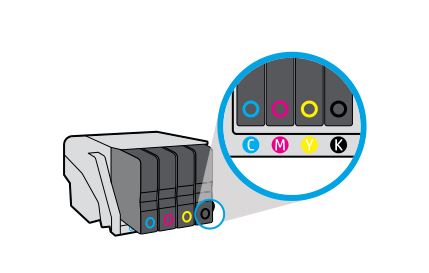
8. Hold the ink cartridge so that the ink cartridge contacts are facing down and toward the printer. Match the colored dot on the ink cartridge with the dot of the same color on the carriage. Slide the new ink cartridge into its slot, and then gently press the ink cartridge down until it clicks into place and is seated firmly in the slot. Make sure that the color-coded letter on the cartridge matches that on the slot.
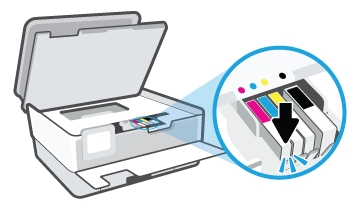
hp officejet pro 8035 how to replace ink cartridges 09

hp officejet pro 8035 how to replace ink cartridges 10

9. Repeat step 3 to 7 for each ink cartridge you are replacing.

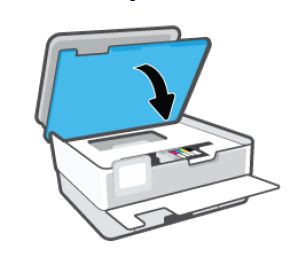
10. Close the ink cartridge access door.
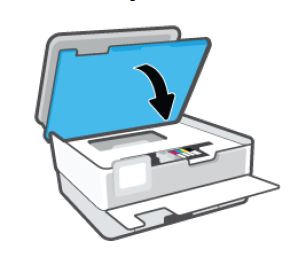
hp officejet pro 8035 how to replace ink cartridges 11

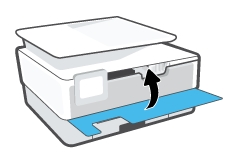
11. Close the front door.
hp officejet pro 8035 how to replace ink cartridges 12

Align the printhead only if necessary.
The printer automatically aligns the printhead during the initial setup. The printhead does not have to be realigned when cartridges are replaced. However, you might want to use this feature for print quality issues in printouts where straight lines look wavy or jagged. You can align the printhead from the printer display and from the HP printer software.
How to Replace an Empty Ink Cartridge in the HP OfficeJet Pro 8025 series – an Illustrated Tutorial in 11 Steps

Make sure you purchase the right ink cartridges for your specific printer and printer region or have your old ones refilled. Cartridges are not compatible between different brands, and often not within the same brand. HP often designs its inkjet hardware to use country-specific consumables. When you unbox a new HP inkjet printer and set it up, you install a set of ink tanks that ship with the printer. As you turn on the device and get ready to use it, an initialization sequence localizes it to the country associated with the ink cartridges you installed.

HP recommends that you use original HP ink cartridges. XL (Extra Large) cartridges cost more but do provide better value in the long run. They will be able to print at least double the pages of a regular cartridge. Our advice is that if you print often, go with XL. However, ink can dry up. So if you are not a frequent printer, go with the regular cartridges.

You can check the estimated ink levels from the printer control panel or from the printer software. Ink level warnings and indicators provide estimates for planning purposes only. When you receive a low-ink warning message, consider having a replacement cartridge available to avoid possible printing delays. You do not have to replace the cartridges until prompted to do so.

To check the estimated ink levels from the printer control panel:
– touch or swipe down the tab at the top of the screen to open the Dashboard, and then touch the Ink Icon (see below) to check the estimated ink levels.
hp officejet pro 8025 how to replace ink cartridges 01

Which ink cartridges do I need for my HP OfficeJet Pro 8025 printer?

For your US HP OfficeJet Pro 8025 printer you need 1 HP 910 Black OR the XL-version HP 910XL Black AND 3 color cartridges: HP 910 Cyan/Magenta/Yellow OR the XL-version HP 910XL Cyan/Magenta/Yellow. There are also Combo Packs (4 cartridges in one pack) available, like the HP 910 | 4 Ink Cartridges | Black, Cyan, Magenta, Yellow | 3YL61AN, 3YL58AN, 3YL59AN, 3YL60AN. Check the price of HP 910 cartridges at Amazon.com .

For your European or UK HP OfficeJet Pro 8025 printer you need 1 HP 912 Black OR the XL-version HP 912XL Black cartridge AND 3 color cartridges: HP 912 Cyan + HP 912 Magenta + HP 912 Yellow cartridges. OR the XL-version of the color cartridges: HP 912XL Cyan + HP 912XL Magenta + HP 912XL Yellow. There are also Combo Packs (4 cartridges in one pack) available, like the HP 3YP34AE 912XL High Yield Original Ink Cartridge, Black/Cyan/Magenta/Yellow, Pack of 4.

Try Amazon's ink selector tool to find compatible ink cartridges for your printer.

Replace the ink cartridges.

1. Look at the Power button located on the printer. If it is not lit, the printer is turned off. Press the Power button to turn on the printer. Wait until the product is idle and silent before continuing.
hp officejet pro 8025 how to replace ink cartridges 02

Remove the old cartridge
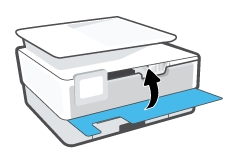
2. Open the front door.
hp officejet pro 8025 how to replace ink cartridges 03

3. Open the cartridge access door. Wait until the carriage is idle and silent before you proceed.
hp officejet pro 8025 how to replace ink cartridges 04

4. Press the tab on the front of the cartridge inward to release it, and then pull up on the cartridge to remove it from the slot.
hp officejet pro 8025 how to replace ink cartridges 05

Insert the new cartridge
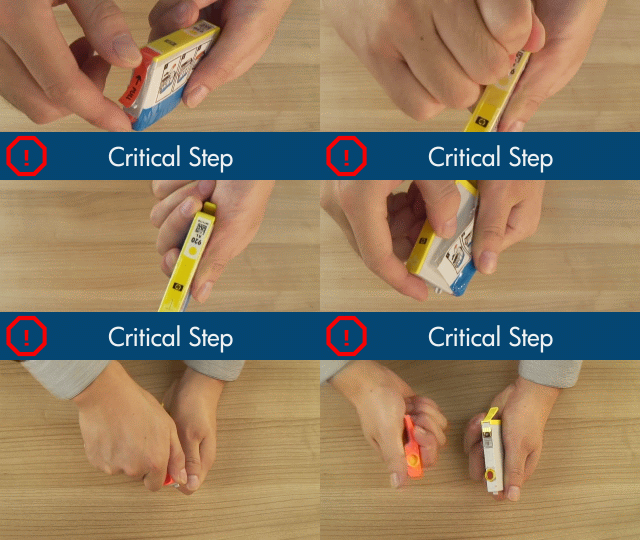
5. Remove the new ink cartridge from its packaging by pulling the orange pull-tab straight back to remove the plastic wrap from the ink cartridge. Make sure you remove the orange pull-tab completely. When you remove the plastic wrap, the paper label on the top of the cartridge tears slightly, which is necessary to vent the cartridge. Do not touch the copper-colored electrical contacts and ink port.
hp officejet pro 8025 how to replace ink cartridges 06

6. Remove the orange cap from the cartridge. Hold the ink cartridge by its sides, and then twist the cap counter-clockwise until it snaps off. A forceful twist may be required to remove the cap.
hp officejet pro 8025 how to replace ink cartridges 07

hp cartridge01

7. Gently bend the tab away from the ink cartridge. Be careful not to bend the tab out more than 1.27 cm (0.5 in). Moving the tab too far might damage the ink cartridge or cause the tab to break.
hp officejet pro 8025 how to replace ink cartridges 08

8. Hold the ink cartridge so that the ink cartridge contacts are facing down and toward the printer. Match the colored dot on the ink cartridge with the dot of the same color on the carriage. Slide the new ink cartridge into its slot, and then gently press the ink cartridge down until it clicks into place and is seated firmly in the slot. Make sure that the color-coded letter on the cartridge matches that on the slot.
hp officejet pro 8025 how to replace ink cartridges 09

hp officejet pro 8025 how to replace ink cartridges 10

9. Repeat step 3 to 8 for each ink cartridge you are replacing.

10. Close the ink cartridge access door.
hp officejet pro 8025 how to replace ink cartridges 11

11. Close the front door.
hp officejet pro 8025 how to replace ink cartridges 12

Align the printhead only if necessary.
The printer automatically aligns the printhead during the initial setup. The printhead does not have to be realigned when cartridges are replaced. However, you might want to use this feature for print quality issues in printouts where straight lines look wavy or jagged. You can align the printhead from the printer display and from the HP printer software.
How to Replace an Empty Ink Cartridge in the HP Officejet 8702 All-in-One series Printer – an Illustrated Tutorial in 7 Steps

Make sure you purchase the right ink cartridges for your specific printer and printer region or have your old ones refilled. Cartridges are not compatible between different brands, and often not within the same brand. HP often designs its inkjet hardware to use country-specific consumables. When you unbox a new HP inkjet printer and set it up, you install a set of ink tanks that ship with the printer. As you turn on the device and get ready to use it, an initialization sequence localizes it to the country associated with the ink cartridges you installed.

HP recommends that you use original HP ink cartridges. XL (Extra Large) cartridges cost more but do provide better value in the long run. They will be able to print at least double the pages of a regular cartridge. Our advice is that if you print often, go with XL. However, ink can dry up. So if you are not a frequent printer, go with the regular cartridges.

You can check the estimated ink levels from the printer software or from the printer control panel. The icon below displays the estimated ink levels. Ink level alerts and indicators provide estimates for planning purposes only. When you receive a low-ink alert, consider having a replacement cartridge available to avoid possible printing delays. You do not have to replace the cartridges until you are prompted to do so. HP recommends that you replace any missing cartridges as soon as possible to avoid print quality issues and possible extra ink usage or damage to the ink system. Never turn off the printer when ink cartridges are missing.
hp officejet 8702 01

Which ink cartridges do I need for my HP Officejet 8702 All-in-One Printer?

For your US HP OfficeJet 8702 All-in-One Printer you need an HP 952 Black Ink Cartridge AND 3 color cartridges: HP 952 Cyan, HP 952 Magenta and HP 952 Yellow (OR the HP 952 XL versions). There are also Combo Packs (4 cartridges in one pack) available, like the HP 952XL Black and 952 Tri-color (Cyan, Magenta, Yellow) Combo Pack. Check the price of HP 952 cartridges at Amazon.com .

For your European or UK HP OfficeJet 8702 All-in-One Printer you need an HP 953 Black Ink Cartridge AND and 3 color cartridges: HP 953 Cyan, HP 953 Magenta and HP 953 Yellow (OR the HP 953 XL versions). There are also Combo Packs (4 cartridges in one pack) available, like the Hewlett Packard HP Original 953 cartridges 4er Set black, cyan, magenta, yellow Combo Pack.

Try Amazon's ink selector tool to find compatible ink cartridges for your printer.

Replace the ink cartridges

1. Turn the printer on by pressing the power button, if it is not already turned on. Wait until the product is idle and silent before continuing.
hp officejet 8702 02

Remove the empty cartridge
2. Slip your fingers into the slot on the left side of the printer, and then hp officejet 8702 03

3. Find the cartridge you want to replace. Push in on the front of the cartridge to release it, and then pull it toward you to remove it from its slot.
hp officejet 8702 04

hp officejet 8702 05

Insert the new cartridge
4. Remove the new ink cartridge from its packaging. Do NOT touch the electrical contacts and ink port.
hp officejet 8702 06

Do NOT lift the latch handle on the print carriage to install the ink cartridges. Doing so could cause the printhead or ink cartridges to be incorrectly seated, which can cause errors or print quality problems. The latch must remain down in order to correctly install the ink cartridges.

5. Hold the new cartridge so that the cartridge contacts face the printer. Using the color-coded letters for help, slide the ink cartridge into the empty slot until until it clicks into place and it is securely installed in the slot. Make sure that you insert the ink cartridge into the slot that has the same colored letter as the color you are installing.
hp officejet 8702 07

hp officejet 8702 08

hp officejet 8702 09

hp officejet 8702 10

6. Repeat steps 3 through 5 for each ink cartridge you are replacing.

7. Close the print-carriage access door and wait until the warm-up sequence finishes and your printer is quiet before you proceed.
hp officejet 8702 11

Align the printhead only if necessary.
Aligning the printhead ensures the high-quality output. The printhead does not have to be realigned when cartridges are replaced. However, you might want to use this feature for print quality issues in printouts where straight lines look wavy or jagged. You can align the printhead from the printer software and from the printer display.

How to Replace the Battery in the FireX Smoke Alarm PADC240 – an Illustrated Tutorial in 19 Steps

Hazards
More accidents happen at home than anywhere else. Replacing the battery of a smoke detector is not without hazards. Make sure you know what you’re doing. The FireX smoke alarm PADC240 is mains-powered and connected to your 110 volt or 220 volt home electrical system. The 9 volt battery only serves as backup in the event of a power failure. Since smoke alarms are placed at ceilings, there’s also a risk of falling. If the battery is not replaced correctly, it might not work properly.
  • Read our disclaimer
  • Read the official manual
  • Hire a qualified electrician if insecure

When is replacement of the battery needed?
The alarm will chirp at random intervals to indicate that the backup battery is running low and needs replacing. However you should replace smoke alarms, when they are ten years old or sooner if they don’t respond properly when tested.

This manual has especially been written for the FireX Smoke Alarm PADC240, but might also be useful for other FireX smoke alarms with a 9V battery back-up, like the I240C and PAD240.

Necessaries
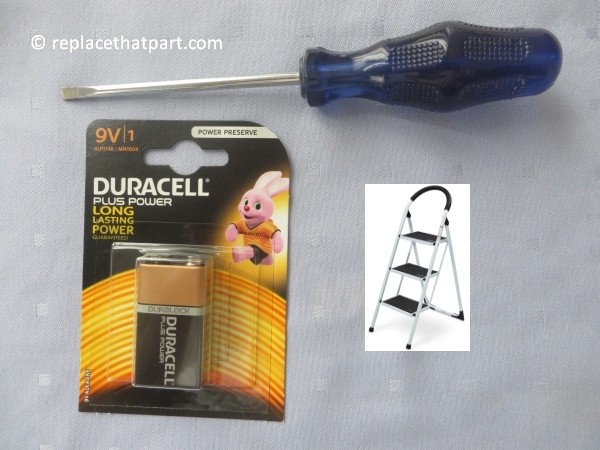
To replace the battery of the FireX Smoke Alarm PADC240, you need:

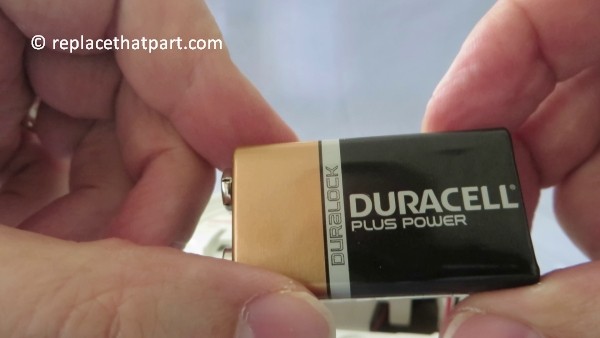
  • New high quality, long lasting 9 volt battery, NOT a rechargeable one
  • Small screwdriver
  • Step Ladder

how to replace the battery in the firex smoke alarm padc240 00

Play low battery sound

Replacing the battery

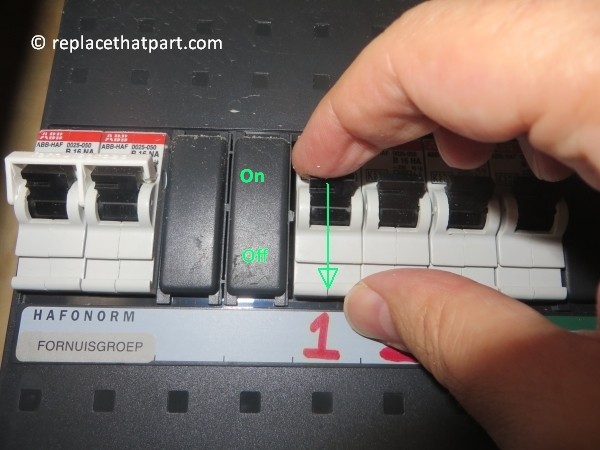
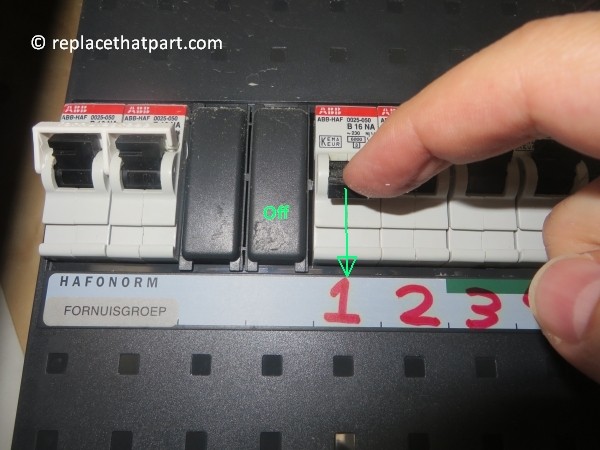
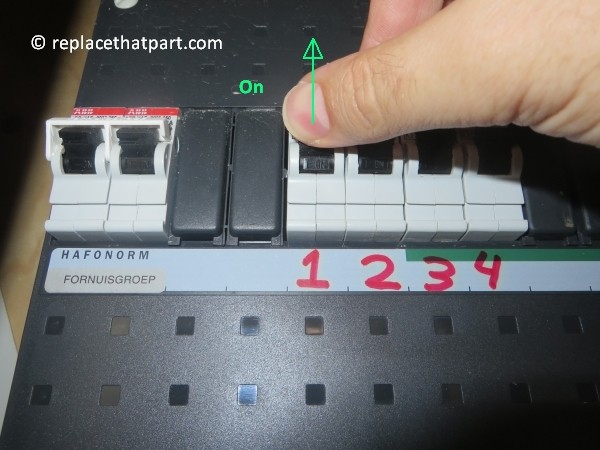
1. Always turn off the electricity. Locate your house’s main electrical panel. Before replacing the battery, turn off main power by removing the appropriate fuse, or switch the circuit breaker that serves the smoke alarm to the off position.
how to replace the battery in the firex smoke alarm padc240 01

how to replace the battery in the firex smoke alarm padc240 02

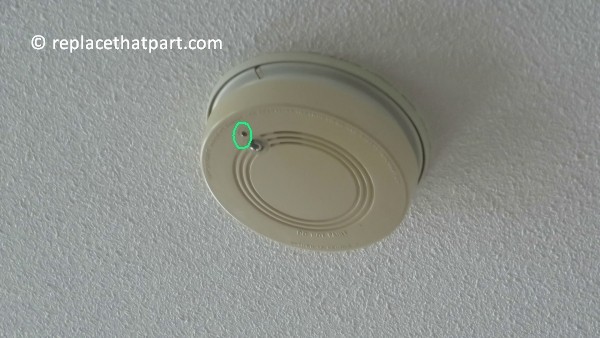
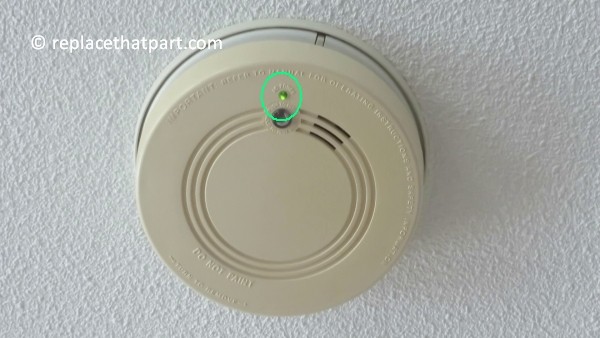
2. Check that the green light on the unit is off. This indicates that the power has been successfully turned off. Other parts of the room or your house might continue to have lights and power.
how to replace the battery in the firex smoke alarm padc240 03

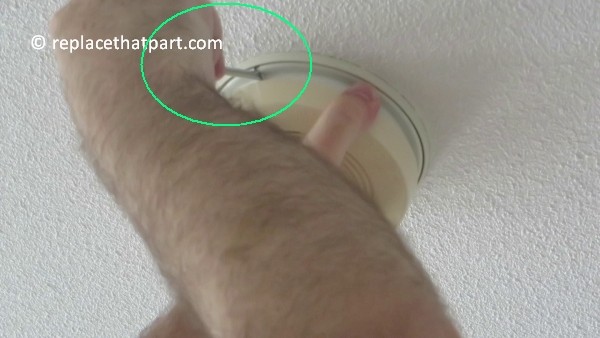
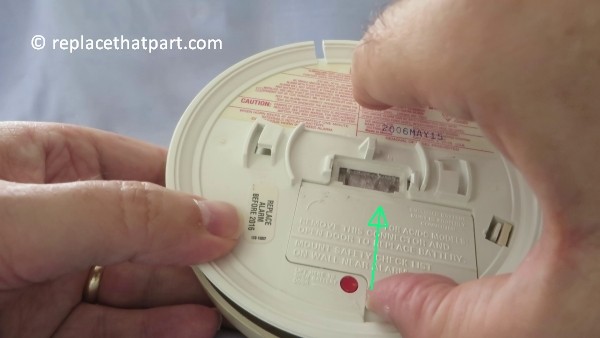
3. Find the slot for the insertion of the screwdriver to enable you to remove the alarm from the base.
4. Insert the screwdriver into the slot until you feel a slight movement, indicating that the alarm has been disconnected from the base.
how to replace the battery in the firex smoke alarm padc240 04

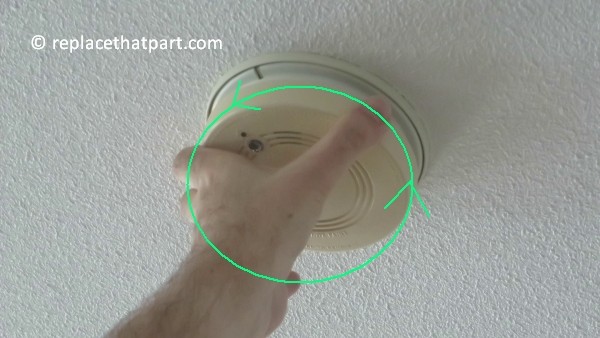
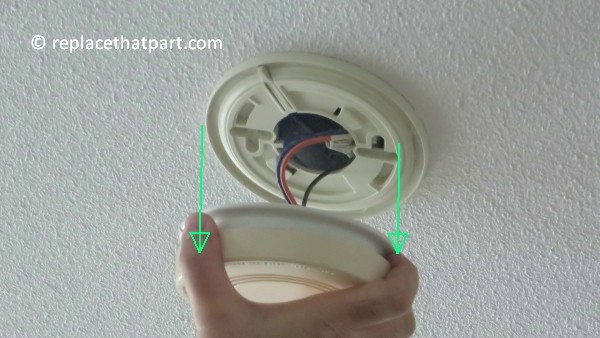
5. Grip the whole top of the smoke detector with your hand and turn it about a half inch counterclockwise. This will release it and you can pull it straight off. Some force might be needed, as it doesn’t necessarily come off easily.
how to replace the battery in the firex smoke alarm padc240 05

how to replace the battery in the firex smoke alarm padc240 06

how to replace the battery in the firex smoke alarm padc240 07

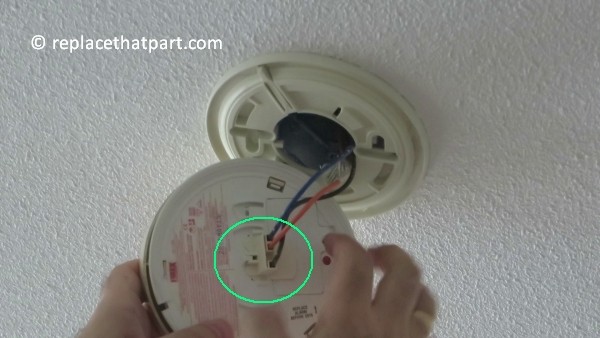
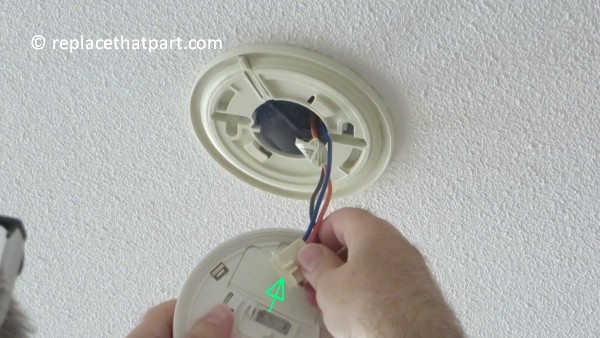
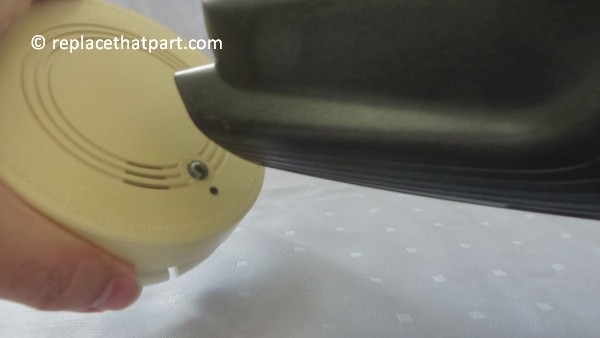
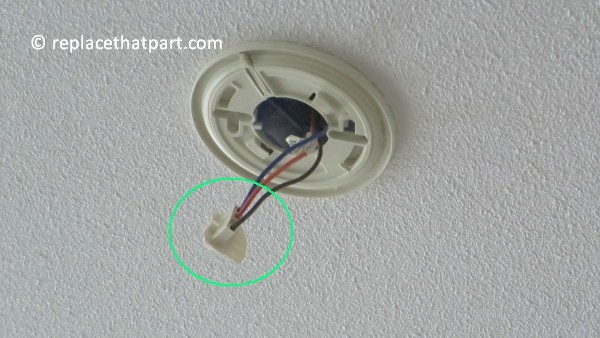
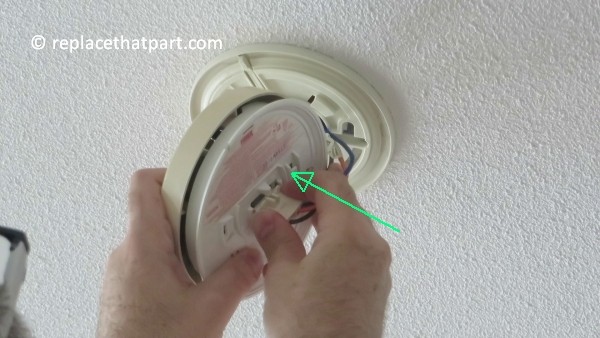
6. Carefully unplug the cable without damaging any wired connections. The beige connector plug with the three wires should pull straight out. It’s probably tight but that’s what you need to do to get the battery compartment open. We did NOT have to push, pull or squeeze plastic “catches” or buttons to release the connector plug, but we had to use muscle power. If you can’t get enough grip on the connector plug with your fingers, you might use waterpump pliers to get it off, but do this at your own risk!
how to replace the battery in the firex smoke alarm padc240 08

how to replace the battery in the firex smoke alarm padc240 09

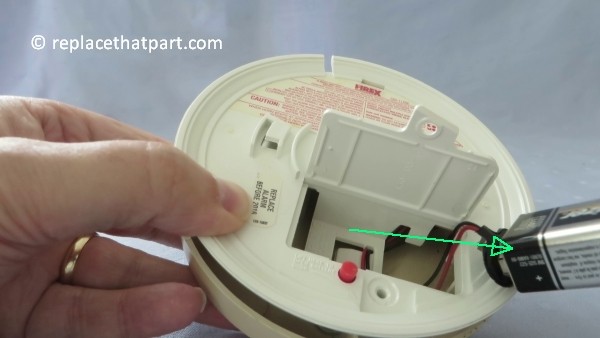
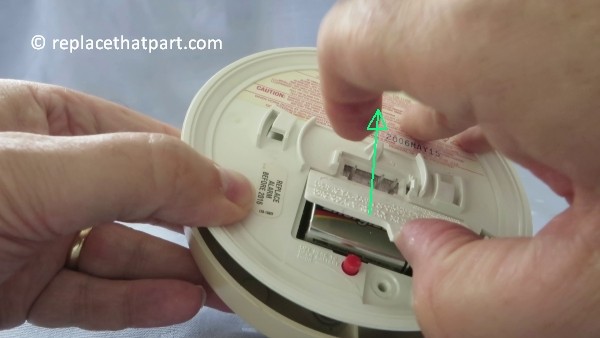
7. Use your fingernail to lift the door of the battery compartment open. You do NOT have to use the red button next to the battery door.
how to replace the battery in the firex smoke alarm padc240 10

how to replace the battery in the firex smoke alarm padc240 11

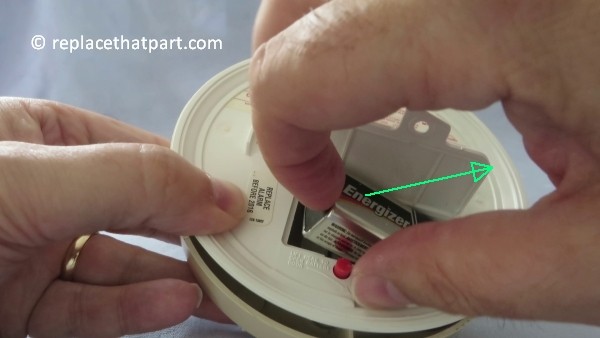
8. Remove the old battery from the battery compartment.
how to replace the battery in the firex smoke alarm padc240 12

how to replace the battery in the firex smoke alarm padc240 13

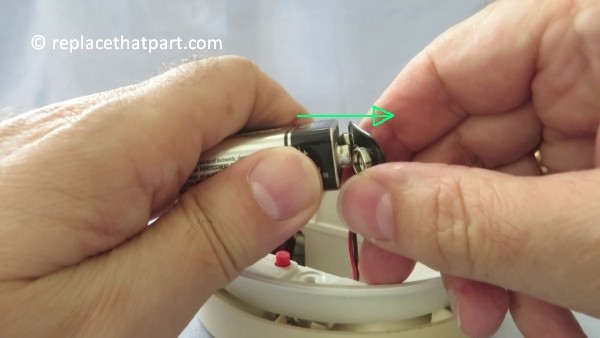
9. Gently disconnect and discard the old battery from the 9 volt battery connector. Do this carefully, otherwise you might damage the connector. Apply slight force, but hold the connector, not the wires when you remove it.
how to replace the battery in the firex smoke alarm padc240 14

how to replace the battery in the firex smoke alarm padc240 15

how to replace the battery in the firex smoke alarm padc240 16

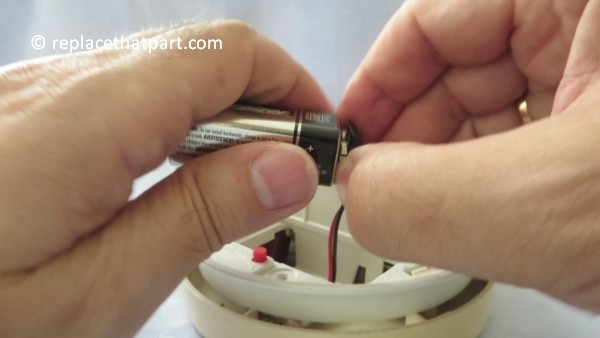
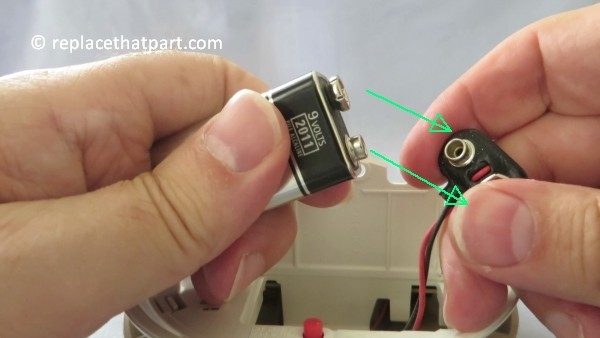
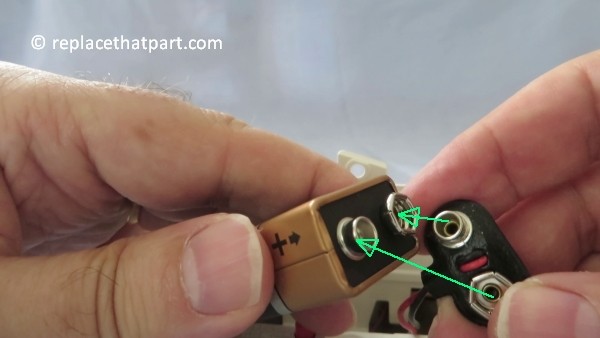
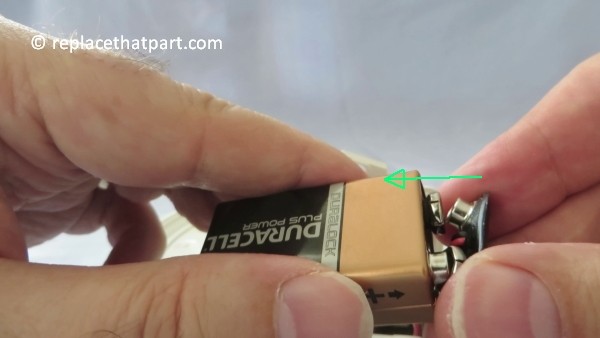
10. Connect a new, 9 volt battery to the connector. Use a high quality, long lasting battery. Using rechargeable or low quality batteries may cause your smoke detectors to fail. The 9 volt battery will have two prongs that need to be pushed into place tightly. The battery will fit only one way. Be sure the battery connector is securely attached to the battery terminals.
how to replace the battery in the firex smoke alarm padc240 17

how to replace the battery in the firex smoke alarm padc240 18

how to replace the battery in the firex smoke alarm padc240 19

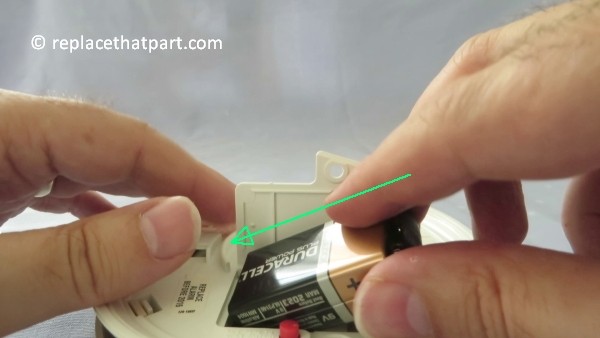
11. Place the new and connected battery into the battery compartment.
how to replace the battery in the firex smoke alarm padc240 20

how to replace the battery in the firex smoke alarm padc240 21

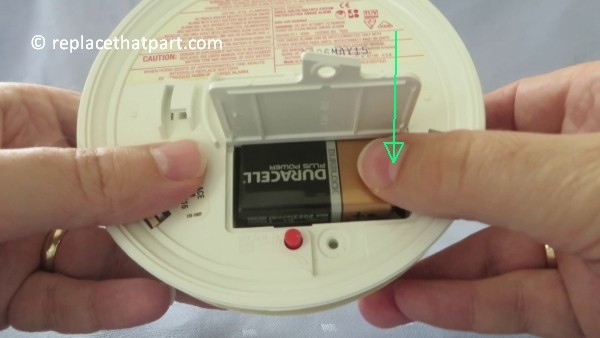
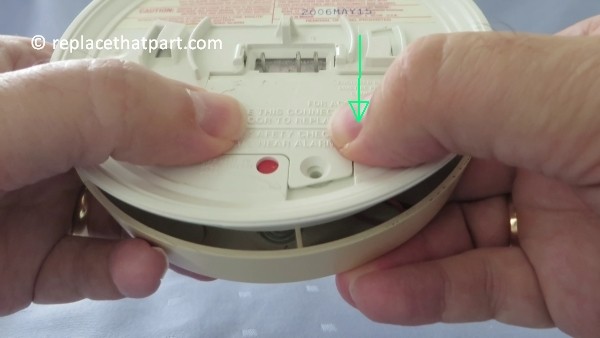
12. Close the battery compartment door. Push down until it snaps into place. You do NOT have to use screws.
how to replace the battery in the firex smoke alarm padc240 22

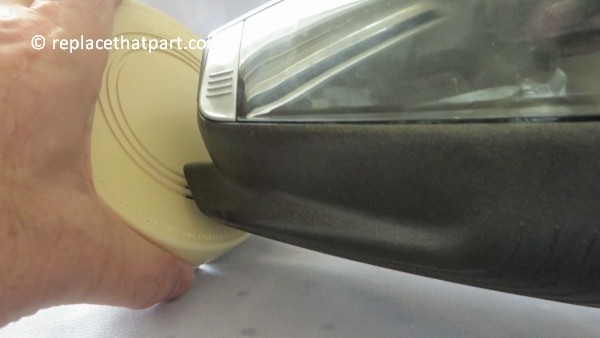
13. Now your smoke alarm is on your table, you might want to use this opportunity to remove possible dust from the inside and outsight of the smoke alarm, using a (handheld) vacuum cleaner. To clean the housing, wipe it down with a dry microfiber cloth.
how to replace the battery in the firex smoke alarm padc240 23

how to replace the battery in the firex smoke alarm padc240 24

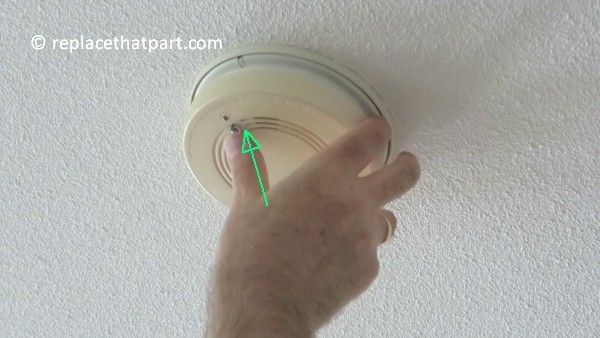
14. Press and hold the test button. The alarm will sound if the battery is properly connected and working. DO NOT use any other test method.

Play test sound

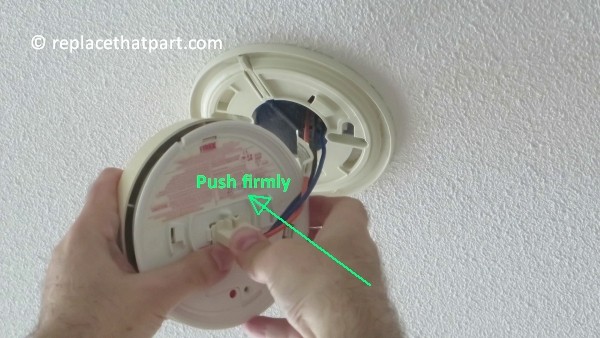
15. Replace the beige connector plug. Push firmly until the connector snaps into place with a click. Gently tug the connector to be sure it is attached properly.
how to replace the battery in the firex smoke alarm padc240 25

how to replace the battery in the firex smoke alarm padc240 26

how to replace the battery in the firex smoke alarm padc240 27

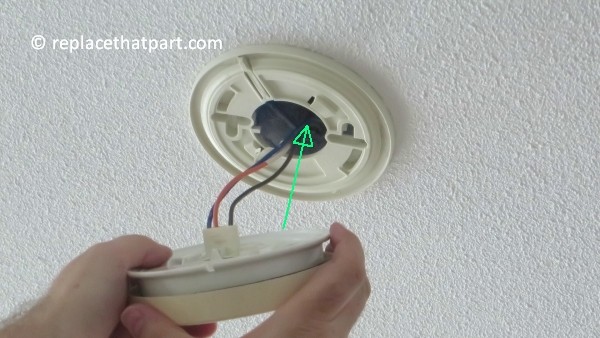
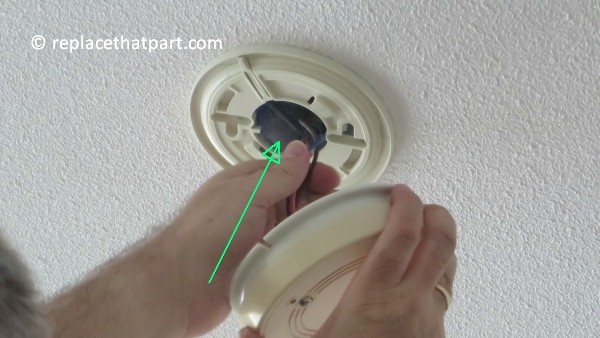
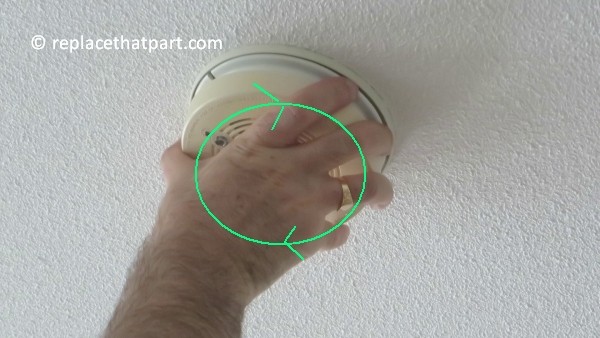
16. Push the wires back into the ceiling if necessary and reattach the smoke alarm to the mounting plate by turning smoke alarm clockwise until it snaps into place.
how to replace the battery in the firex smoke alarm padc240 28

how to replace the battery in the firex smoke alarm padc240 29

how to replace the battery in the firex smoke alarm padc240 30

17. Turn the electricity back on.
how to replace the battery in the firex smoke alarm padc240 31

18. Ensure that the green light is showing on the unit. This indicates that the alarm is connected correctly to the main supply.
how to replace the battery in the firex smoke alarm padc240 32

19. Press and hold the test button once again. The alarm will sound if the smoke alarm is properly connected and working. DO NOT use any other test method.
how to replace the battery in the firex smoke alarm padc240 34

Play test sound

If the green light on the unit is on and the test sound works, you’ve successfully replaced the battery of your Firex smoke alarm. Congratulations! Your FireX smoke alarm will guard you for years to come!